
Most patios are underdesigned. That’s not a criticism — it’s an observation from eleven years working on outdoor spaces in tropical and coastal climates. Someone buys a furniture set, maybe adds an umbrella, and calls it done. The space exists. It doesn’t pull you outside. Good patio design does the opposite: it creates an outdoor room so well-considered that you find yourself out there with a coffee at 7am and a cold drink at 10pm. The ideas in this list span structure, materials, planting, lighting, and furniture. Together, they cover everything from the foundational floor choice to the finishing touches that make an outdoor living space feel genuinely lived-in. Whether you’re starting from scratch or transforming a tired backyard patio, pick the ideas that speak to your climate and style — and build from there.
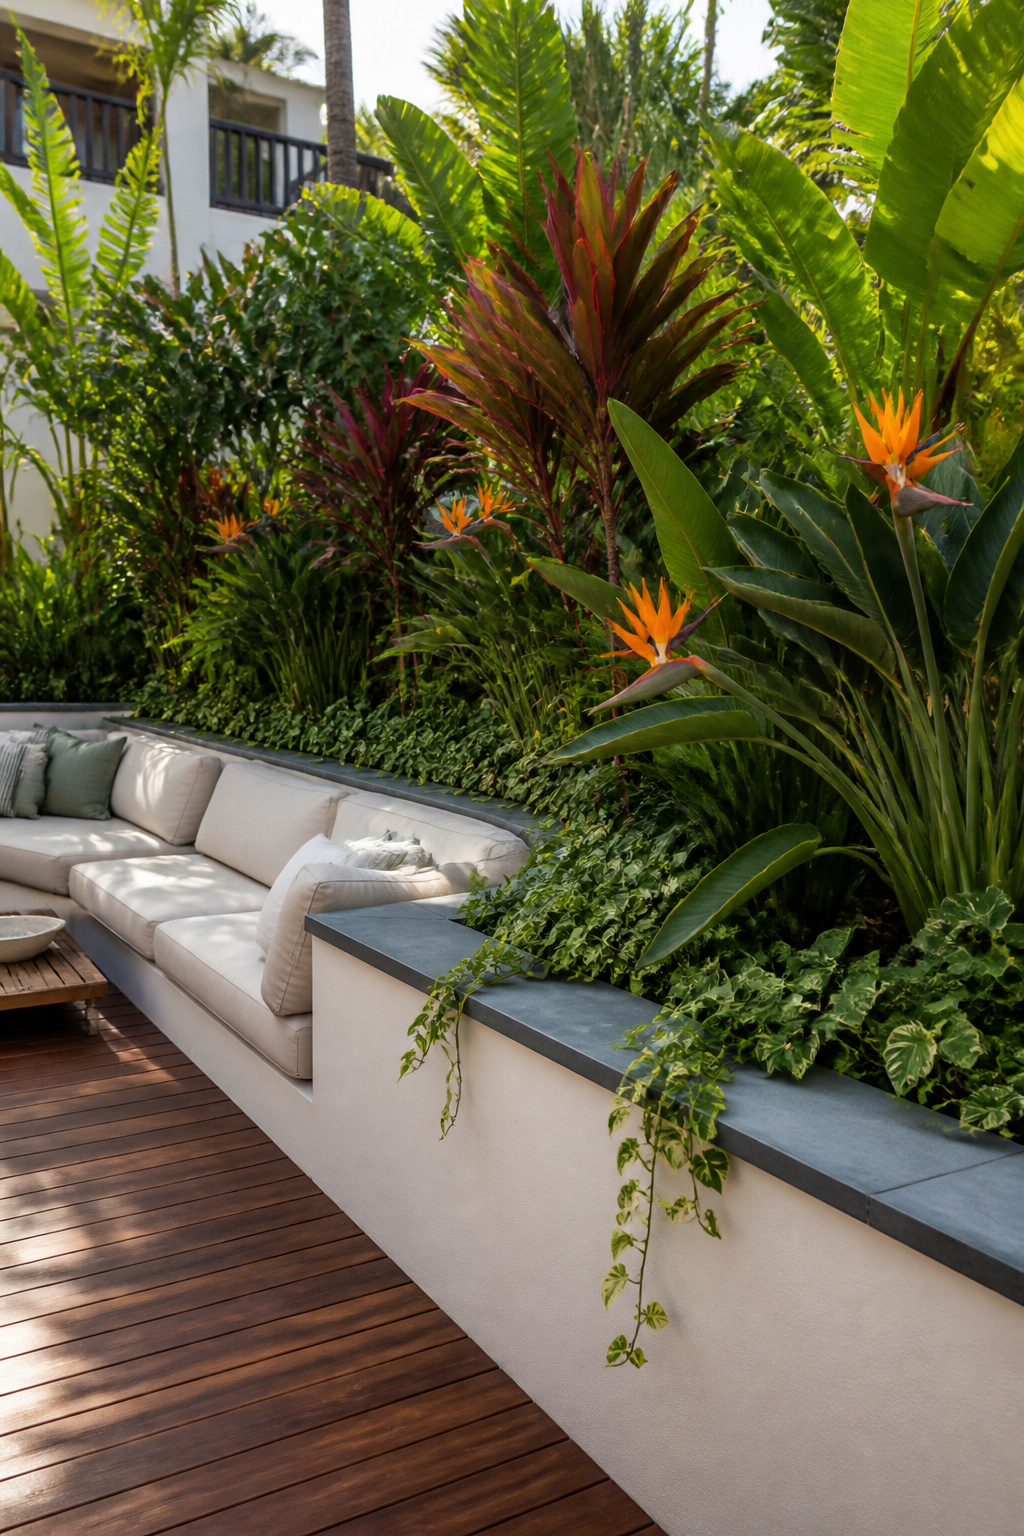
1. Tropical Biophilic Patio With Lush Vertical Plant Walls
Why Vertical Planting Transforms a Bare Wall Into a Living Boundary
A vertical plant wall is the most efficient way to bring biophilic density to a patio without sacrificing floor space. Research consistently shows that proximity to greenery reduces cortisol — and a planted wall maximises that effect by wrapping the space rather than just punctuating it. In practice, a well-planted wall functions as a visual screen, a thermal buffer (living walls lower adjacent surface temperatures by up to 10°C), and an acoustic dampener in a single installation. Industry surveys suggest 62% of outdoor designers now cite biophilic integration as the leading driver of patio renovations. For ideas on adapting this approach to compact spaces, see these balcony vertical garden ideas for maximising green space on a limited footprint.
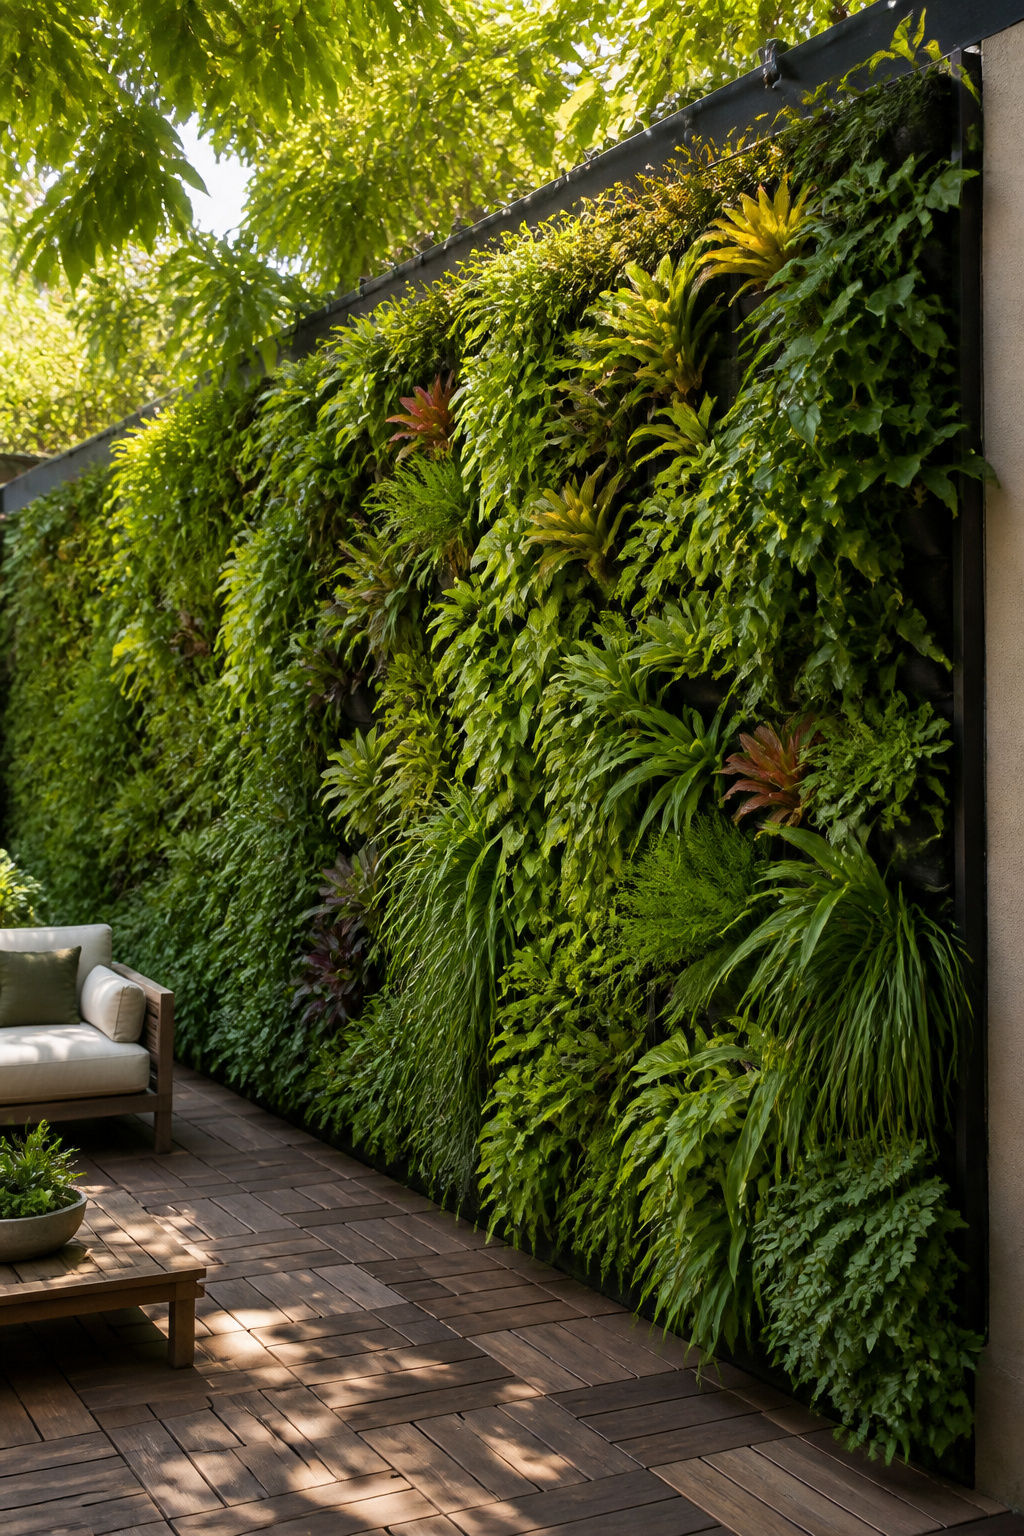
How to Choose the Right Plants and Modular Frame System
Modular panel systems — geo-textile or rockwool plug panels pre-grown over six to eight weeks — give the most professional result and are far more manageable than pocket planters at scale. Budget around $15–25 per square foot installed for a mid-grade system. The best performers for outdoor vertical walls are ferns, bromeliads, pothos, philodendron, and ornamental grasses. For an edible element, herbs like basil, mint, and lemon thyme tuck in beautifully. A drip irrigation line running behind the panel turns watering into a set-and-forget task — the difference between a garden feature that stays lush and one that becomes a brown tangle by midsummer.
Maintaining a Vertical Garden in Varying Climates
In frost-prone climates, focus on cold-tolerant species — ivy, ornamental kale, creeping jenny — and treat tender tropicals as removable seasonal inserts. Plan for annual replacement of 10–15% of panels. This is normal attrition, not failure. Use slow-release fertiliser tabs in the growing medium once per season rather than liquid feed, which causes salt build-up in panel structures over time. A well-maintained vertical wall looks dramatically better after five years of establishment than it did on installation day.
2. Natural Stone Firepit Circle for Year-Round Outdoor Gathering
The Design Logic: Why a Firepit Anchors an Outdoor Patio
A firepit circle is functionally different from other outdoor furniture. It doesn’t just give people somewhere to sit — it gives them something to face. The fire becomes the social anchor the way a dining table does indoors: it defines a gathering zone and orients everyone inward. That shift, from furniture pushed against the perimeter to a central feature, is one of the most transformative changes in outdoor patio design. A circular paver surround requires at least 16 feet of total space for comfortable seating clearances. For a deeper look at what makes a firepit space work socially and spatially, these firepit ideas for a true gathering space are worth exploring before you settle on a size or style.
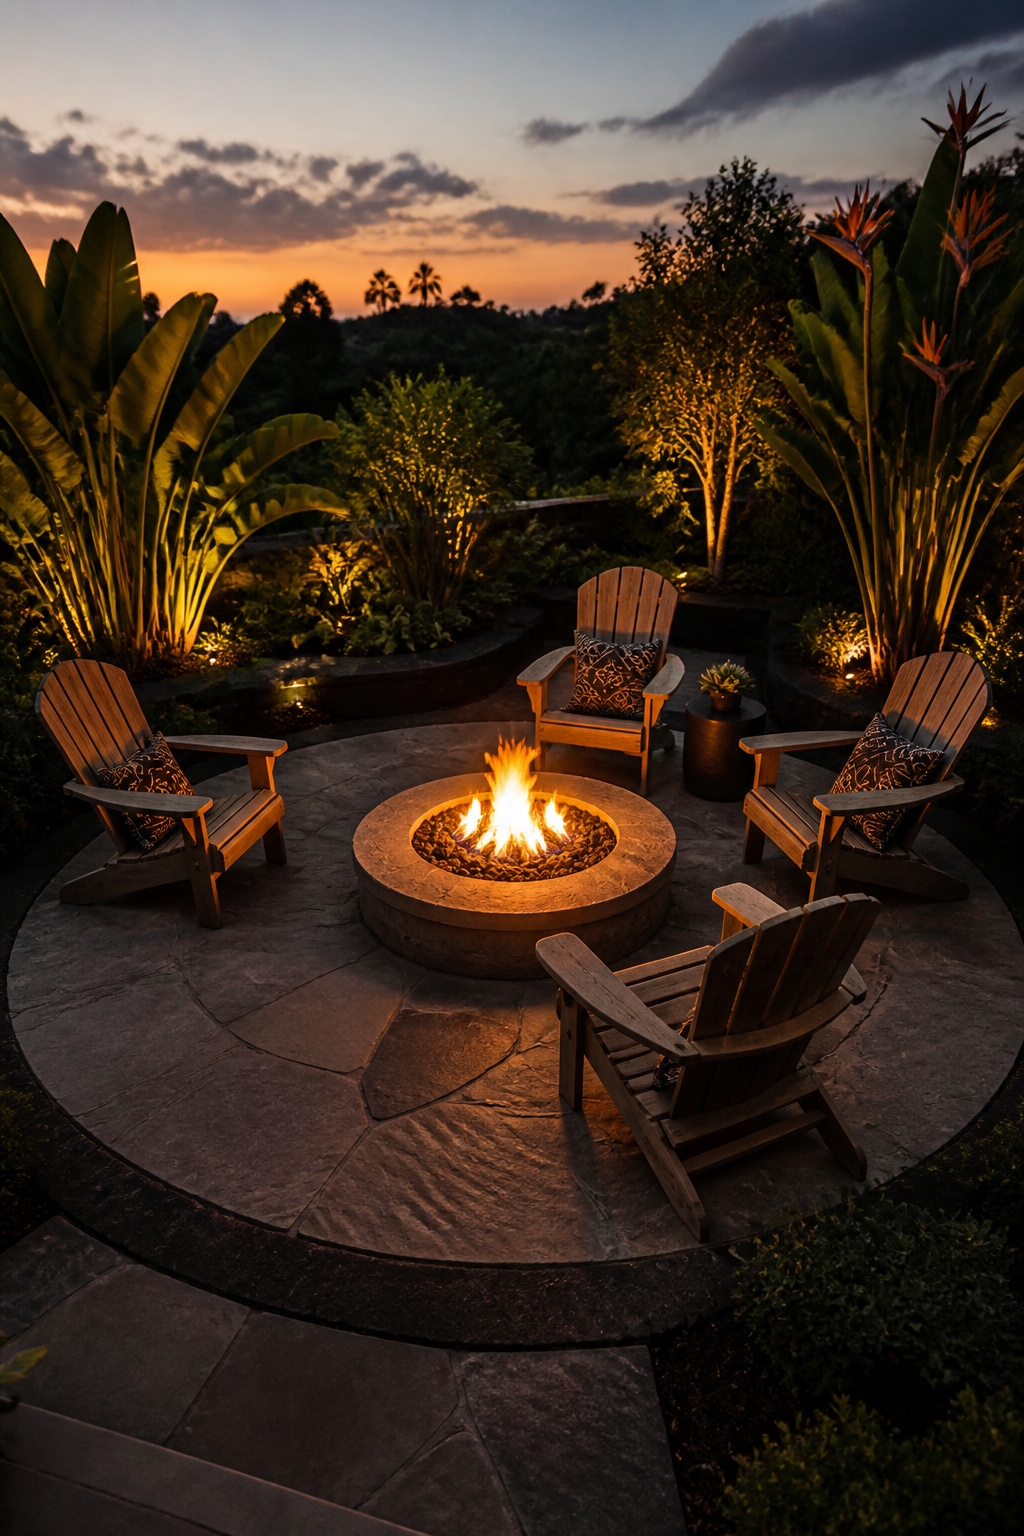
Selecting the Right Stone: Flagstone, Bluestone, Travertine
For the firepit surround, flagstone and bluestone are the two strongest choices. Flagstone — sandstone, limestone, or slate — has excellent traction, handles heat well, and is available in two-to-three-inch thicknesses for stable installation. Bluestone offers a smoother, more refined surface with lower maintenance requirements, though it costs more: a 20×20-foot premium patio can run $5,000–$8,000 installed. Travertine looks beautiful but is porous and absorbs significant heat in summer sun. In warm climates, that’s a problem — the surface near a firepit should not add to the thermal discomfort. Size the fire feature to your group: 24–32 inches for two to three people, 36–48 for four to six, and 48 inches or larger for regular entertaining.
Seating Arrangements That Work With Fire Safety Clearances
Keep combustible furniture at least three feet from the firepit edge — most codes require a ten-foot clearance from any permanent structure. Low-profile seating works best around a firepit because it places people at fire-viewing height rather than above it. Adirondacks, stone bench seating walls, and low sectionals all read naturally in this context. Built-in stone seating walls positioned six to eight feet from the pit radius are the most elegant permanent solution — they double as a patio retaining border and clearly define the gathering zone. Leave deliberate gaps in the seating circle so movement around the fire feels natural, not cramped.
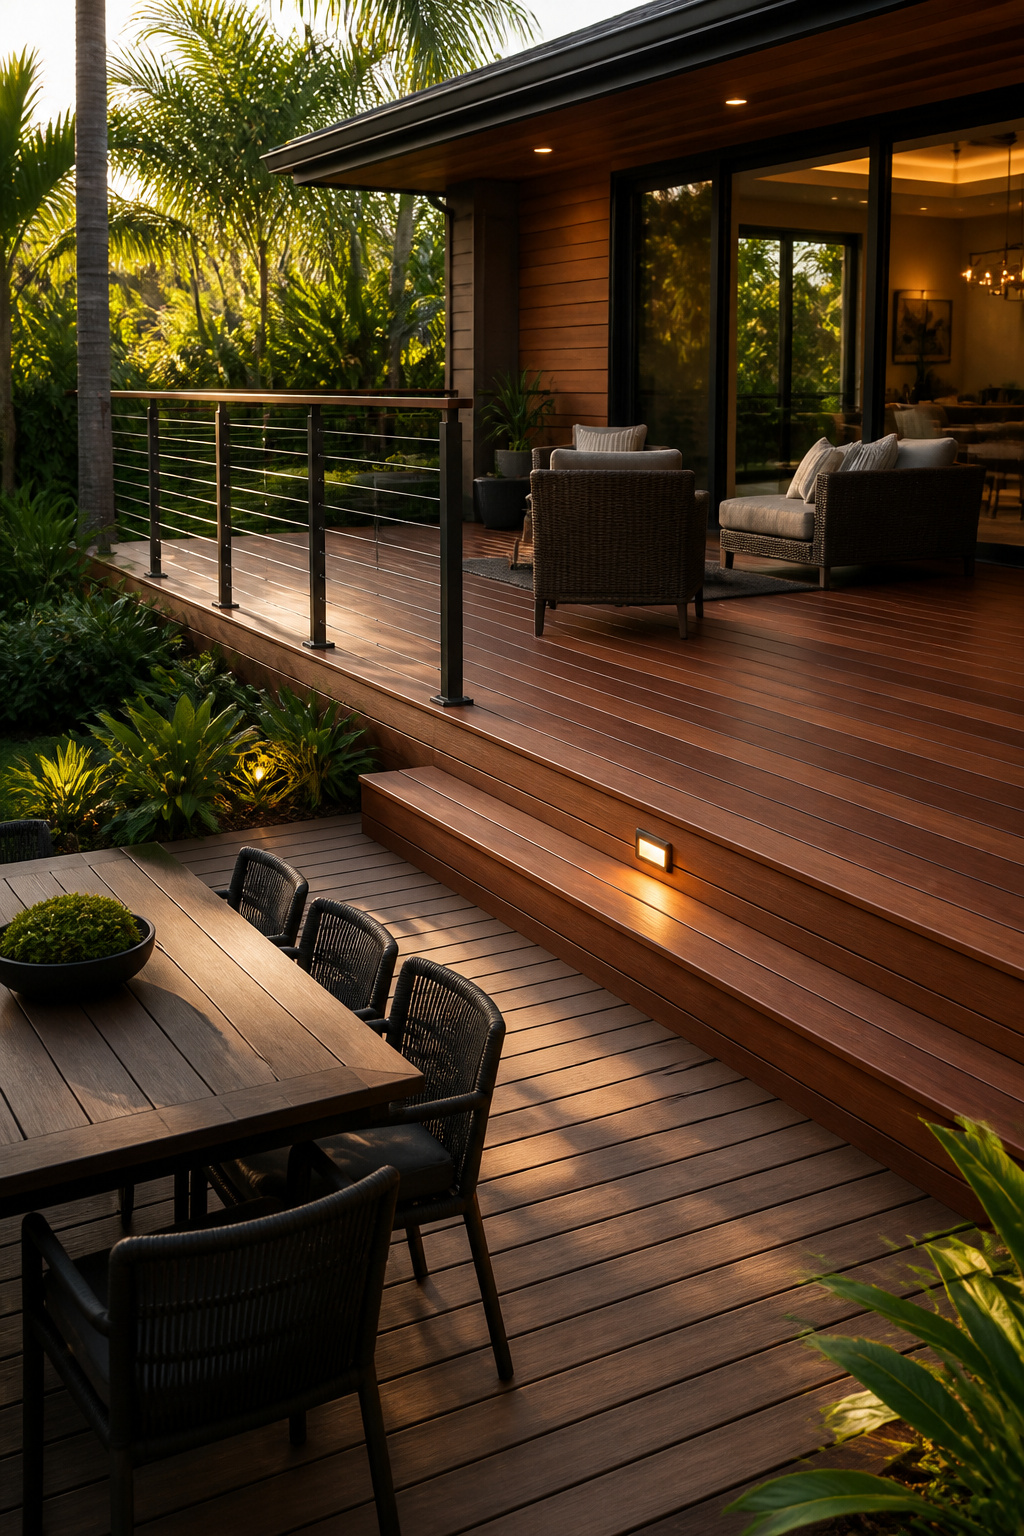
3. Sustainable Hardwood Decking as Your Patio Design Foundation
Why the Patio Floor Sets Every Other Decision That Follows
The decking material is the first patio design decision — and the one that governs everything built on top of it. It determines which furniture weights are viable, how hot the surface gets underfoot in summer, and what aesthetic register the space communicates. Hardwood decking has a warmth underfoot that concrete and stone cannot replicate. That’s no small thing in an outdoor room you’re trying to inhabit rather than just occupy. FSC certification has become a prerequisite for any sustainability-conscious patio build: it guarantees legally verified, environmentally responsible supply chains, and it matters both ethically and practically for LEED-adjacent projects.
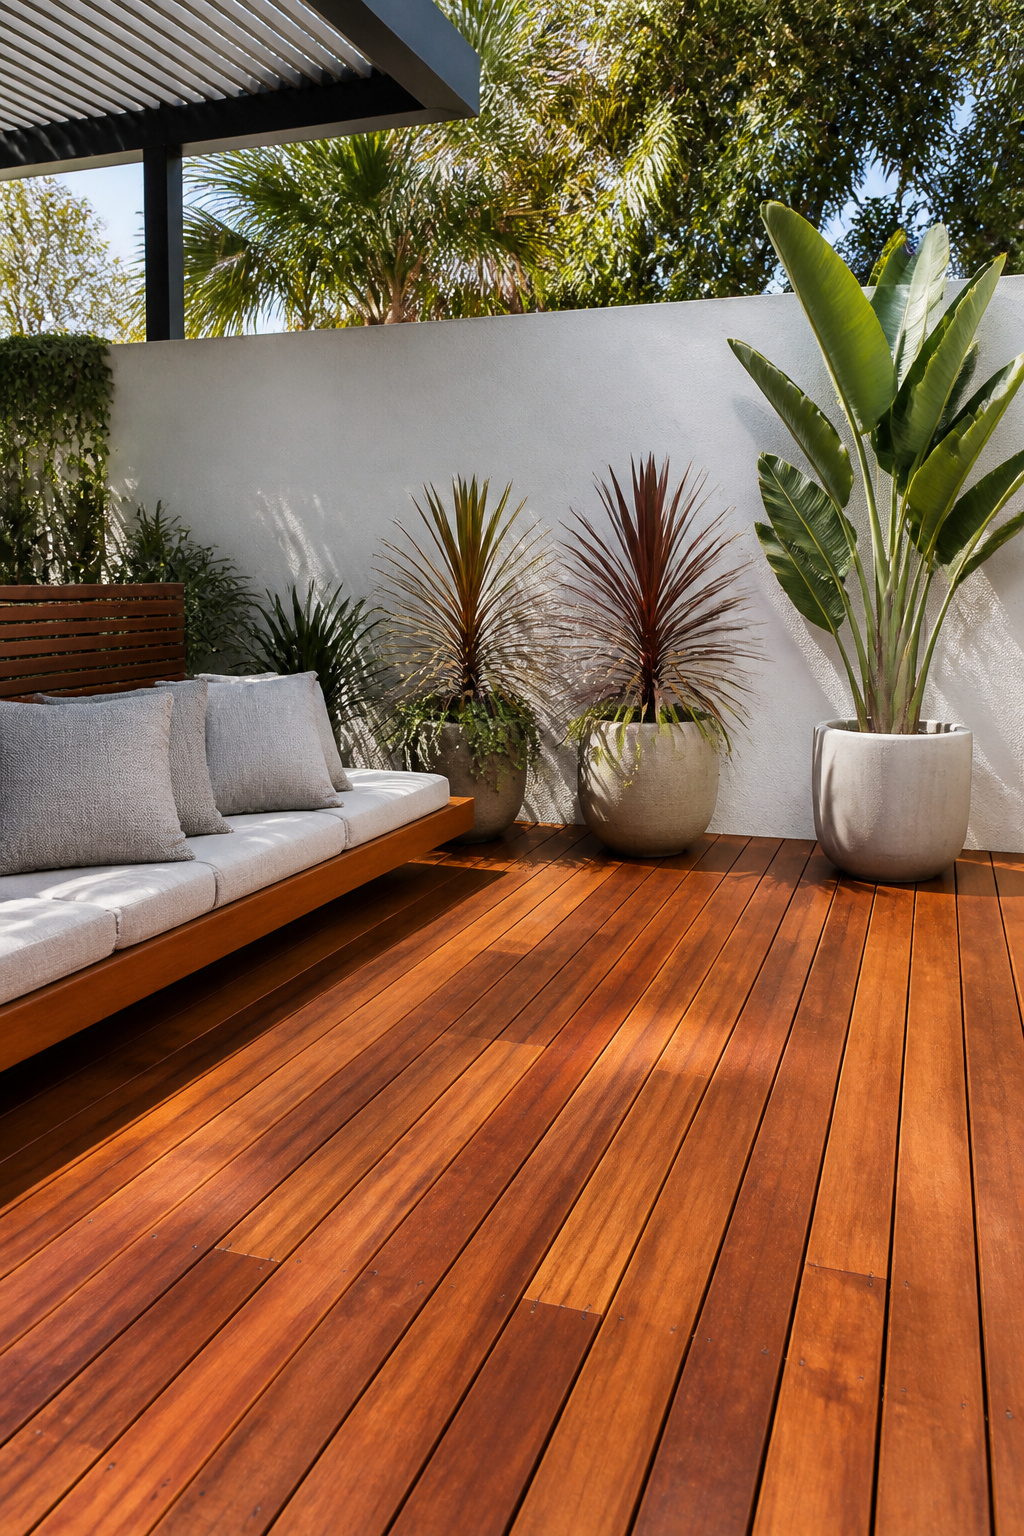
Ipe, Cumaru, and FSC-Certified Teak: The Hardwood Hierarchy
Ipe sits at the top of the outdoor hardwood hierarchy: Janka hardness of 3,680 lbf, a lifespan of 40–75 years outdoors, and natural oils that resist moisture without chemical treatment. FSC-certified ipe is now widely available from sustainable South American plantations. Cumaru runs a close second — Janka hardness 3,340 lbf, virtually indistinguishable from ipe in appearance, and 15–20% cheaper while delivering equivalent rot resistance. FSC-certified teak remains the classic benchmark, valued for its high silica content and exceptional natural oils. Grade A heartwood, from the centre of mature trees, is the standard specification for outdoor decking. All three species earn LEED credits in the Materials and Resources category when sourced with FSC certification.
Installation Approaches and Long-Term Maintenance
Hidden fastener systems — ipe clips between boards — eliminate visible screws and allow for natural thermal expansion. Allow quarter-inch spacing between boards for drainage. For maintenance, apply a penetrating UV oil annually to hold the warm golden-brown tone, or let the surface silver naturally (just like teak), which does nothing to compromise structural integrity. One critical note: never use film-forming sealers on ipe or cumaru. They trap moisture and peel within a season. Penetrating oils only.
4. Open-Air Pergola Dining Area for the Ultimate Outdoor Experience
How a Pergola Defines Your Patio Dining Zone Without Enclosing It
Infrastructure — that’s what a pergola really is in outdoor patio design. The open-beam roof filters light into dappled patterns without cutting airflow, which is essential for warm-climate outdoor dining where a solid roof would trap heat. Beyond shade, the structure provides permanent attachment points for string lights, ceiling fans, hanging planters, and eventually climbing plants. It is the skeleton of an outdoor room. For a 4-person dining table, a 10×10-foot pergola is the minimum comfortable footprint. Step up to 12×14 feet for six people with room to move chairs freely. For more on how pergola design shapes the mood of an outdoor room, see these zen-inspired patio pergola designs for mindful outdoor living.
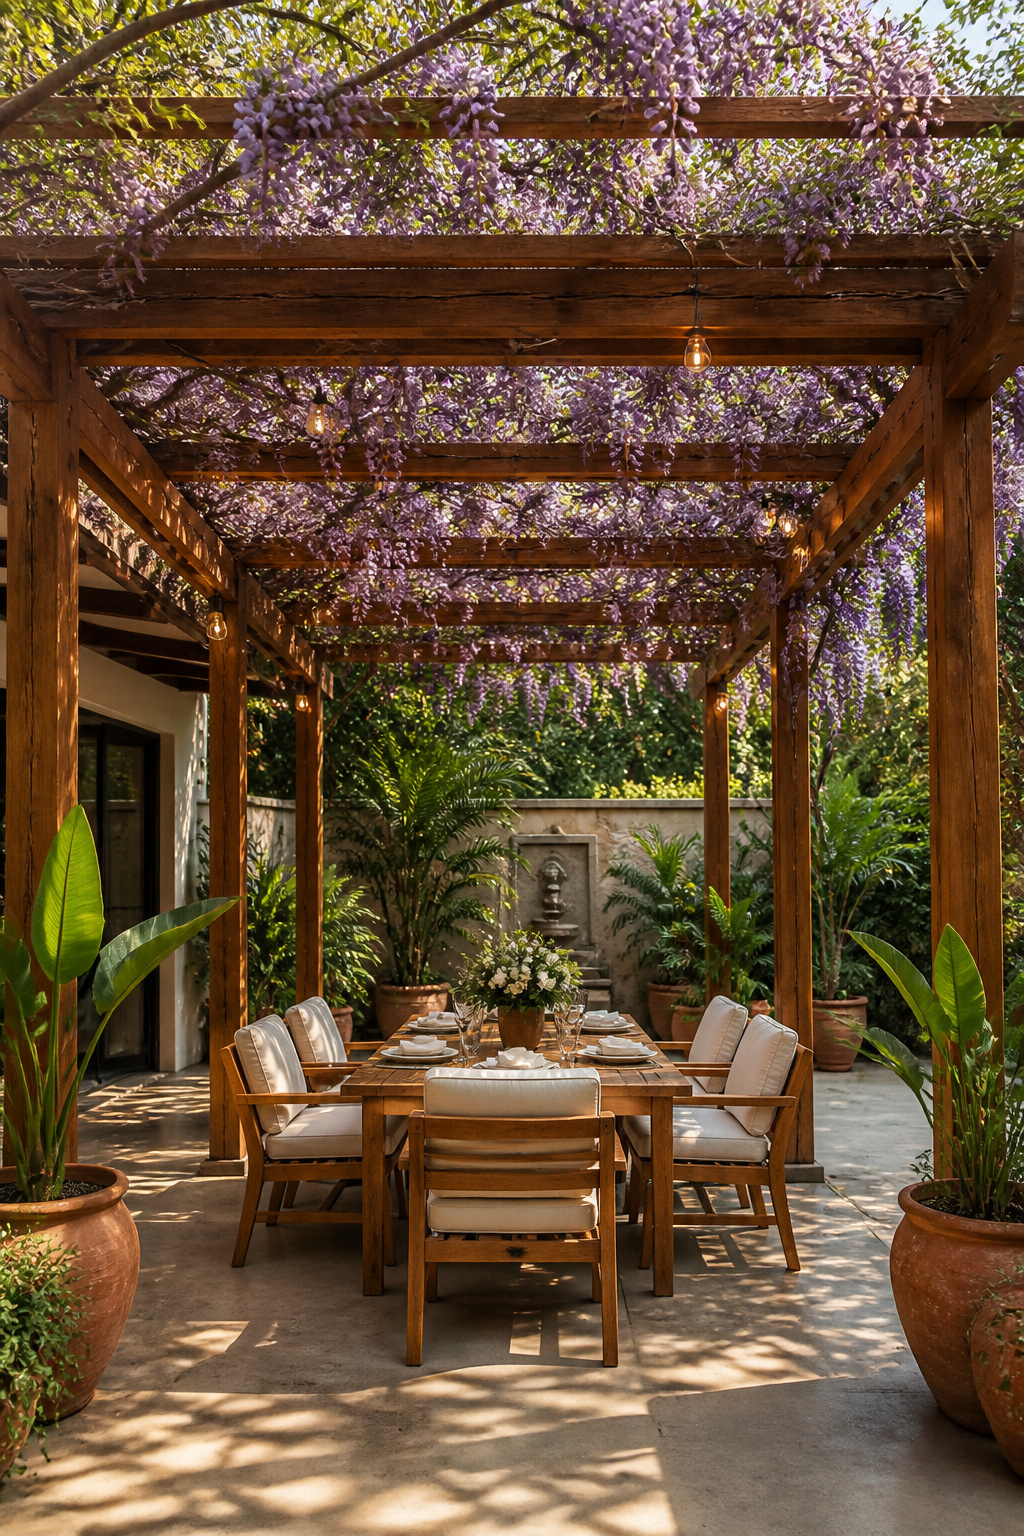
Material Choices: Cedar, Aluminium, Powder-Coated Steel
Cedar is the natural-warmth choice: naturally rot-resistant, beautiful in tone, and well-established as an outdoor structural material. It requires staining or oiling every two to three years and has a realistic lifespan of 15–25 years with consistent maintenance. Powder-coated aluminium is the low-maintenance contemporary alternative. It won’t rot, warp, or need seasonal treatment, and the best products now come in wood-grain finishes that are genuinely convincing at conversational distance. A 25-plus year lifespan is realistic. For either material, a retractable solution-dyed acrylic canopy extends usable hours dramatically. Motorised options deploy in under thirty seconds — the kind of convenience that actually changes how you use a space.
Climbing Plants and Retractable Canopies as the Finishing Layer
Train two climbers up the end posts from the day of installation. Wisteria and jasmine are the classic pergola plants: both provide scent and dense coverage within three to five years. Wisteria grows aggressively and needs annual pruning to prevent structural damage to fixings. Jasmine is more manageable. Grapevine is the practical tropical and Mediterranean option — edible, naturally deciduous (restoring winter sun when you want it), and fast-establishing once rooted. The canopy develops over years, but the structure looks complete and intentional from day one.
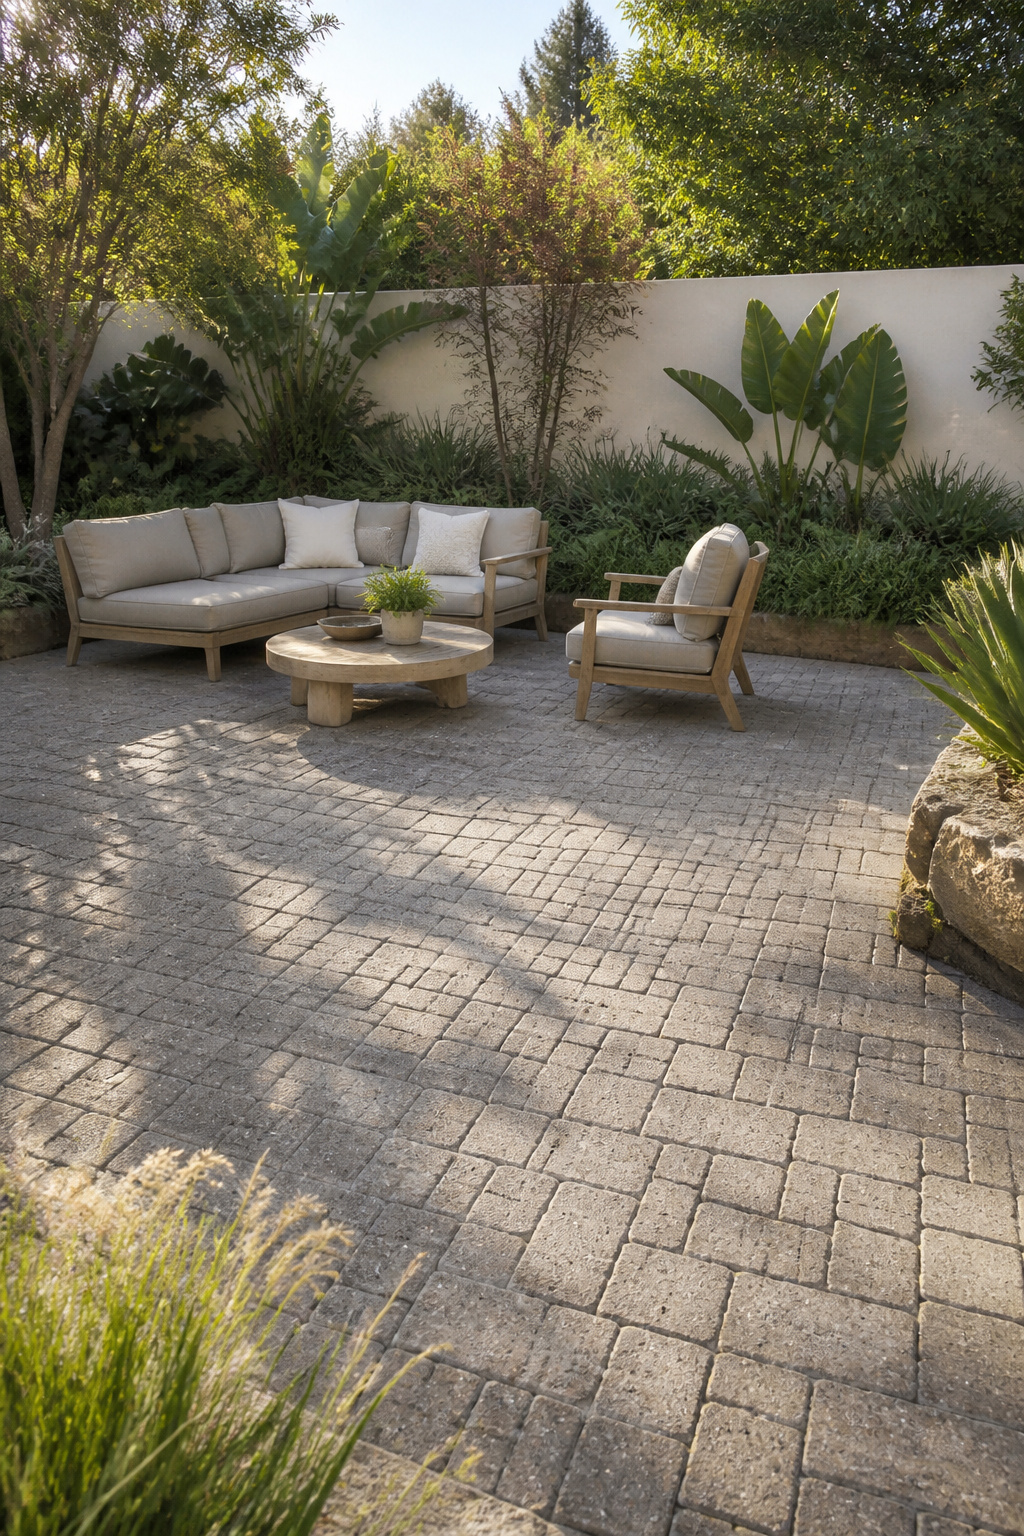
5. Built-In Planter Borders That Define a Natural Patio Layout
Using Built-In Planters as Both Boundary and Practical Division
Built-in planters do something movable containers cannot: they give the patio design a permanent, designed quality that signals intention from the moment you step outside. A raised border running along a patio edge serves simultaneously as an informal seating ledge, a privacy buffer, and a planted backdrop — it frames the space. The most common construction approach is a concrete block core faced with rendered stucco, natural stone, or brick. Minimum depth for perennials and tropical specimens is 18 inches; 12 inches is workable for annuals and herbs, though it restricts the plant palette significantly.
Construction: Cinder Block, Poured Concrete, or Natural Stone
The cinder block core approach is fastest and most cost-effective: render the exterior with colour-matched stucco, or tile it to match the patio floor. The non-negotiable step is waterproofing — an EPDM membrane or fibreglass coating inside the planter prevents moisture from migrating through the masonry and causing cracking over time. A side-wall drain installed 1.5 inches above the planter base is better than a bottom drain because it allows a water reservoir at the base for slow root uptake during dry periods. Skip this detail and you’ll have a planter that either dries out immediately or stays waterlogged. There is no middle ground without the drainage port.
Plant Palette Choices for the Tropical Contemporary Aesthetic
For a tropical contemporary register, anchor the planter with bird of paradise, cordyline, agave (for dry climates), or cannas for bold seasonal colour. Layer bromeliads around the base and let trailing pothos or sweet potato vine spill over the edge for movement. In cooler climates, hardy banana (Musa basjoo) survives to -10°C with crown mulching and delivers the same visual punch as the tropical specimens.
6. Eco-Friendly Permeable Paver Patio for Sustainable Drainage
What Permeable Paving Does That Solid Concrete Cannot
Every litre of rainwater that falls on a solid concrete patio goes straight into the stormwater drain. The most environmentally meaningful patio design choice available is to change this. Permeable paving returns that water to the soil where it fell — filtering pollutants (oils, fertilisers, atmospheric deposits) through the stone aggregate sub-base as it percolates down. The EPA’s stormwater Best Management Practices documentation cites permeable pavements as one of the highest-impact residential interventions available. Many municipalities offer $10–20 per square foot rebates for permeable patios and driveways, with payback periods of five to ten years through stormwater utility credits.
Gravel-Joint Pavers, Permeable Concrete, and Recycled Glass Aggregate
PICP — Permeable Interlocking Concrete Pavers — is the most durable and highest-performing option. Concrete pavers with shaped interlocking edges, joints filled with angular aggregate (never sand), are rated for heavy foot traffic. Installed costs run $10–30 per square foot. Pervious concrete is cheaper per square foot but requires annual vacuum sweeping to clear sediment from the porous aggregate matrix; lifespan is 20–25 years. For an eco-visual option, recycled tumbled glass aggregate fills the joints with colour and texture while functioning identically to stone aggregate. It’s the sustainable choice that also happens to look intentional.
Installation Notes and Local Stormwater Regulations
Permeable paving requires a six-to-twelve-inch crushed stone sub-base versus four to six inches for conventional paving — that’s the main driver of the 20% cost premium. On clay-heavy soil, a gravel sump or French drain running beneath the sub-base is essential. Water that can’t percolate into the native soil will pool in the sub-base and heave the pavers. Also, check with local planning before installing: some municipalities classify large permeable surfaces as impervious for stormwater fee purposes unless specifically certified. Annual maintenance is straightforward — vacuum-sweep the joints once per year to remove debris and sediment, at a cost of $200–500 for a typical patio.
7. Outdoor Kitchen and Bar Station as the Patio’s Entertaining Hub
The Case for a Built-In Outdoor Kitchen Over a Cart Setup
Cart setups are flexible and forgiving. They are also a signal — to you and to every guest — that the outdoor space is not quite finished. A built-in kitchen communicates permanence and gives the patio a clear purpose: this is where people gather to cook, eat, and stay. The outdoor patio design workflow triangle applies here exactly as it does indoors: grill, prep surface, and sink or cooler should form a triangle with each leg under nine feet for comfortable movement. An L-shaped or U-shaped built-in installation typically costs $5,000–15,000 at basic to mid-range specifications — an investment that pays back through the hosting lifestyle it enables.
Appliance and Countertop Choices That Survive Outdoor Conditions
Porcelain slab is the clear winner for outdoor kitchen countertops. It is non-porous (no sealing required), UV-stable, survives freeze-thaw cycles, handles grill proximity heat, and costs less than granite in outdoor specifications. Granite is durable and looks exceptional, but requires sealing every six to twelve months outdoors and shows oil staining on lighter colours without vigilant maintenance. For appliance specification, use minimum 304-grade stainless steel for outdoor-rated products. Refrigeration drawers with double-wall insulation extend the usable outdoor season by three to four months in colder climates. For guidance on protecting your investment, this detailed guide on weatherproofing your outdoor kitchen covers the material and drainage decisions that determine long-term durability.
Bar Counter Height, Stool Clearance, and Social Flow
The bar counter decision shapes how the kitchen functions socially. A 42-inch bar-height counter with 30-inch stools creates the classic bar dynamic: the cook has a working surface and the guests are elevated and engaged. A 36-inch counter height with 24-inch counter stools is more versatile — the same surface serves prep and seating. Leave 18 inches of knee clearance below the bar overhang for comfortable seating. Most importantly, orient the bar toward the main seating area, not a wall. The host should maintain eye contact with guests while cooking. That single orientation decision transforms an outdoor kitchen from a work station into the social centre of the patio.
8. Water Feature as Your Patio Design’s Focal Point
Why Sound and Movement Matter in an Outdoor Room
Moving water is the one sensory layer that no amount of planting, lighting, or furniture arrangement can replicate. It masks low-frequency urban noise — traffic, HVAC, neighbour activity — at the frequencies our brains register as stressful. It creates a psychological shift that signals the transition from inside to outside. Even a small wall-mounted fountain circulating ten to fifteen litres per minute produces enough ambient sound to reframe the acoustic environment of a patio. This is the same principle that makes every resort pool deck feel instantly relaxing, applied at residential scale.
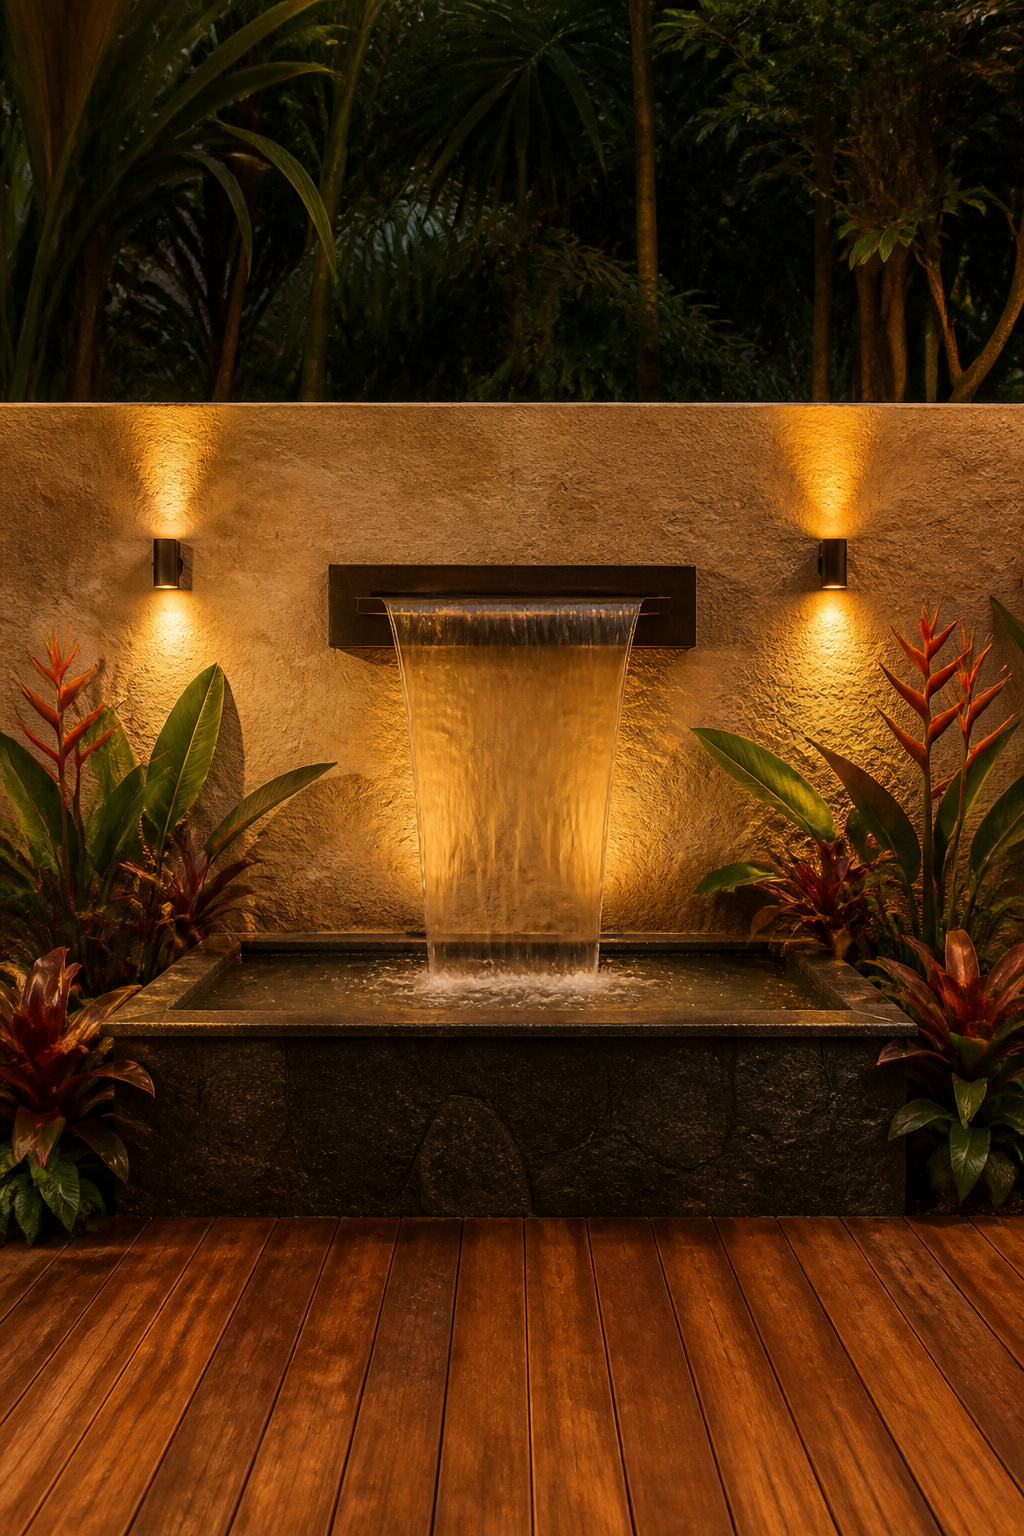
Wall-Mounted Fountains, In-Ground Rills, and Self-Contained Bowls
Self-contained bowl features are the starting point: no plumbing required, a submersible pump on a timer, and capacities from fifteen litres (tabletop scale) to 200 litres for a large ground-level feature. They’re fully portable and can be repositioned seasonally. Wall-mounted spout or scupper fountains are the most architecturally integrated choice — water falls from a spout into a reservoir below, and the feature becomes part of the wall rather than an object placed in front of it. Rill channels are the most ambitious and contemporary option: a linear channel cut through the patio floor, water flowing continuously in a shallow groove. The visual impact is exceptional, but rills require planning-stage integration into the paving layout. They cannot be retrofitted without rebuilding the floor.
Pump Selection, Winterisation, and Algae Prevention
For self-contained bowls in full-sun positions, solar pump kits (1.5–3W panels) run a small submersible for daytime operation. A battery backup module extends operation into evening. For algae prevention, an inline UV steriliser kills algae at the source. Barley straw extract in liquid form — one to two applications per season — is the organic alternative. Winterise by draining self-contained features fully: never leave water in the reservoir in freeze-thaw climates. For permanent rills and wall fountains, install a submersible aquarium heater or drain the system before first frost.
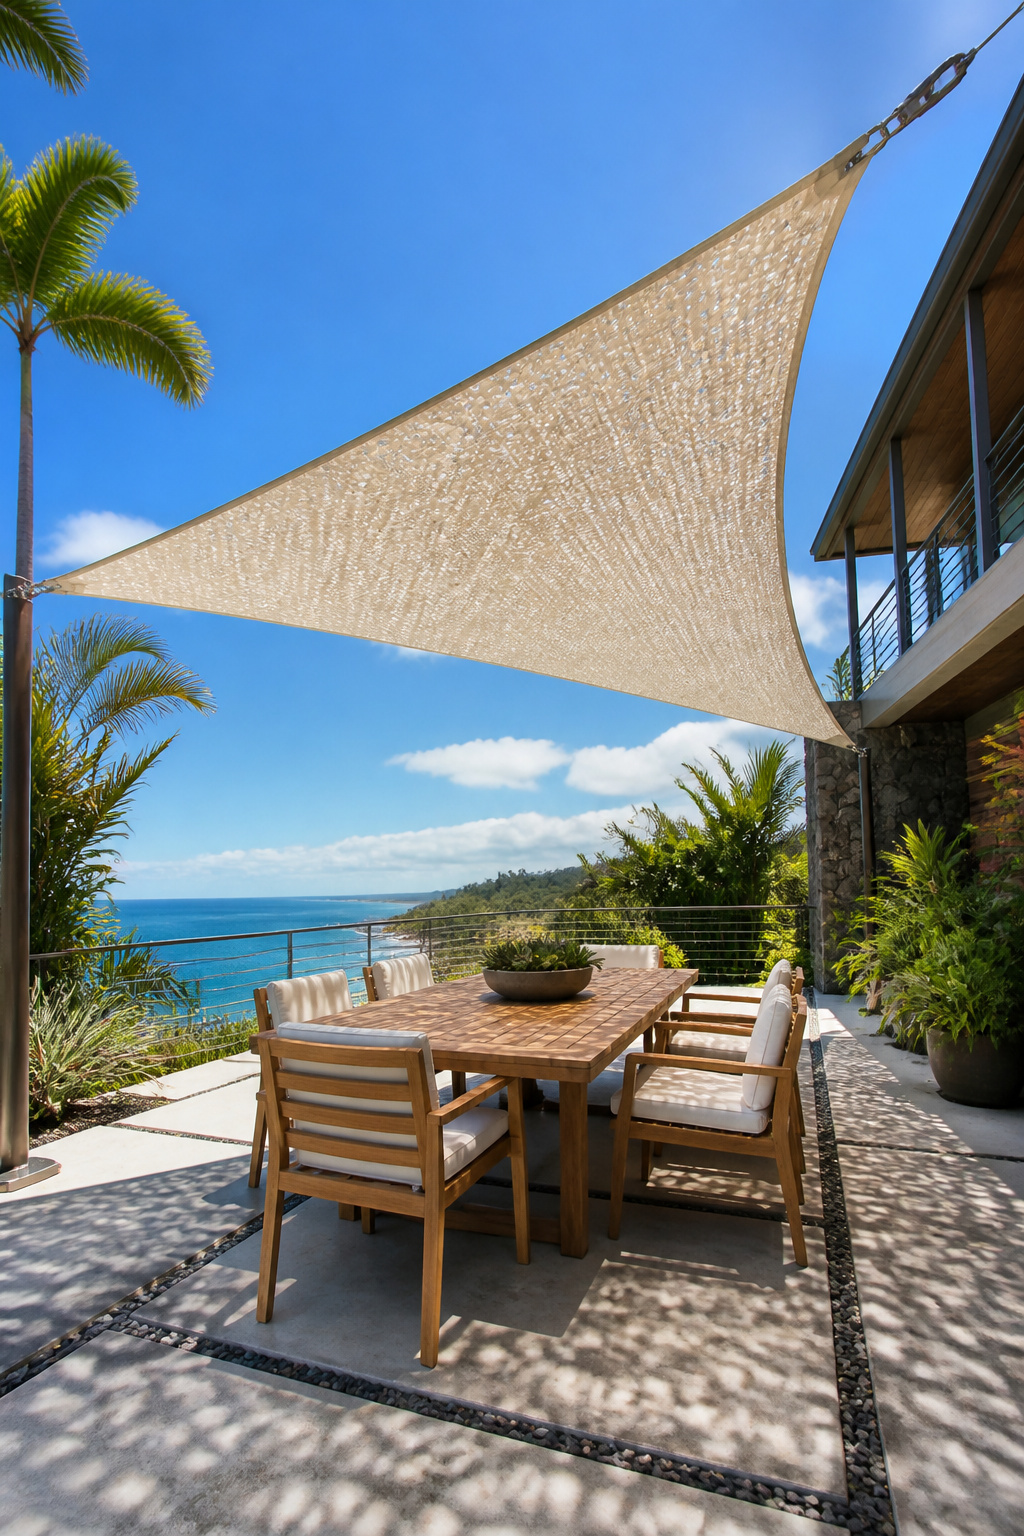
9. Sail Canopy Shade Structure for a Modern Coastal Patio Feel
Why Sail Canopies Outperform Umbrellas for Large Patio Zones
The numbers tell the story immediately. A single 10×12-foot sail shade covers 120 square feet of ground — the same footprint as a large outdoor dining set. A single market umbrella covers 40–60 square feet. Beyond area, the structural performance difference is significant. A hyperbolic sail with alternating high and low anchor points is under tension in three dimensions simultaneously. That tensioned form resists wind in a way a flat umbrella simply cannot — wind finds no flat face to push against. HDPE mesh fabric blocks 95–97% of UV rays while allowing airflow through the knitted structure, which is critical in warm climates where a solid canopy creates a heat pocket rather than shade.
Attachment Points, Tension Cables, and Material Grades (HDPE vs Acrylic)
HDPE mesh is the right choice for most climates: breathable, slightly stretchy, UV-blocking up to 97%, and durable across a wide weather range. Solution-dyed acrylic is waterproof and holds colour longer in high UV environments, but it’s stiffer and traps more heat — best where rain coverage matters more than breathability. For fixings, use stainless steel D-rings and tensioning hardware attached to either engineered steel posts (four-inch square hollow section set in concrete) or structural wall anchors. Never attach to fencing. Most residential fencing is not rated for the lateral loads that a tensioned sail generates in wind.
Angle and Overlap Strategies for Maximum Shade Coverage
A minimum 20-degree tilt off horizontal is required for water run-off and wind resistance. In exposed or coastal positions, 30–40 degrees works better. For full coverage, overlap two sails by at least twelve inches — this also allows you to adjust the shade angle seasonally by varying the attachment point height. The low point of any sail should never be directly over a seating area: always position the drainage point to one side so rain doesn’t funnel onto the table. Keep cables under genuine tension throughout. A loose sail flaps, degrades faster, and reads as unfinished from across the garden.
10. Mixed-Level Deck Platforms for a Dynamic Outdoor Living Space
How Level Changes Create Zones Without Walls
One step between deck levels is one of the most elegant spatial tools in patio design. A seven-inch level change communicates a zone transition — you are moving from one outdoor room to another — without any visual barrier that would reduce apparent space. Two steps, or fourteen inches of level change, feels like a genuine floor-level shift. The conventional arrangement is lower-level dining (more intimate, contained) and upper-level lounging (broader outlook, more relaxed). This can be reversed effectively on sloped sites. Level changes also solve drainage problems on sloped plots by accommodating grade change without cutting into the slope.
Rise Heights, Building Code Requirements, and Edge Treatments
The standard deck step rise is four to seven inches — and it must be consistent across the full run. Even a half-inch variation between steps causes people to trip, because the body calibrates to the first step and expects that dimension to repeat. In the United States, decks more than 30 inches above grade require a railing at least 36 inches high (42 inches for multi-family under IBC). Below this threshold, open edges with plantings or low retaining walls work well. Cable railing is the contemporary choice for open edge treatment: cables spaced at a maximum 3⅛ inches on centre through posts, using 1×19 stainless steel wire rope.
Combining Decking Materials for Visual Interest
Using two different materials across levels is a straightforward way to reinforce the zone distinction visually. Ipe or hardwood on the upper level and concrete pavers or composite decking on the lower reads as two distinct surfaces because they are two surfaces — the level change is backed by material change. A board direction change at the step is a simpler version of the same idea: boards running parallel to the house on the upper level, perpendicular on the lower. Composite decking performs well on lower-level platforms where moisture exposure from adjacent ground is higher, pairing naturally with natural hardwood on the elevated upper deck.
11. Bamboo Privacy Screen as a Natural Patio Design Element
The Dual Role of a Privacy Screen as Both Boundary and Feature
Bamboo screening is more often misunderstood than it is used well. When positioned correctly — set twelve to eighteen inches from the boundary wall with climbing plants behind — a bamboo screen creates depth and shadow that a flat fence surface never achieves. The warm golden-brown tone is climatically neutral: it reads as ‘outdoors’ without imposing a regional aesthetic. A dense bundled-pole screen also delivers five to eight decibels of sound reduction, which is meaningful in urban settings. The patio privacy you gain from a well-placed screen changes how the space feels to inhabit. For the full range of approaches, these backyard patio privacy ideas cover bamboo, planting, and structural screening solutions side by side.
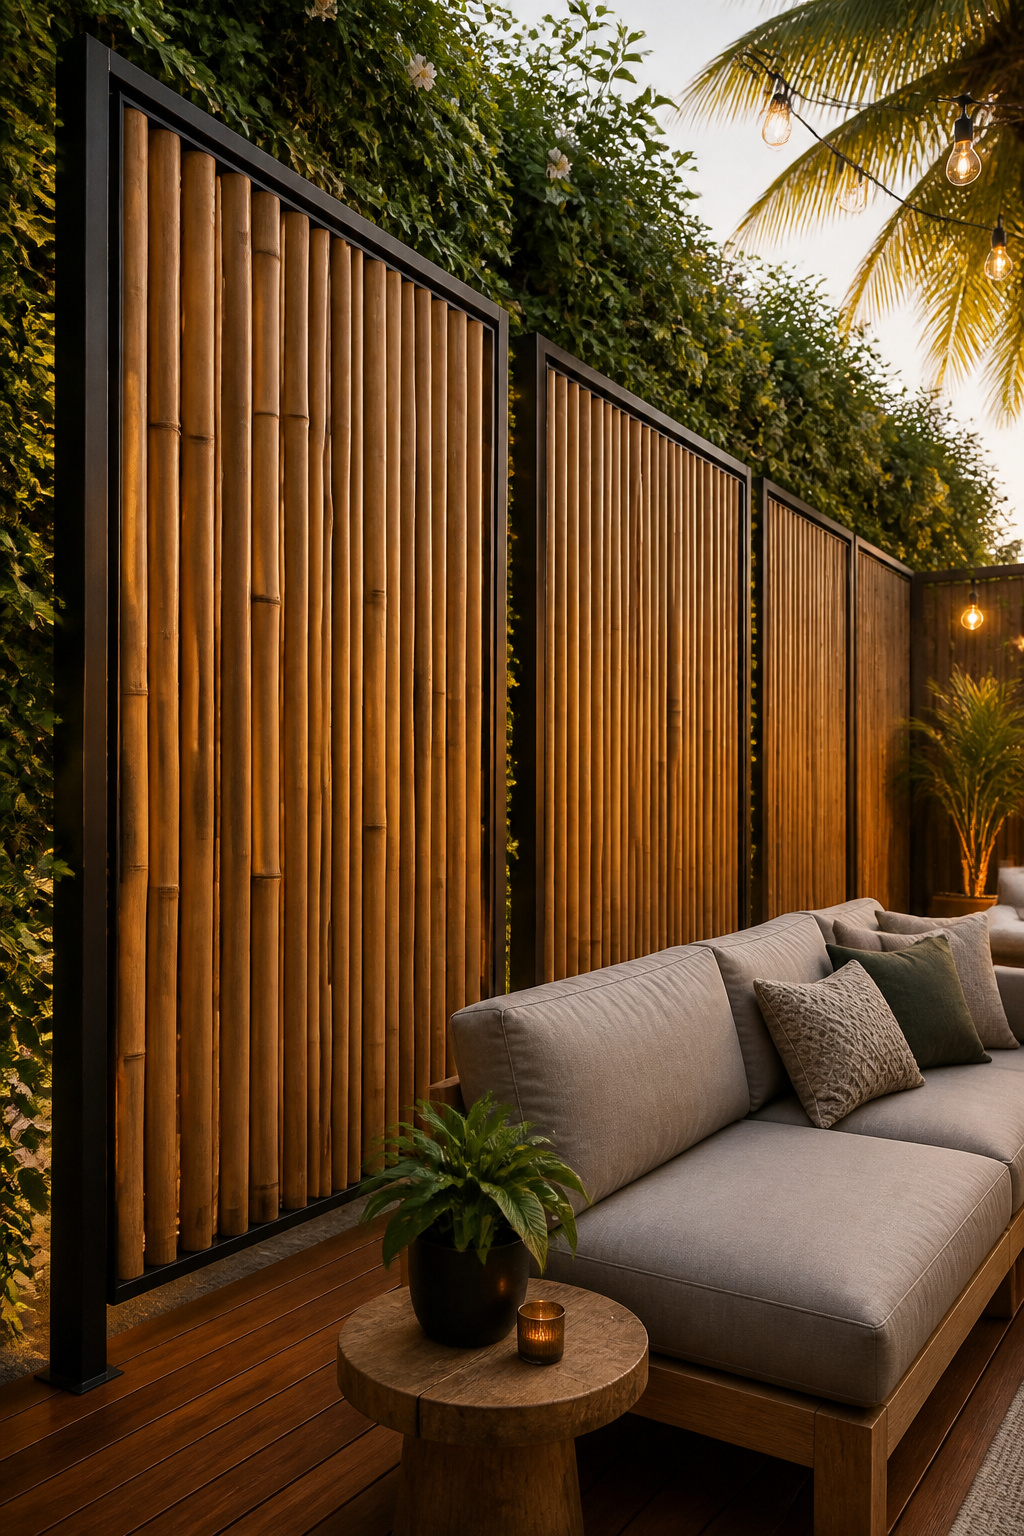
Bamboo Panel Options: Bundled Poles, Woven Mat, Framed Modules
Bundled Moso pole panels are the most natural-looking option: individual poles bundled and tied, with gaps that allow air movement and 80–90% visual privacy. Woven mat panels are flatter and provide complete visual privacy, though they’re less durable in wet climates. Pre-framed modular panels — an aluminium frame with bamboo infill — are the most practical for longevity. They can be removed, repositioned, and replaced panel-by-panel as needed. The aluminium frame protects the bamboo from direct contact with post fixings, eliminating the condensation rot that is the most common cause of early failure in bamboo screening.
Lifespan Realities and Treatment Requirements
Untreated bamboo panels last three to seven years in damp climates and eight to twelve years in dry ones. Annual linseed oil application extends this substantially. At the premium end, MOSO Bamboo Lumber products — heat-treated and high-temperature steamed — carry a 25-year product warranty and perform comparably to hardwood in outdoor applications. This is not the cheap reed-screen material. It is an engineered sustainable product that deserves to be specified alongside timber and stone in a serious patio design.
12. Layered Patio Lighting: From String Lights to Integrated Uplights
The Three Layers of Outdoor Lighting and Why All Three Matter
A patio with only string lights has ambient lighting. It lacks task and accent layers, which means the cooking zone is poorly lit, the design details disappear after dark, and the space looks flat. The three-layer approach works outdoors exactly as it does indoors: ambient (string lights, lanterns, pergola fixtures), task (downlights over the kitchen prep area, step lights at level transitions, illumination at the dining zone), and accent (in-ground LED uplights aimed at specimen plants, wall-wash fixtures on the boundary screen, grazing lights on textured surfaces). All three layers working together is the difference between a patio that gets used in the evenings and one that doesn’t.
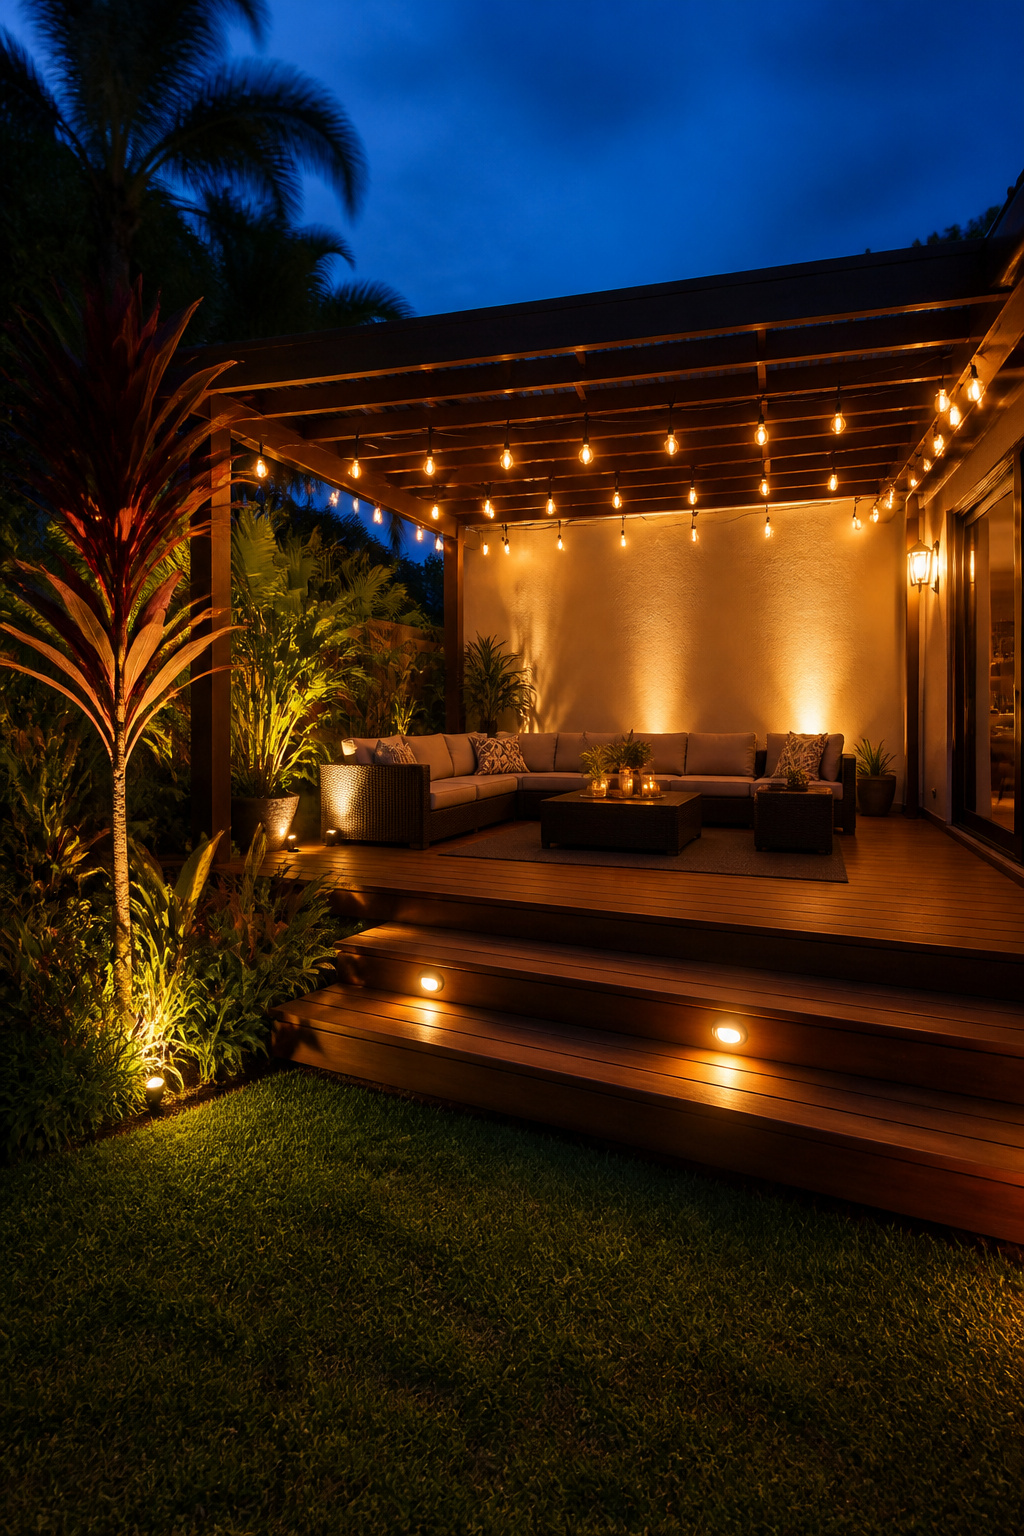
Fixture Types: LED String Lights, Path Lights, In-Ground Uplights, Wall Sconces
For outdoor installations, IP ratings are the baseline specification: IP44 (splash-proof) is the minimum for covered patio positions; IP65 (sustained jets of water) for exposed areas; IP67 (temporary submersion) for in-ground uplights at ground level. LED Edison-style string lights with warm 2700K colour temperature are the right choice for ambiance. Avoid 4000K cool white outdoors — it creates a clinical atmosphere that undermines every other design decision in the space. In-ground uplights need 5–12W for a specimen tree or feature wall at most residential scales. Warm white 2700K or warm amber 1800K gives the tropical mood.
Smart Control Options for Automated Ambiance Transitions
The practical minimum for outdoor lighting control is a timer: set ambient lights to activate at sunset and off at midnight. This single automation changes how often a patio gets used by removing the friction of manually switching lights on after dark. Beyond timers, systems like Philips Hue Outdoor allow pre-set evening scenes that shift the entire patio atmosphere at a single tap. Govee’s RGBIC Outdoor Permanent Lights add colour-dynamic and music-sync capability for entertaining-focused spaces. The technology is genuinely useful here — not a gadget, but the mechanism through which a designed lighting scheme actually gets used consistently.
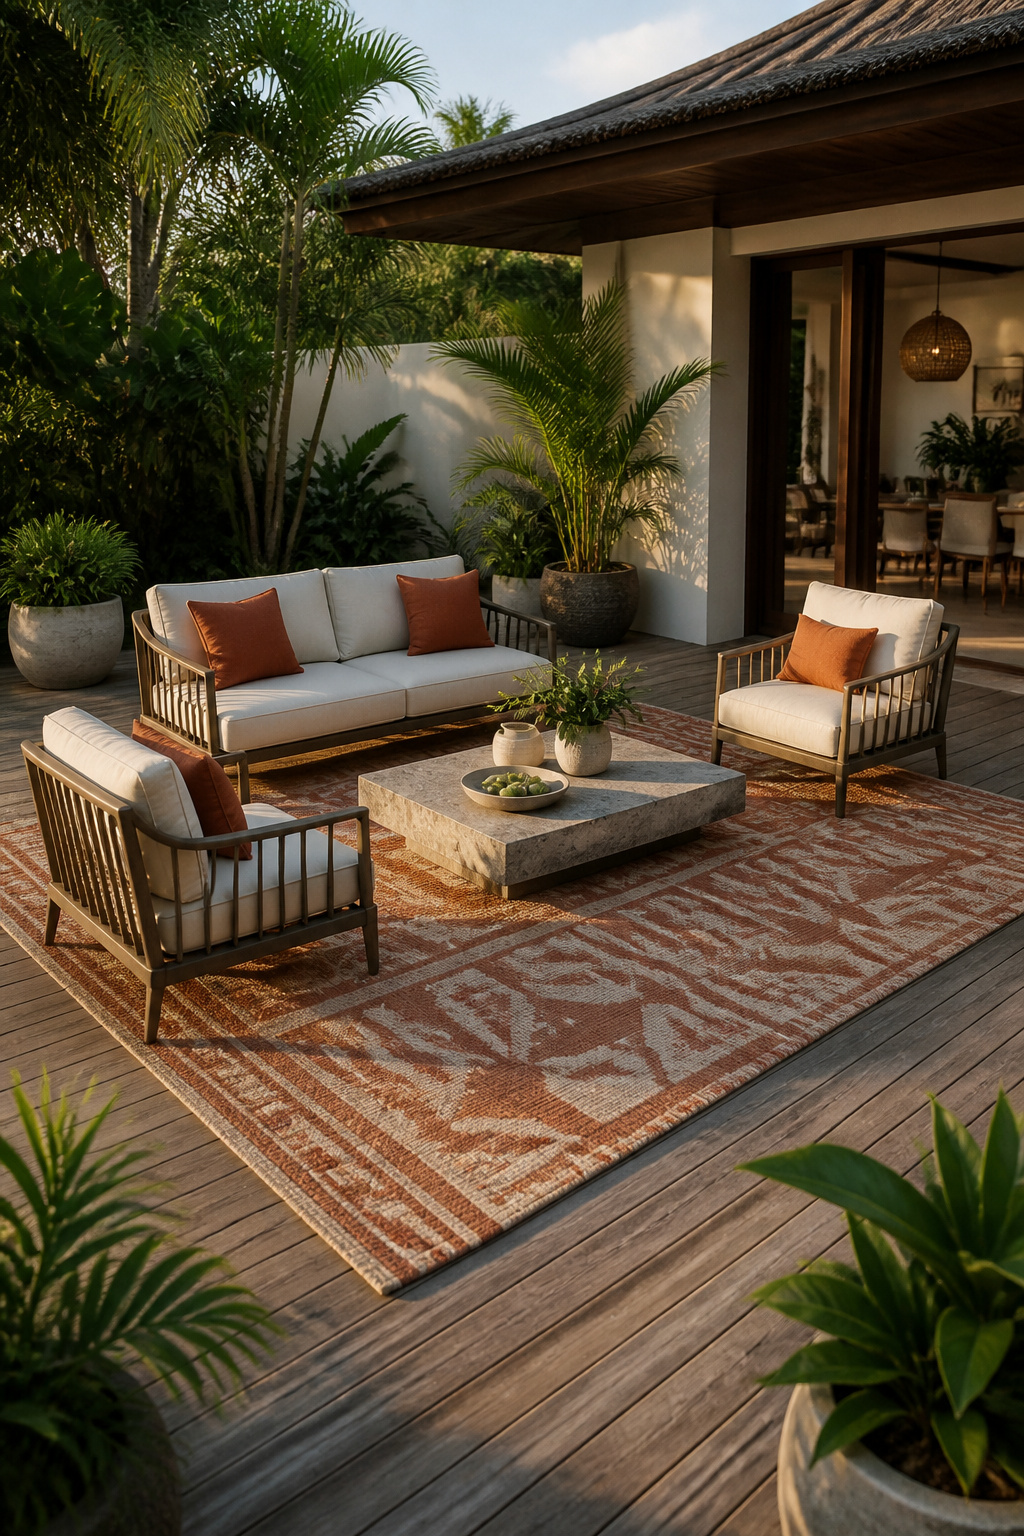
13. Outdoor Rug and Cushion Groupings That Anchor Conversation Zones
How Soft Furnishings Define Zones on an Open Patio Surface
Zone definition — that’s what an outdoor rug actually does, and it’s far more important than style alone. Without a rug, chairs and a sofa sit on a floor. With one, they constitute a lounge. The room-scale sizing rule applies without modification: a 9×12-foot rug under a four-seat outdoor lounge with a coffee table creates a proportional conversation zone. A 5×8-foot rug reads as an afterthought. Layering a smaller textured accent rug over a larger neutral base adds depth and defines a focal centre within the zone — the same technique that works in every well-styled interior, applied to the outdoor patio setting.
Material Durability: Polypropylene, Solution-Dyed Acrylic, Quick-Dry Foam
100% polypropylene flatweave with UV stabilisation is the value benchmark. Colour is baked into the polymer strand during extrusion (solution-dying process), so UV exposure fades the surface rather than stripping a coating. Hydrophobic fibres resist mould and dry quickly. Lifespan is three to seven years in full sun. Solution-dyed acrylic cushion fabric delivers higher UV and fade resistance — properly maintained cushions last ten-plus years in full sun. The cushion fill matters as much as the cover: use open-cell quick-dry foam, which dries in hours after rain. Closed-cell foam traps water for days and develops mould from the inside before you see any external sign.
Sizing Rules for Outdoor Rugs Relative to Furniture Groupings
For an outdoor dining zone, the rug must extend 24 inches beyond the table edge on all sides — chairs need to remain on the rug when pushed back. For an outdoor lounge zone, all furniture legs should be on the rug if possible, with at minimum the front legs. Leave at least six inches between the rug edge and any path or paving edge to avoid a trip hazard. Polypropylene rugs can be hosed down for cleaning. Solution-dyed acrylic cushions take mild soap and water, then need to air-dry before storage. Never store outdoor cushions damp — this is the primary cause of premature mildew, and it is entirely avoidable.
14. Container Garden Towers as Patio Design Focal Points
Why a Container Tower Creates Vertical Drama Without Permanent Construction
Three containers at a patio corner — tall, medium, short — cost $200–600 in pots and plants and read as a designed landscape feature from across the garden. The tower grouping creates vertical layering that raises the eye and adds apparent height and complexity to a flat surface. Containers also give you something built-in planting cannot: complete seasonal flexibility. Tropical specimens overwinter indoors and return in spring. The containers move; the patio design stays consistent year-round. For elevated decks with load restrictions, fibreglass containers that mimic glazed ceramic or hammered copper weigh 80–90% less than their ceramic equivalents — genuinely indistinguishable at conversational distance.
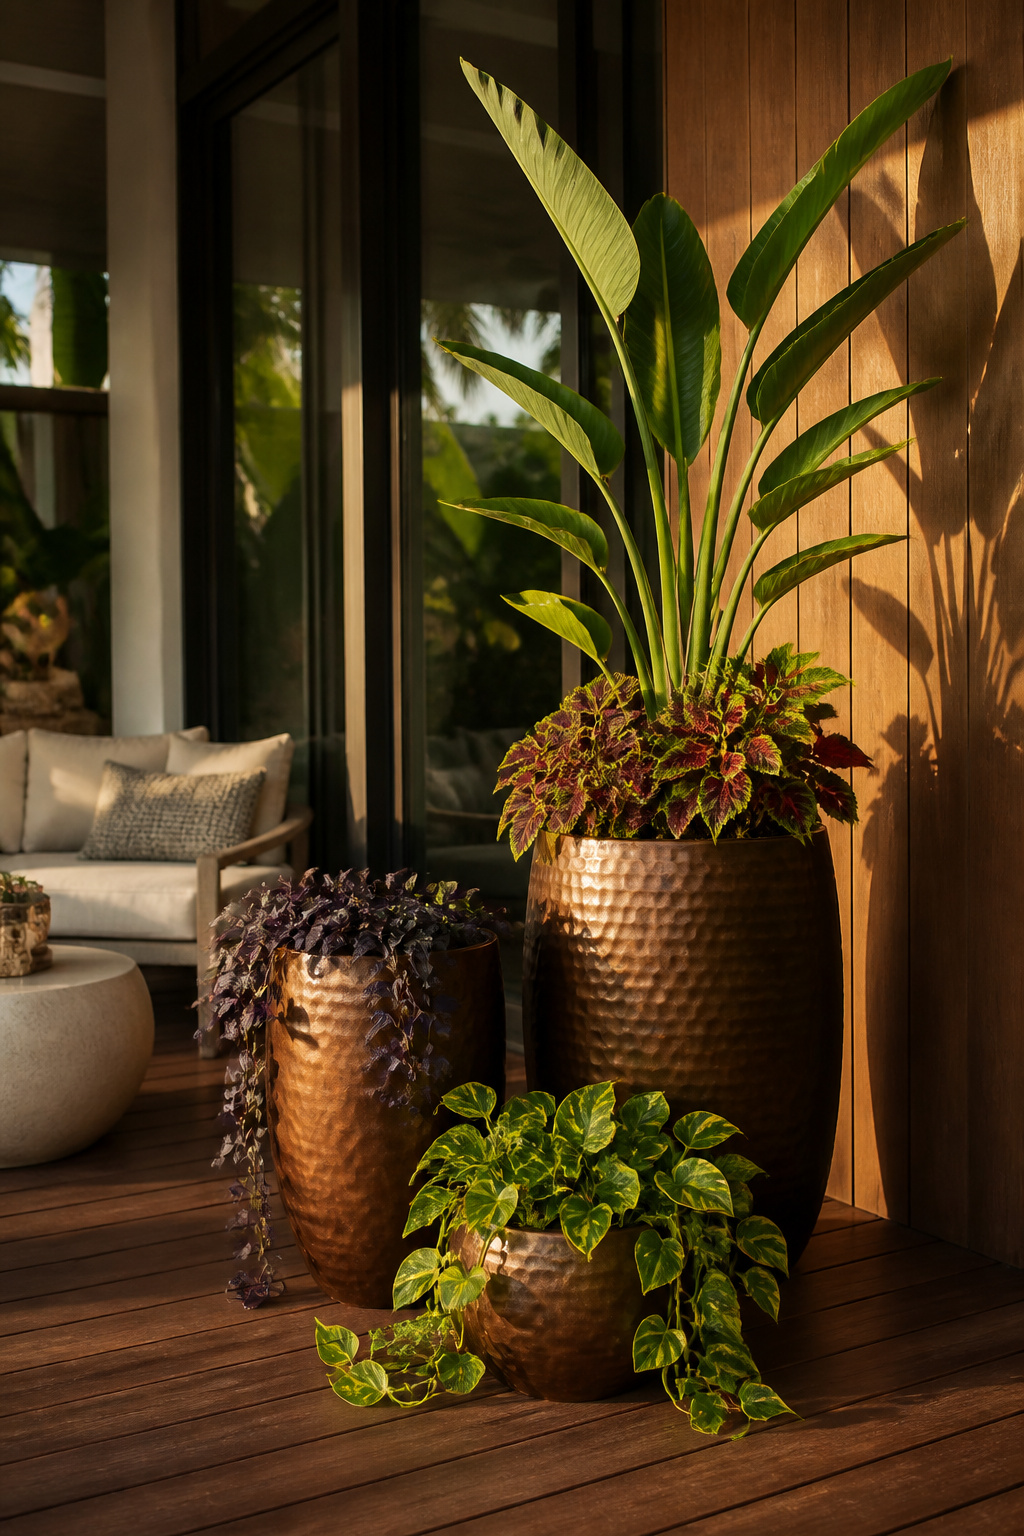
Container Materials: Glazed Ceramic, Weathered Terracotta, Fibreglass Mimics
Glazed ceramic is beautiful, colour-stable for fifteen-plus years, and available in frost-proof finishes for temperate climates. A 24-inch pot weighs 35–50 pounds empty — that matters on elevated decks. Weathered terracotta is porous and cracks in freeze-thaw cycles without sealing; linseed oil treatment and winter storage extends its life meaningfully. Fibreglass mimics are the smart specification for any elevated or load-sensitive position: a 24-inch fibreglass pot weighs five to eight pounds empty, the finish is indistinguishable from stone or glazed ceramic at distance, and the lifespan is ten-plus years outdoors without any maintenance beyond wiping down.
Planting Strategies: Single Specimen vs Layered Thriller-Spiller-Filler
The thriller-filler-spiller method is the professional standard for making container arrangements look designed rather than assembled. The thriller is the central tall specimen — for a tropical patio, this is bird of paradise, canna, agave, or Dipladenia trained up a stake. The filler is the mid-height plant surrounding the thriller: bromeliads, coleus, or low ornamental grasses. The spiller trails over the pot edge — trailing pothos, sweet potato vine, or scaevola — softening the container edge and visually connecting the pot to the ground. The most common mistake is combining a full-sun thriller with a shade-tolerant spiller in the same container. For more on applying this approach across different outdoor spaces, these container garden ideas for small spaces show the method in a range of patio contexts.
15. Coastal-Inspired Patio With Weathered Teak and Sea-Grass Weave
The Coastal Patio Aesthetic and Why Restraint Defines It
The coastal patio design aesthetic is the most imitated and least understood register in outdoor design. It succeeds through deliberate limitation: natural materials (teak, stone, linen-weave textiles), a narrow colour palette (white, warm grey, sand, soft blue-green), and no sea-themed ornamental accessories. The moment you add anchor motifs or rope detailing, you’ve moved from coastal to nautical — a fundamentally different and far less sophisticated look. Successful coastal patio design lets materials age honestly: teak that silvers to soft grey, stone that develops character with weathering, fabric that bleaches slightly at the edges over seasons. This is the opposite of obsessive maintenance. It requires choosing well at the start and getting out of the way.
Teak Furniture Grades (A, B, C) and the Silver Patina Decision
Grade A teak is the only specification worth buying for outdoor furniture. It comes from the heartwood of mature trees — the densest, most oil-rich material, with a deep reddish-brown hue and tight consistent grain. Grade B comes from outer heartwood in younger trees, with fewer natural oils and more colour variation. It’s suitable for sheltered positions but not appropriate for coastal salt-air exposure. Grade C includes sapwood: avoid for any outdoor application. For the patina decision, either let teak silver naturally (the grey finish is UV-induced surface weathering that does not affect structural durability) or apply a penetrating teak sealer — not teak oil, which is a marketing term with no agreed formulation — once annually to hold the golden-brown.
Sea-Grass and Wicker Weave: Which Performs Outdoors and Which Doesn’t
Natural sea-grass furniture should not be used outdoors. It absorbs moisture, degrades under UV, and becomes brittle within one to two seasons in any coastal humidity. The correct outdoor choice is synthetic wicker — PE resin woven over a powder-coated aluminium frame. At conversational distance, the difference from natural wicker is undetectable. Look for UV-stabilised PE resin, a powder-coated aluminium frame, and solution-dyed acrylic cushion fabric. This combination outlasts solid wood alternatives in salt-air environments and requires essentially no maintenance beyond occasional hosing down.
16. Hammock Garden Corner and Tropical Relaxation Zone
Creating a Dedicated Relaxation Zone Distinct From the Entertaining Area
The dedicated relaxation zone is the element that makes an outdoor space feel genuinely multi-functional rather than just a dining annex. Most effective hammock corners are spatially separated from the main entertaining area — tucked between planted borders, positioned at the far end of the patio, or set back under a pergola corner. The separateness is the point. A hammock in full afternoon sun gets used rarely, regardless of how well it’s hung. The same hammock under a pergola overhang or in the shadow of a sail canopy corner becomes a daily destination in warm months. Add a small side table within arm’s reach and the space stops being an aesthetic feature and starts being somewhere people actually spend time.
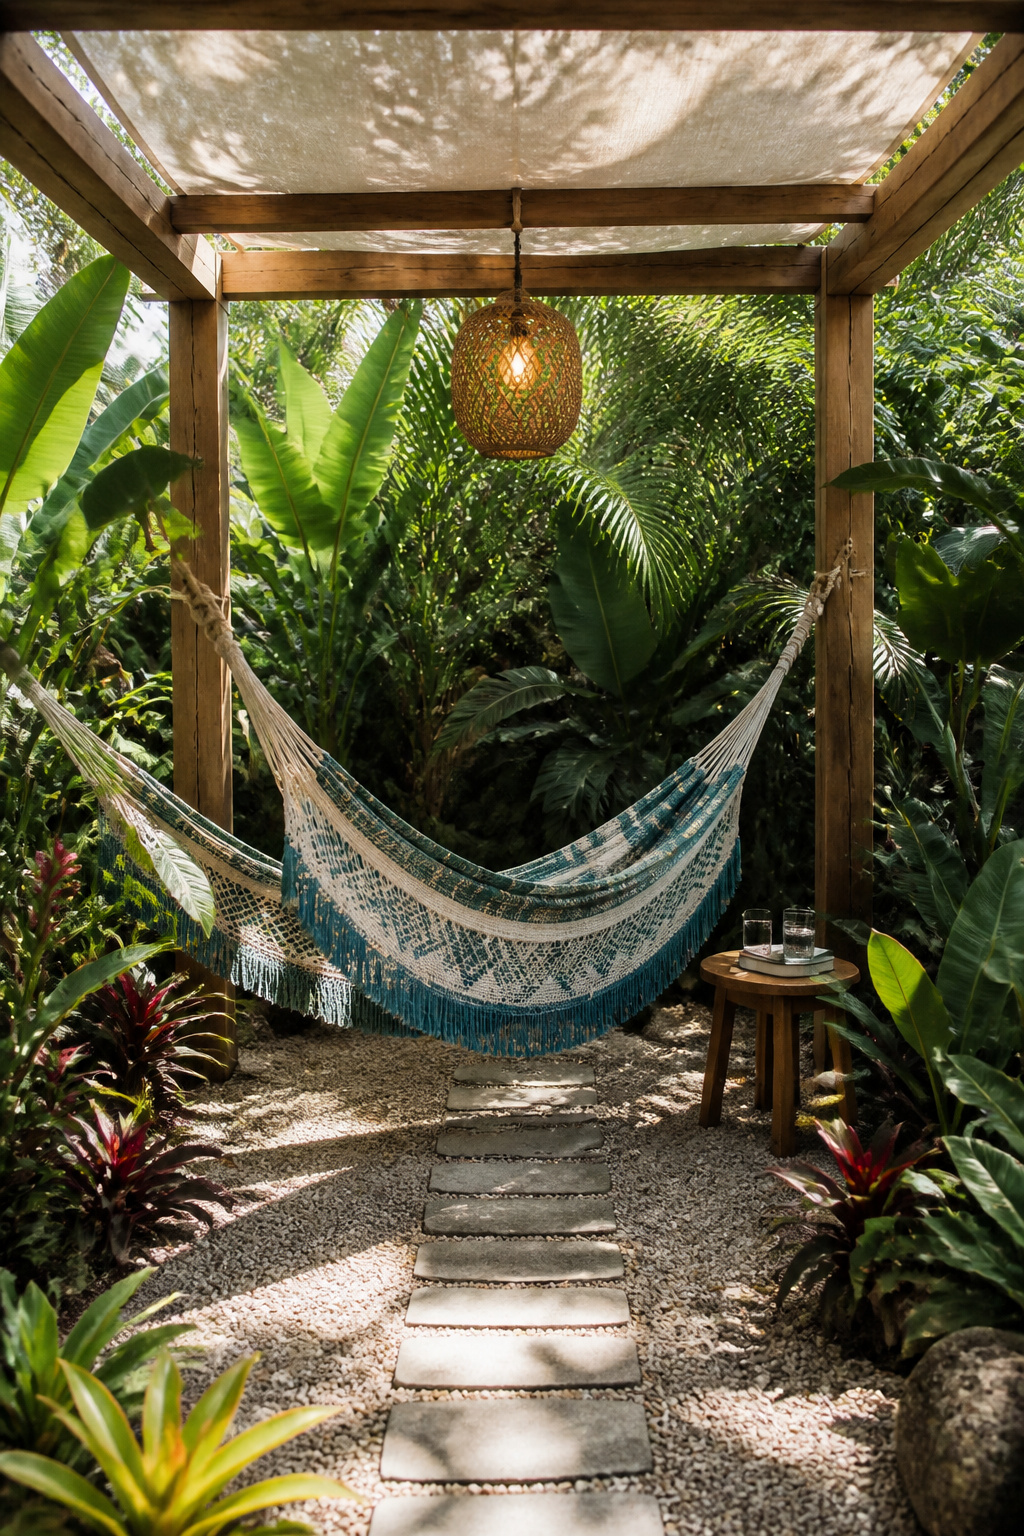
Hammock Types: Brazilian Cotton, Mayan Nylon, Chair Hammock for Small Spaces
Brazilian cotton hammocks are warm, soft, and genuinely comfortable. They are subject to mildew in damp climates and suit covered patio positions or dry climates well; outdoor lifespan is three to seven years. Mayan-weave nylon hammocks use the traditional Mayan woven structure in UV-stabilised nylon: breathable, quick-drying, and mildew-resistant. This is the right choice for humid, wet, or coastal climates — lifespan exceeds ten years with basic care. For small patios where a full-length hammock would dominate the space, a Nicaraguan chair hammock works in a four-by-four-foot footprint and delivers the same relaxation experience in a much smaller spatial commitment.
Framing Options: Standalone Frame, Between Posts, Tree Attachment Hardware
A standalone powder-coated steel frame is the most practical starting point: no ground works required, fully portable, and adjustable for correct hang height. You need at least twelve to fifteen feet between attachment points for a full-length hammock. If pergola posts are available, lag-bolt eye hooks rated to 500 pounds minimum through the post with a backing plate — check structural load before adding hammock tension. For tree attachment, use tree straps (one-inch webbing minimum) that distribute load across the bark surface. Trees need a minimum eight-inch trunk diameter to be appropriate hammock anchors. The centre of the hammock when occupied should sit approximately eighteen inches above the ground.
17. Mosaic and Decorative Concrete Patio Surfaces Inspired by Global Design
Why the Patio Floor Is the Strongest Design Statement You Can Make
In outdoor spaces — particularly those viewed from upper floors or from inside looking out — the patio floor is the design. Furniture is secondary. A patterned or decorative floor communicates intention before anyone sits down, before the lights come on, and regardless of which furniture arrangement happens to be in place. An encaustic cement tile floor in a Moroccan geometric pattern reads as a designed space from thirty feet away without a single additional accessory. This is the opposite of the usual priority order, which skimps on the floor and spends on furniture. Floor surfaces in good patio design outlast furniture by decades. The investment logic runs the other way.
Encaustic Cement Tiles, Exposed Aggregate, and Stamped Concrete
Encaustic cement tiles have been made since the mid-1800s in Europe and North Africa. They are made from cement, marble dust, and mineral pigments layered in moulds — the pattern runs through the full depth of the tile, so it wears through gracefully rather than revealing a blank substrate. Outdoors, they require a penetrating impregnator sealer before installation and a topcoat sealer after grouting; reseal annually in high-use areas. They are not suitable for freeze-thaw climates unless under a covered patio. Exposed aggregate concrete — pea gravel, granite chips, or tumbled glass scattered onto a fresh pour and pressure-washed at 24 hours — is durable, non-slip, and has a lifespan of 25-plus years with occasional resealing. Stamped concrete uses rubber moulds pressed into fresh concrete with colour hardener to mimic slate, flagstone, or cobblestone; seal every two to five years.
Sealing Requirements and Long-Term Performance
New concrete cures fully at 28 days — apply sealer after this point. Earlier application traps moisture and causes whitening beneath the film, which is a permanent flaw. For encaustic tiles, the penetrating impregnator step before installation is non-negotiable: it prevents grout contamination of the porous tile face during installation, which cannot be undone. For smooth-finish decorative concrete in wet climates, mix fine silica sand into the sealer before application. Film-forming sealers without anti-slip additive are dangerously slippery when wet — this is a practical safety detail that is consistently overlooked and consistently regretted.
Choosing Your Patio Design Style and Taking the First Step
How to Match Your Patio Design Approach to Your Climate and Lifestyle
The right patio design is always a climate-first decision before it is an aesthetic one. In hot, dry climates, shade is the primary structural priority: a sail canopy or pergola comes first, permeable paving reduces the heat island effect underfoot, and drought-tolerant planting in built-in borders keeps the space green without constant irrigation. In humid tropical climates, hardwood or composite decking over concrete allows air circulation beneath the boards and prevents the mould that plagues flat concrete surfaces. Mayan nylon hammock fabrics and MOSO bamboo screens with oil treatment perform well in sustained humidity where cotton and untreated bamboo fail. In cooler temperate climates, a firepit circle extends the outdoor season into autumn; a covered pergola with a retractable canopy provides rain shelter; tropical container plantings overwinter indoors and return to the patio design in late spring.
Where to Start: The Foundational Decisions Versus the Finishing Touches
The correct sequence is consistent regardless of budget: floor material first, then shade structure, then fixed elements (outdoor kitchen, built-in planters, water feature), then furniture, then soft furnishings and lighting last. This is the opposite of how most homeowners approach patio design — which is to buy furniture immediately and discover later that it doesn’t suit the floor, the shade situation, or the scale of the space. Start with what lasts longest. Outdoor design professionals now identify natural and sustainable materials as the top priority for contemporary patio builds, and the options — FSC-certified hardwood, permeable paving, MOSO bamboo, solution-dyed acrylic — are more accessible and more affordable than they have ever been. The outdoor living space you actually use every day is one good patio design decision away from the one you have.


