The first tomato I grew in a container was in a plastic bucket on a north-facing fire escape that got maybe three hours of afternoon sun. It produced exactly four tomatoes. They were the best four tomatoes I have ever eaten.
That’s the thing about container gardens: they close the gap between wanting to grow food and actually having the space to do it. Whether you’re working with a windowsill, a two-metre balcony, or a full terrace, there’s a container garden configuration that turns your space into something alive and productive. The key is knowing which ideas are worth your time and which ones will frustrate you before you harvest a single leaf.
The range here is deliberately wide. Some of these container garden ideas are genuinely simple — a trough of cut-and-come-again salad greens you’ll be harvesting in three weeks. Others are more ambitious, like a dwarf fruit tree that rewards years of patient rootstock choices and annual top-dressing. There’s something here whether you’ve never planted a seed or you’re the person who already has twelve pots crowding a third-floor balcony.
1. Kitchen Herb Container Garden on Your Windowsill
The herb windowsill is where most food gardeners begin, and with good reason: the return on a £4 packet of basil seeds is immediate, aromatic, and deeply satisfying. But most windowsill herb gardens fail for a simple reason: mixing herbs with completely different water needs in the same pot. Half end up rotting while the other half dies of thirst.
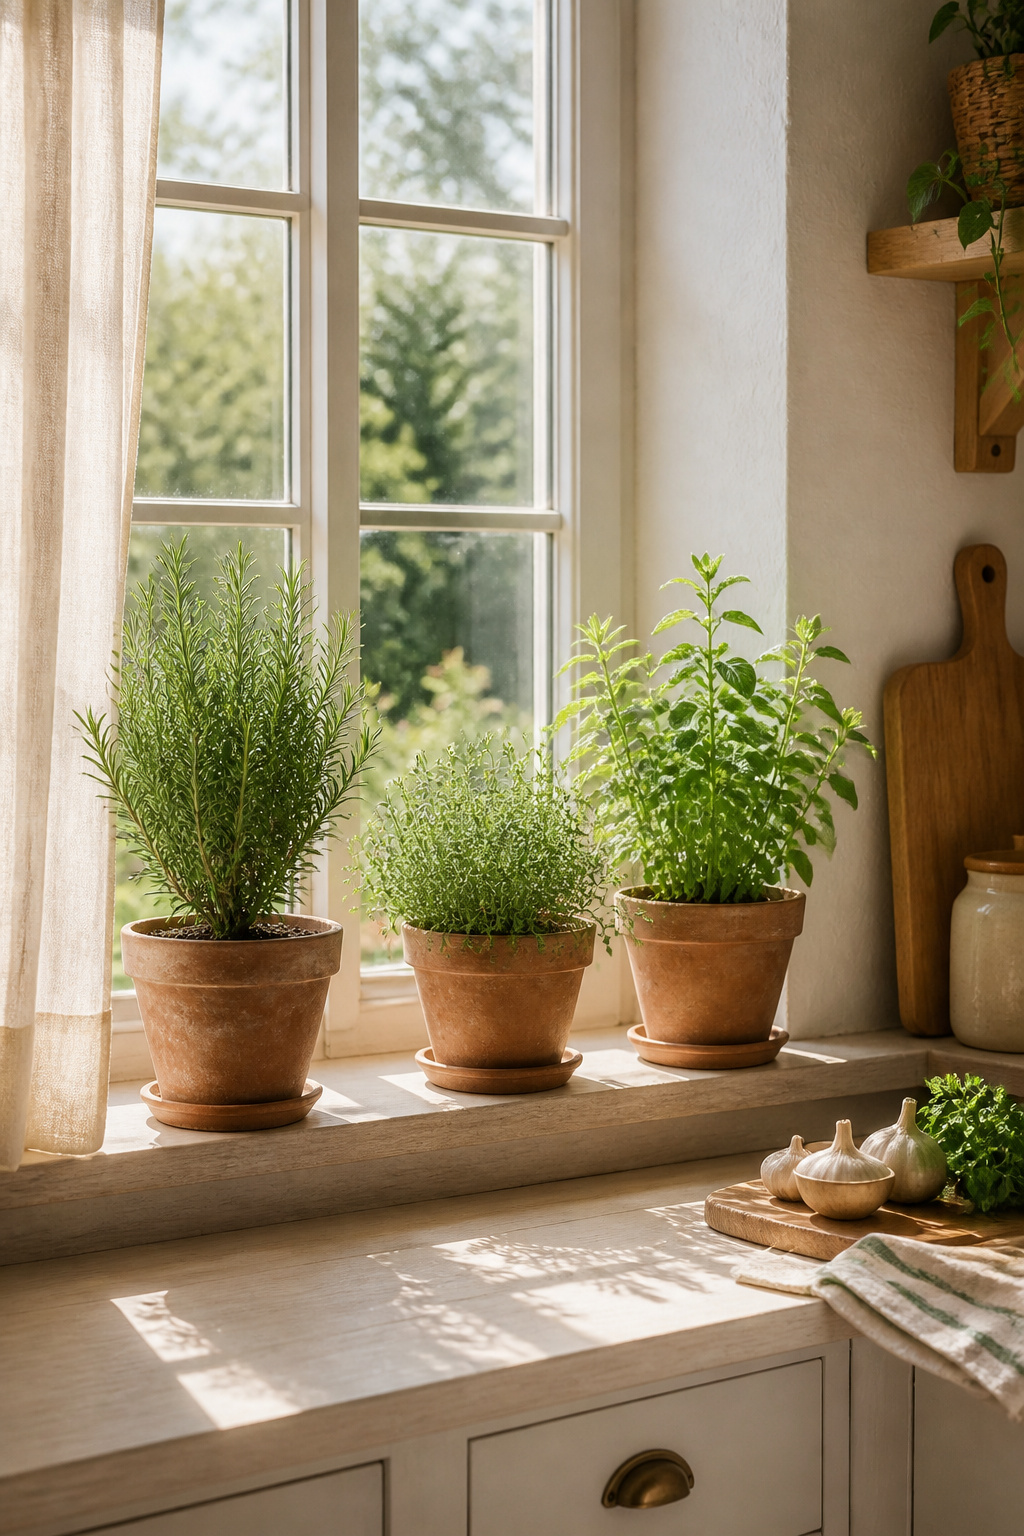
The solution is group compatibility. Mediterranean herbs — rosemary, thyme, and oregano — are natural pot companions. They all come from hot, dry hillsides; they all want full sun, well-drained gritty soil, and to dry out completely between waterings. Put them together in a terracotta pot with 25% perlite added to standard multipurpose compost, and they’ll thrive for months. Put basil in that same pot, and you’ll lose the basil within weeks.
Basil, parsley, and chives belong in their own container with consistently moist compost and a south or east-facing window. For windowsill herbs, east-facing exposure is often better than south for moisture-loving types — they get morning sun without the desiccating intensity of afternoon heat. If you’re bringing kitchen plants indoors year-round, understanding each plant’s native light and moisture conditions makes all the difference.
Containers need to be at least 12 inches wide and deep to support a productive herb clump — smaller pots dry out too fast and restrict root growth. Mint deserves a pot entirely to itself. It’s not difficult — it’s just so vigorous it will crowd out anything sharing the same container. A mint pot that gets cut hard and allowed to reshoot gives you the best flavour, consistently.
2. Cut-and-Come-Again Salad Greens in Window Boxes and Troughs
If you only ever grow one thing in a container, make it a cut-and-come-again salad trough. A plastic window box that’s 6 inches deep, 18 inches long, and costs under £5 is all you need. Fill it with good multipurpose compost, scatter a mixed salad leaf seed packet across the surface, cover thinly, water gently, and in 3-4 weeks you have a salad.
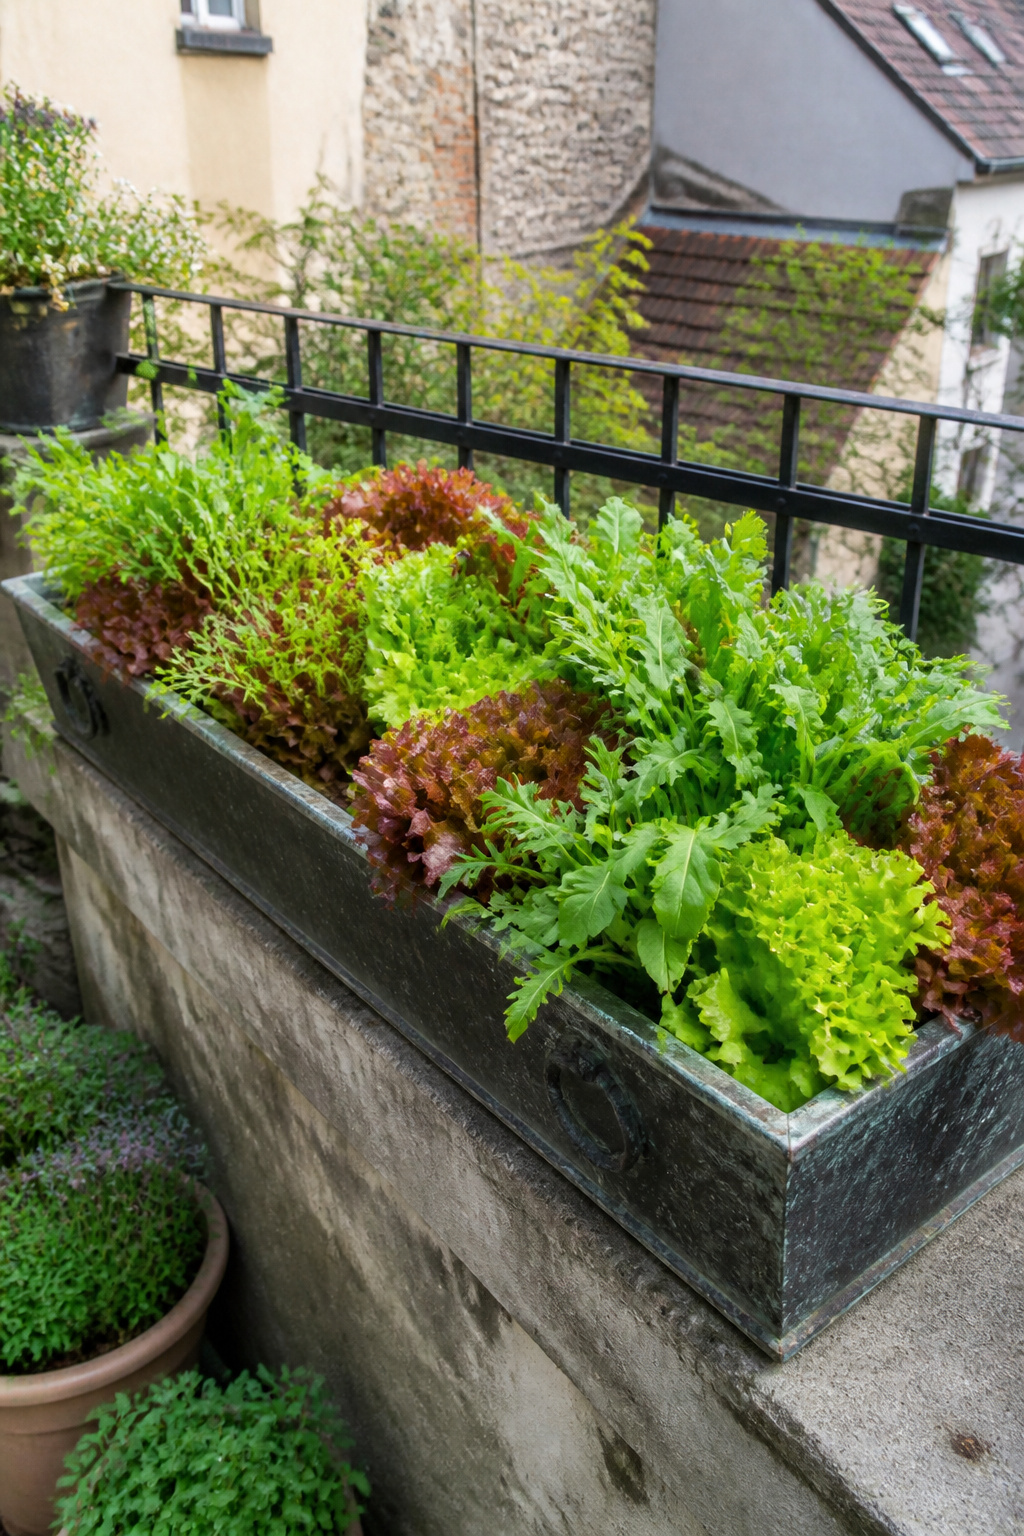
Not a handful of salad. A salad. Three days later, there’s another one. Cut the outer leaves to about an inch above the growing crown and the plant regrows from the centre. A single planting typically produces three or more full cuts before it starts to slow down. That’s remarkable productivity from an object you could hang off a railing.
The best varieties for this method are looseleaf types — not heading lettuces, which don’t regenerate after cutting. Mizuna, tatsoi, arugula (the fastest at 3-5 days regeneration in warm weather), looseleaf lettuce varieties like Oak Leaf and Lollo Rossa, sorrel, and land cress all perform excellently. Mix three or four varieties in the same trough and the different maturation speeds mean your harvest window extends over weeks.
Feed every two to three weeks with liquid fish emulsion — cut-and-come-again crops are heavy nitrogen users, and they lose vigour quickly in unfed containers. Check moisture daily. Plastic window boxes retain less water than ceramic or terracotta, and a container that dries out completely between checks will set the plants back significantly.
3. Self-Watering Planters for Reliable Yields With Minimal Fuss
The single most common reason container vegetables fail is inconsistent watering. A tomato plant in a pot that swings between drought and waterlogging will drop flowers, develop blossom end rot, and produce small bitter fruit. A self-watering container almost eliminates this problem by delivering moisture from below.
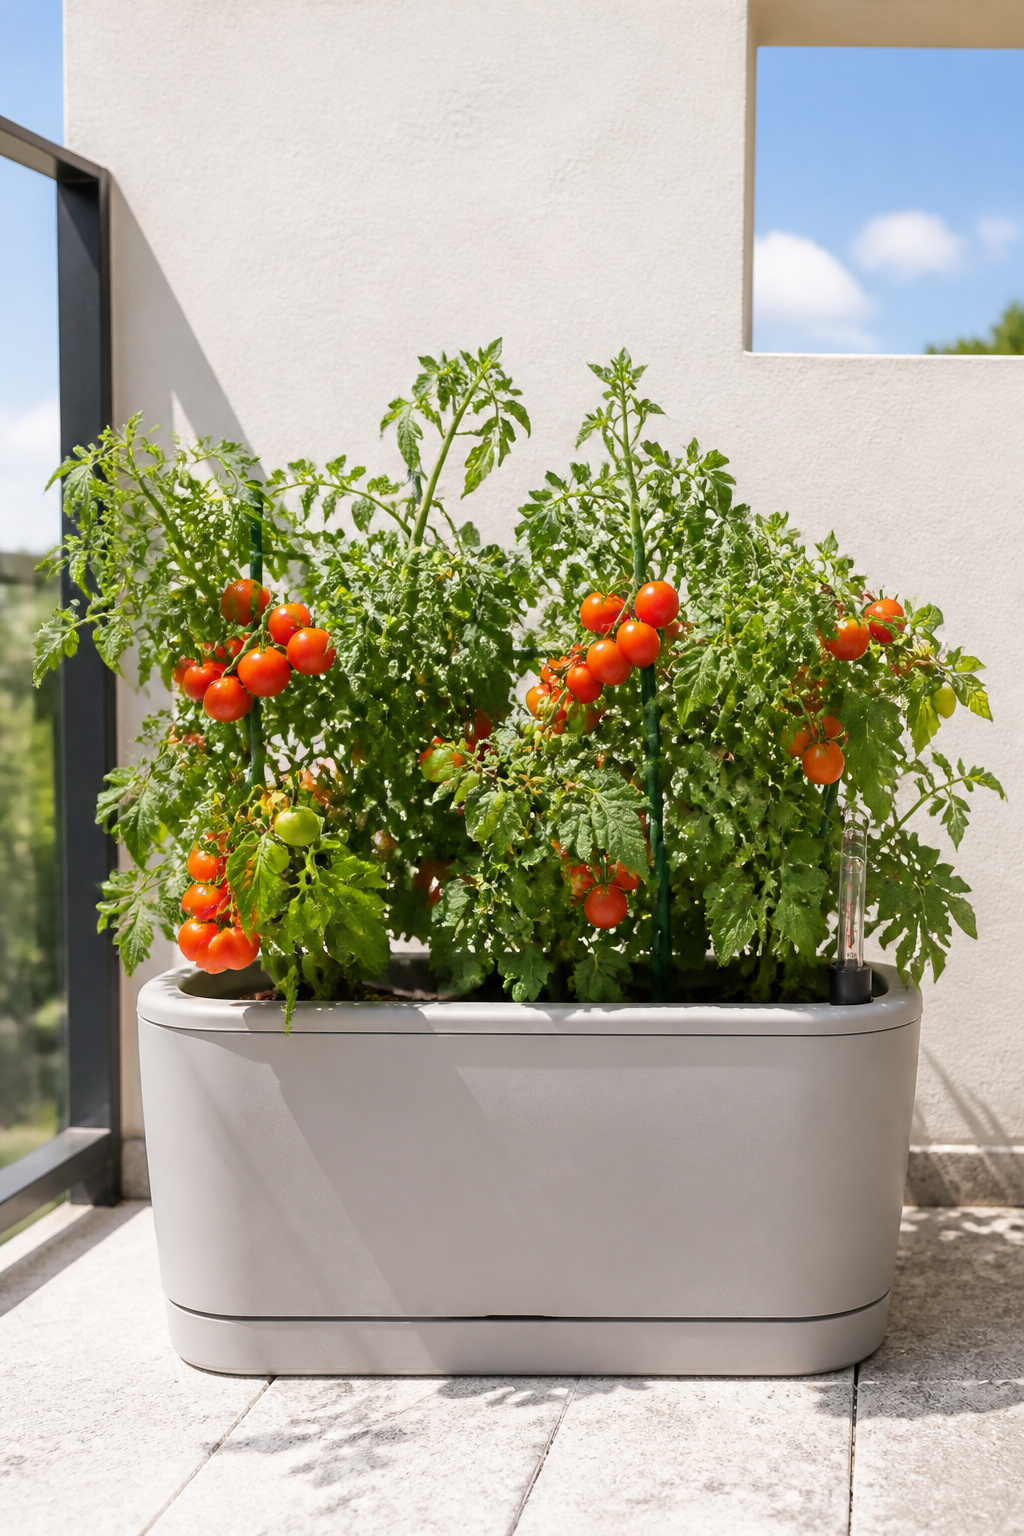
The mechanism is simple: a water-tight reservoir sits beneath the growing medium. Water rises upward through capillary action — the same physics that draws moisture up a paper towel — reaching roots at exactly the rate they need it. Fill the reservoir every few days in summer rather than watering daily, and the plants manage their own intake. For balcony growing with high-yield containers, this system transforms what’s achievable without daily attention.
The crops that benefit most from self-watering containers are the ones most sensitive to drought: tomatoes, peppers, eggplant, celery, and cucumbers. All require consistent moisture throughout their growing period. Inconsistent watering causes blossom end rot in tomatoes — those black leathery patches at the base of ripening fruits — and misshapen, hollow peppers. In a sub-irrigated planter, these problems largely disappear.
Avoid using self-watering systems for Mediterranean herbs. Rosemary and thyme need to dry out completely between waterings, and the consistent moisture of a reservoir system will cause root rot within a few weeks. Keep self-watering containers for thirsty crops, and keep your Mediterranean herbs in a conventional terracotta pot where the drying cycle is rapid.
A DIY 18-gallon tote SIP can be assembled for under £15. You need plastic storage containers, PVC pipe as a fill tube, and a mesh platform to hold the growing medium above the reservoir. The yield from a properly set up DIY tote is comparable to commercial self-watering planters costing five times as much.
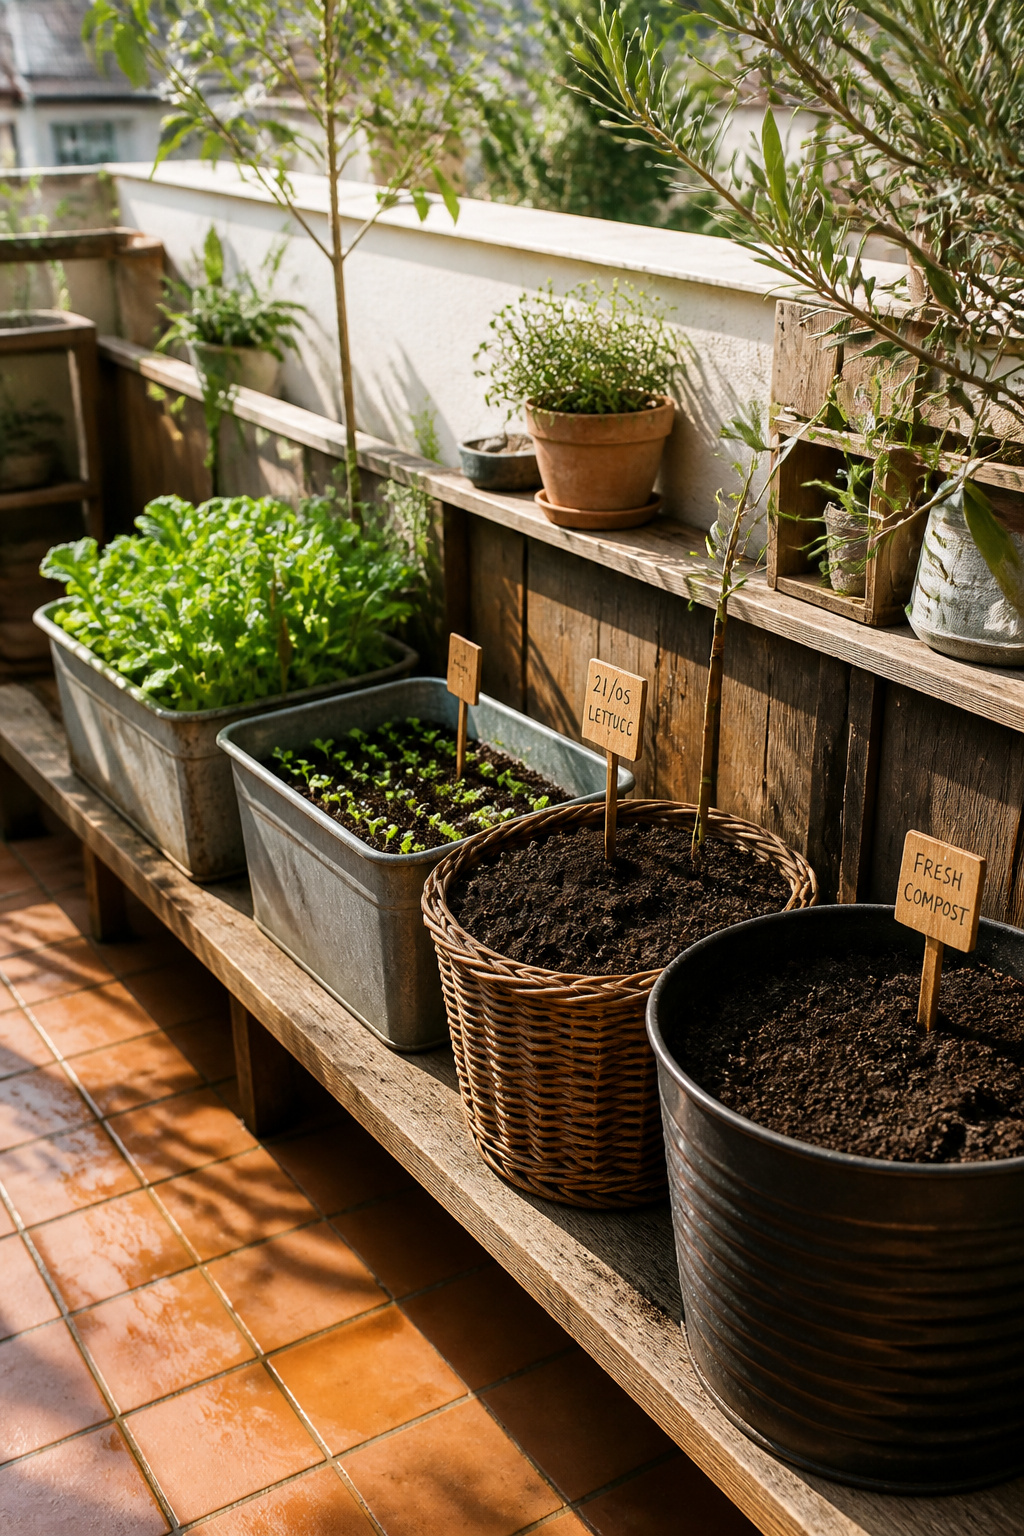
4. Upcycled Container Gardening With Reclaimed Crates and Tin Cans
There’s a particular pleasure in growing food in something that was destined for landfill. A wooden wine crate lined with burlap and filled with herbs. A collection of large olive oil tins drilled for drainage and planted with mixed salad. An old colander — already full of drainage holes — stuffed with nasturtiums. None of these cost more than a few pounds once you have the seeds, and all of them look better on a patio than an equivalent plastic plant pot.
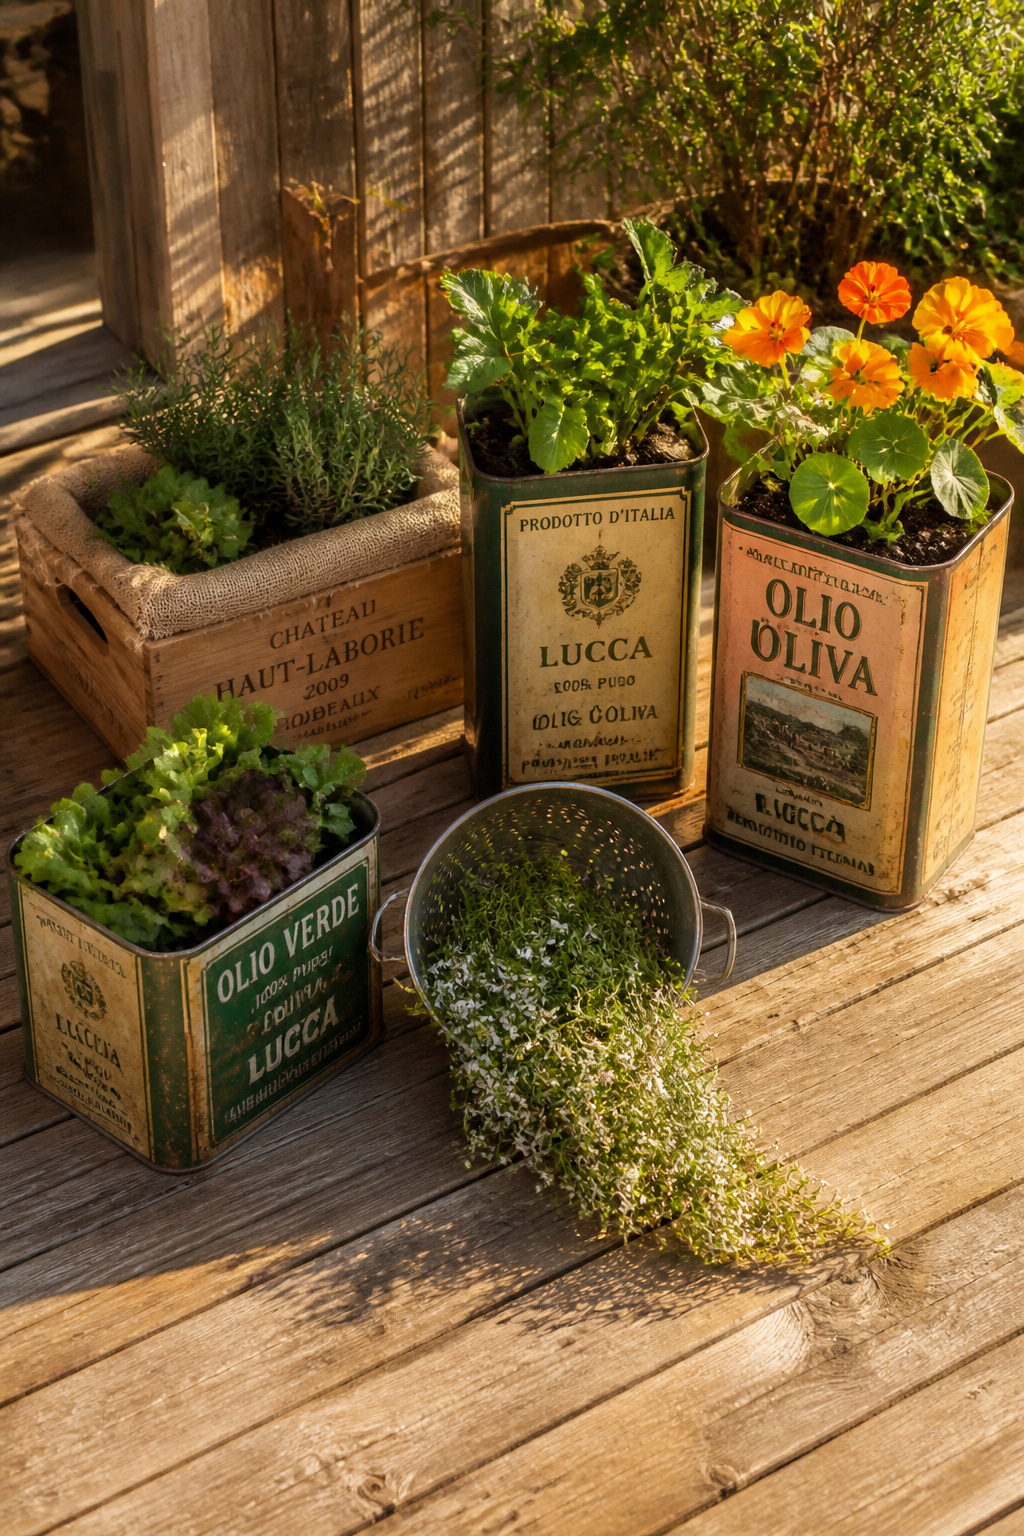
The most important thing to understand about upcycled containers for edible growing is material safety. Food-grade plastics (recycling codes #2 HDPE and #5 PP — the plastics used in milk jugs and yoghurt tubs) are safe. Untreated cedar, redwood, and cypress are naturally rot-resistant and safe for food crops. What to avoid: containers previously holding paint, oil, or chemicals; PVC plastic (code #3); and pressure-treated timber. Preservatives in treated wood can leach into soil and affect edible crops. For sustainable outdoor growing on a patio budget, upcycled containers let you build a productive setup for almost nothing.
Galvanised metal containers — buckets, tubs, traditional watering cans — sit in a slightly ambiguous zone. In neutral to alkaline soils, zinc leaching is minimal and most gardeners use them for herbs and salad greens without issue. If you’re growing in acidic compost, lining with food-grade plastic removes any uncertainty.
Every upcycled container needs drainage holes, no exceptions. Drill at least 3-5 holes of 10mm diameter in the base of tins, buckets, or wooden crates. Line wooden containers inside with burlap or geotextile fabric. This holds compost while allowing drainage, and extends the wood’s lifespan by reducing direct soil contact. Seal external wood surfaces with linseed oil; leave interior surfaces unsealed.
5. Pollinator Flower Pots to Invite Bees Into Small Urban Spaces
A container food garden without a pollinator pot is leaving harvest on the table. Tomatoes, peppers, beans, courgettes, and strawberries all need pollination to produce fruit. On a high-floor balcony, wind pollination is minimal and bee visits are rare. Even one container of pollinator-attracting flowers can meaningfully increase yields from nearby food crops.
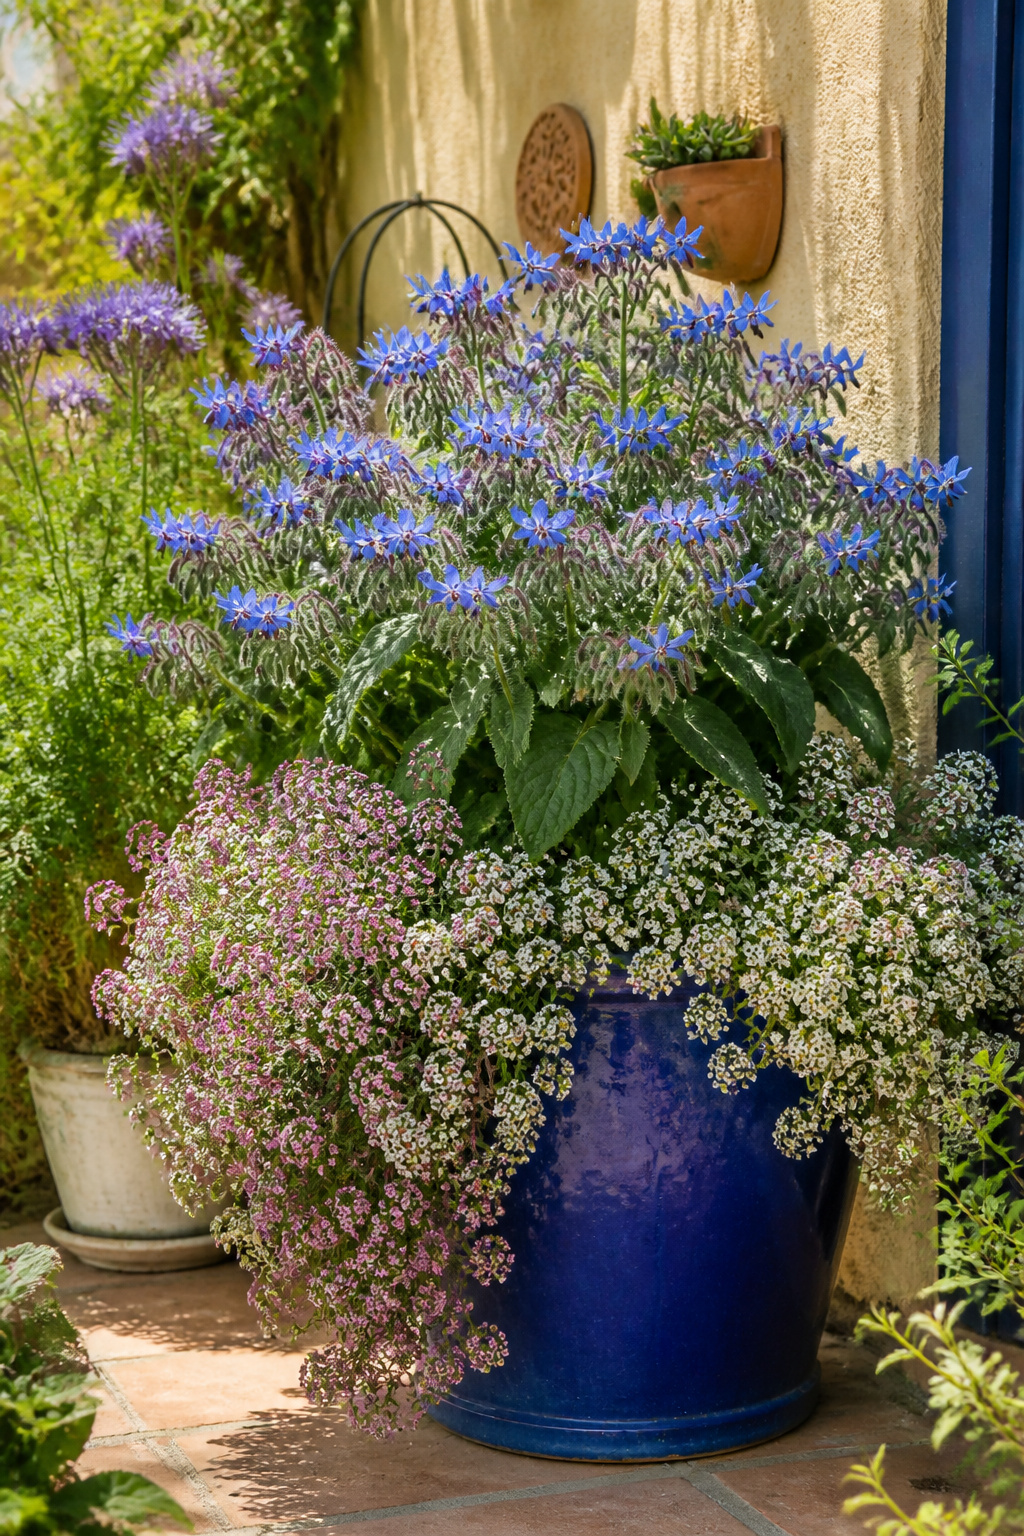
Borage is the most reliable choice. It’s an annual that germinates quickly and produces masses of blue star-shaped flowers from early summer. Bees that visit borage reliably move on to investigate nearby tomato flowers — a well-documented companion planting relationship. Once established, borage self-seeds, giving you a persistent presence in the garden without replanting. Creating a biophilic balcony space is less about design statements and more about small ecological choices — and a borage pot is one of the most effective.
Phacelia — sometimes sold as ‘bee’s friend’ — produces curved spikes of purple-blue flowers within 6-8 weeks of sowing. It attracts not just bees but hoverflies and parasitic wasps, natural predators of aphids. If aphids are your most persistent container pest, a phacelia pot nearby builds a biological defence system.
Sweet alyssum fills the spiller role beautifully. It cascades over container edges and blooms from early summer until the first frost. The shallow nectar-rich flowers are easily accessed by small solitary bees and hoverflies. Group your pollinator plants in a single large clump rather than scattering specimens across several small pots. A concentrated patch is far more visible to a foraging bee than isolated individual flowers.
Placement Tips for Exposed Balconies
On exposed balconies, position pollinator containers in a sheltered corner. Strong wind discourages bee activity. A pot catching full wind exposure at height will receive fewer visits than one tucked against a wall.
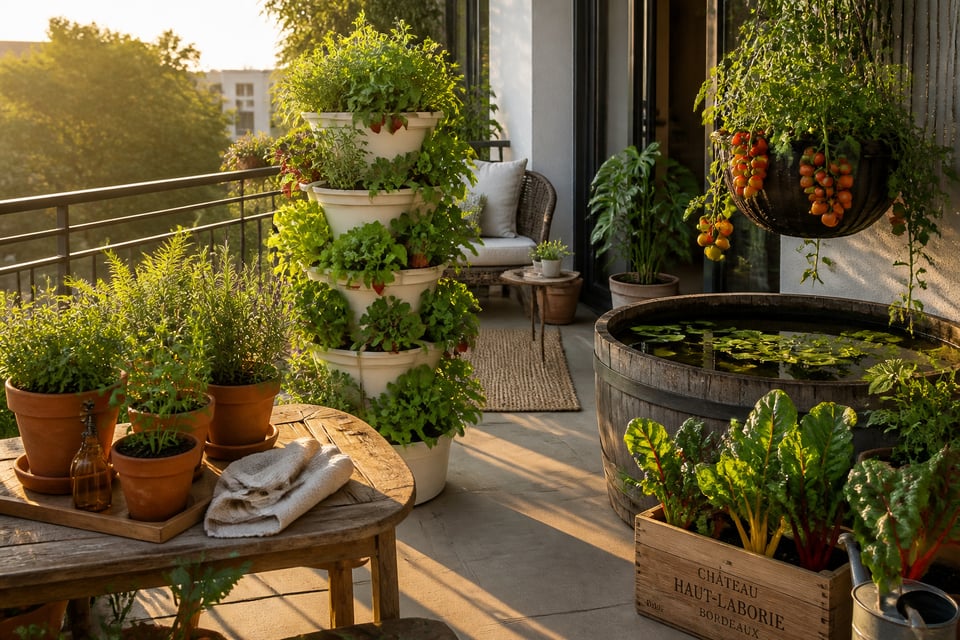
6. Vertical Tower Planters for Growing Up, Not Out
The moment you start growing vertically, the available space on a small balcony feels completely different. A 5-tier stackable tower planter with 30 growing pockets occupies roughly one square foot of floor space. In that same footprint — a single large conventional container — you’ve created growing space for 30 individual plants. The maths are genuinely dramatic.
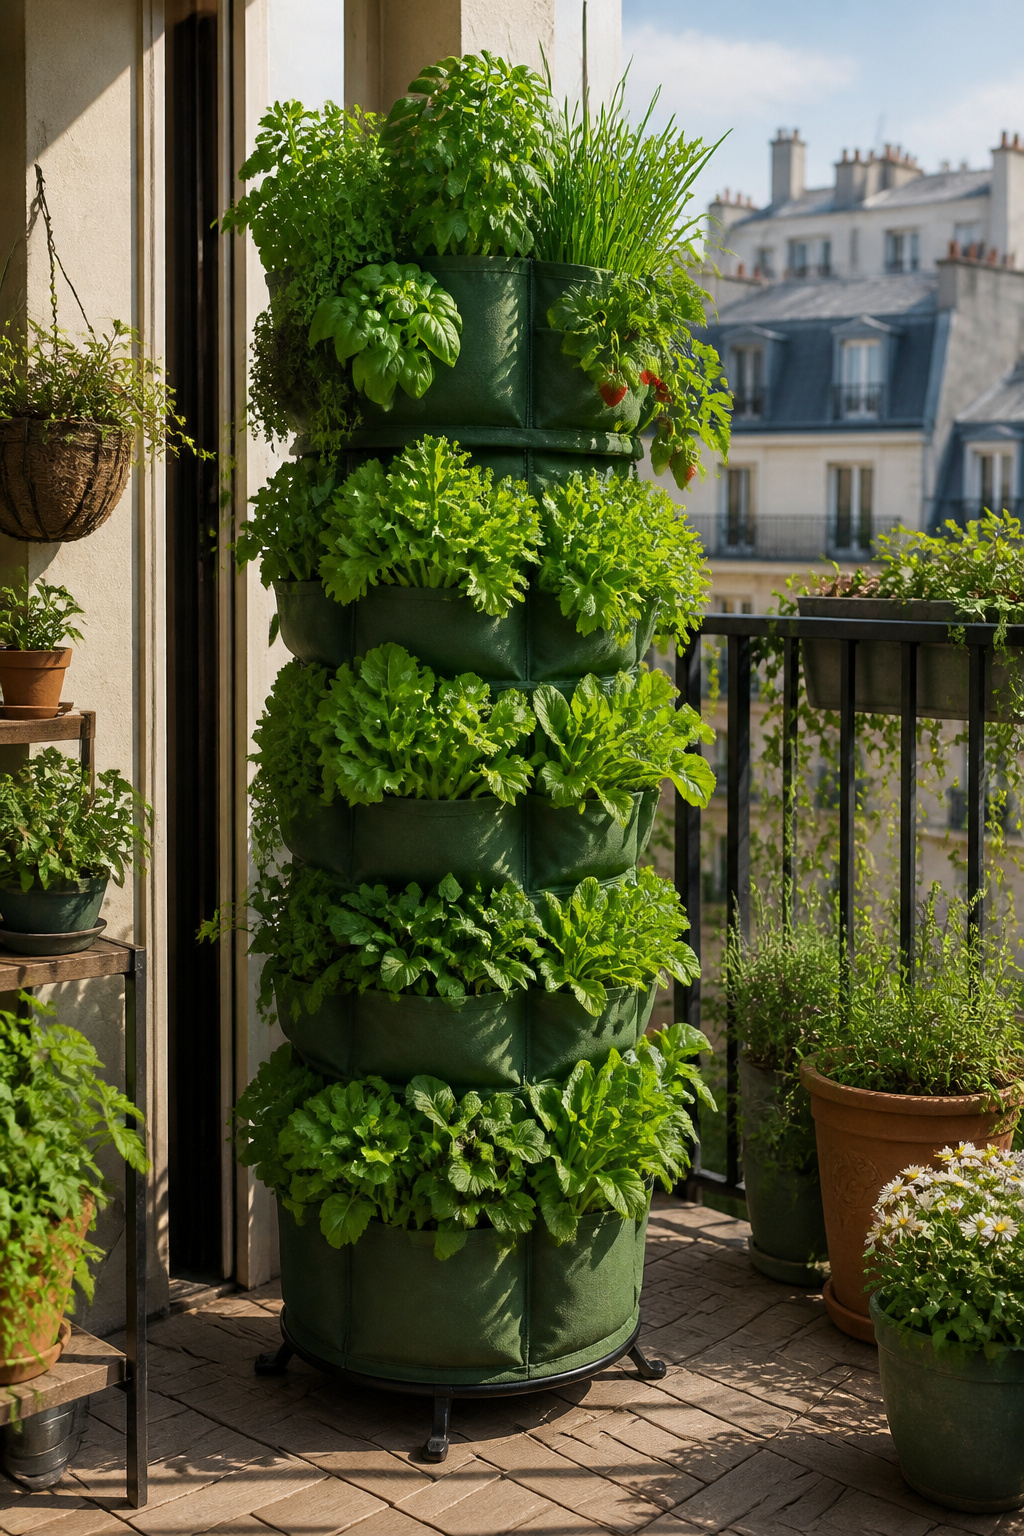
Vertical systems fall into three broad categories. Stackable pots have offset planting holes — water from the top distributes downward through each layer. Fabric pocket towers are wall-mounted or freestanding, with good airflow, excellent for herbs and strawberries. Drip-fed hydroponic column systems produce the highest yield but cost more and need regular nutrient monitoring. For most balcony growers, a fabric pocket tower at £20-40 from a garden centre is the obvious entry point. For balcony garden ideas that go beyond basic container placement, maximising green space on a small balcony covers vertical systems in depth — more options than most growers realise.
Plants that work in vertical towers share a key characteristic: shallow root systems. Strawberries, herbs (basil, chives, parsley, thyme, oregano), lettuce varieties, spinach, and shallow-rooted edible flowers all thrive. Radishes, compact alpine varieties, and even pea shoots grow well in the upper pockets of a tower. What doesn’t work: deep-rooting crops (carrots, parsnips, beets), vigorous sprawlers (courgette, climbing beans), and indeterminate tomatoes. All are too large or root-hungry for the limited growing medium per pocket.
One important practical consideration: weight. A fully planted and watered 5-tier tower can reach 25-40 kg. Check your balcony’s load rating and position towers close to structural load-bearing points rather than at the cantilevered outer edge.
7. The Thriller-Filler-Spiller Container Garden Formula
The thriller-filler-spiller framework organises containers around three plant roles: a tall focal plant (thriller), a bushy mid-layer (filler), and a trailing edge plant (spiller) that cascades over the rim. Apply it and you get visually complete arrangements from a single container. Applied to edible plants, it creates containers that are as productive as they are attractive.
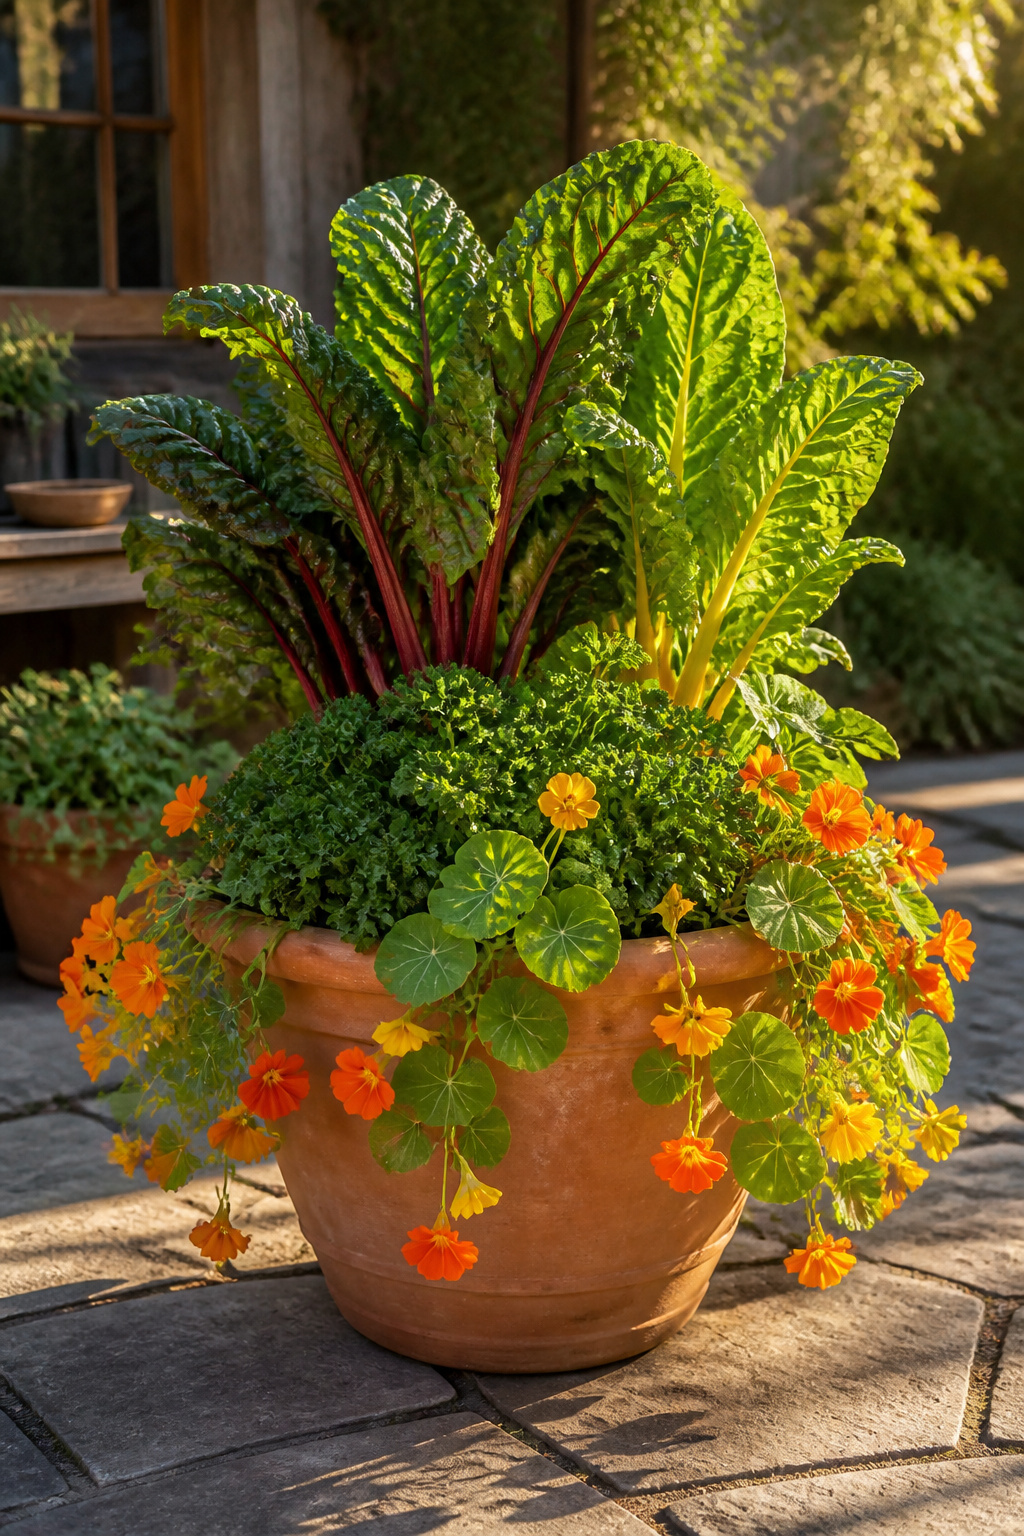
The thriller needs visual impact — height, dramatic colour, or bold form. In an edible container, rainbow chard is nearly unbeatable. The red, yellow, orange, and pink stems look ornamental throughout the season while producing a continuous harvest of nutritious leaves. Purple basil makes a striking thriller in a smaller pot. Tall kale varieties, eggplant (which produces ornamental purple flowers as a bonus), and even single sunflower plants at the back of a large container all work.
For fillers, think bushy and productive. Green basil, curly parsley, compact chive clumps, dwarf bush beans, or small lettuce varieties fill lateral space and produce steadily throughout summer. Spillers are where edible container gardens often get particularly beautiful. Trailing thyme, creeping rosemary, and nasturtiums all work — nasturtium flowers and leaves are both edible, peppery and vivid in salads, excellent on pizza. Trailing tomato varieties like Tumbling Tom cascade over the edge while producing clusters of cherry fruit.
A particularly satisfying combination for a medium container: rainbow chard in orange-gold tones as thriller, curly parsley as filler, and trailing nasturtiums in matching orange and yellow as spiller. The nasturtium flowers echo the chard stems; the colour is cohesive enough to look intentional without being contrived. It’s a container garden that prompts questions from visitors and provides dinner ingredients at the same time.
8. Root Vegetables in Deep Containers: Carrots, Beets, and Radishes
Root vegetables in containers are consistently underestimated. Most small-space growers assume root crops need long open rows of deep, stone-free ground — and they’re right about standard varieties. But containers can absolutely support root crops. The key is matching variety to available depth and getting the soil texture right.

Radishes need only 6 inches of depth and are ready to harvest in 3-5 weeks from sowing. That’s the fastest edible plant in a container by a significant margin — even faster than most microgreens. Sow them in a shallow trough, thin to 2 inches apart, and you’ll be eating them before any other container planting reaches harvest. They’re the best first crop for anyone who needs a quick win.
Beets deserve far more attention than they typically get from container growers. A container 10-12 inches deep supports most beet varieties reliably. Beets give you two crops in one: the roots (roasted, pickled, or eaten raw) and the leaves. The leaves cook exactly like spinach — tender, nutritious, excellent harvested as thinnings before the roots mature. Varieties like Chioggia and Moulin Rouge perform particularly well in 8-inch containers.
Carrots require the most attention to both depth and soil texture. Short-rooted varieties — Chantenay, Paris Market (a round variety needing only 6 inches depth), Thumbelina — are the only reliable option in containers under 18 inches. Standard-length varieties will fork and stunt. More important than depth is soil texture: dense, heavy compost creates forked roots and undersized harvests. Add 25-30% horticultural grit or sharp sand to standard potting mix. Sieve out any stones and thin aggressively to 3 inches between plants.
9. Succession Sowing for a Continuous Container Garden Harvest
The most common container gardening disappointment is the glut-then-nothing cycle. Everything matures in the same week, you harvest frantically, then there’s nothing for a month. Succession sowing solves this by staggering sowing dates so new crops reach harvest just as the previous batch is finishing.
The principle is straightforward but transforms productivity — one of the most reliable container gardening tips for getting consistent harvests. For patio gardening year-round, succession sowing is the single technique that separates an occasional hobby from a genuine food-producing system. Sow lettuce and salad greens every 2-3 weeks from early spring through early autumn. Sow radishes every 2-3 weeks. Arugula does best on a 2-week sowing cycle — it bolts quickly in warm weather, and frequent small sowings outperform a single large one. Beans and beets benefit from monthly intervals.
The container-specific challenge is space management. Once one crop finishes, the container is available for the next succession — but the compost needs refreshing. Remove the spent plants, roots and all. Then add a handful of slow-release granular fertiliser and top up with fresh compost before re-sowing. Skipping this step is the main reason second and third sowings underperform. Container compost depletes rapidly under hungry, fast-growing crops.
Tracking is simpler than it sounds. A dated lolly stick in each container, and a photo of the setup each time you sow — that’s all you need. Split a larger container in half with a small slate tile or broken pot piece. Sow one half first, then the second half three weeks later. As the first half is harvested, the second is just coming into its prime.
10. Dwarf Tomatoes and Peppers for Patio Container Vegetable Growing
Growing tomatoes in containers requires choosing the right variety above everything else. Indeterminate tomatoes — the standard tall types — grow endlessly, require constant pruning and tying, and produce unpredictably in a confined root zone. Determinate (bush) and compact varieties stop growing at a defined height. They set all their fruit within a predictable window and ask far less of the container grower.
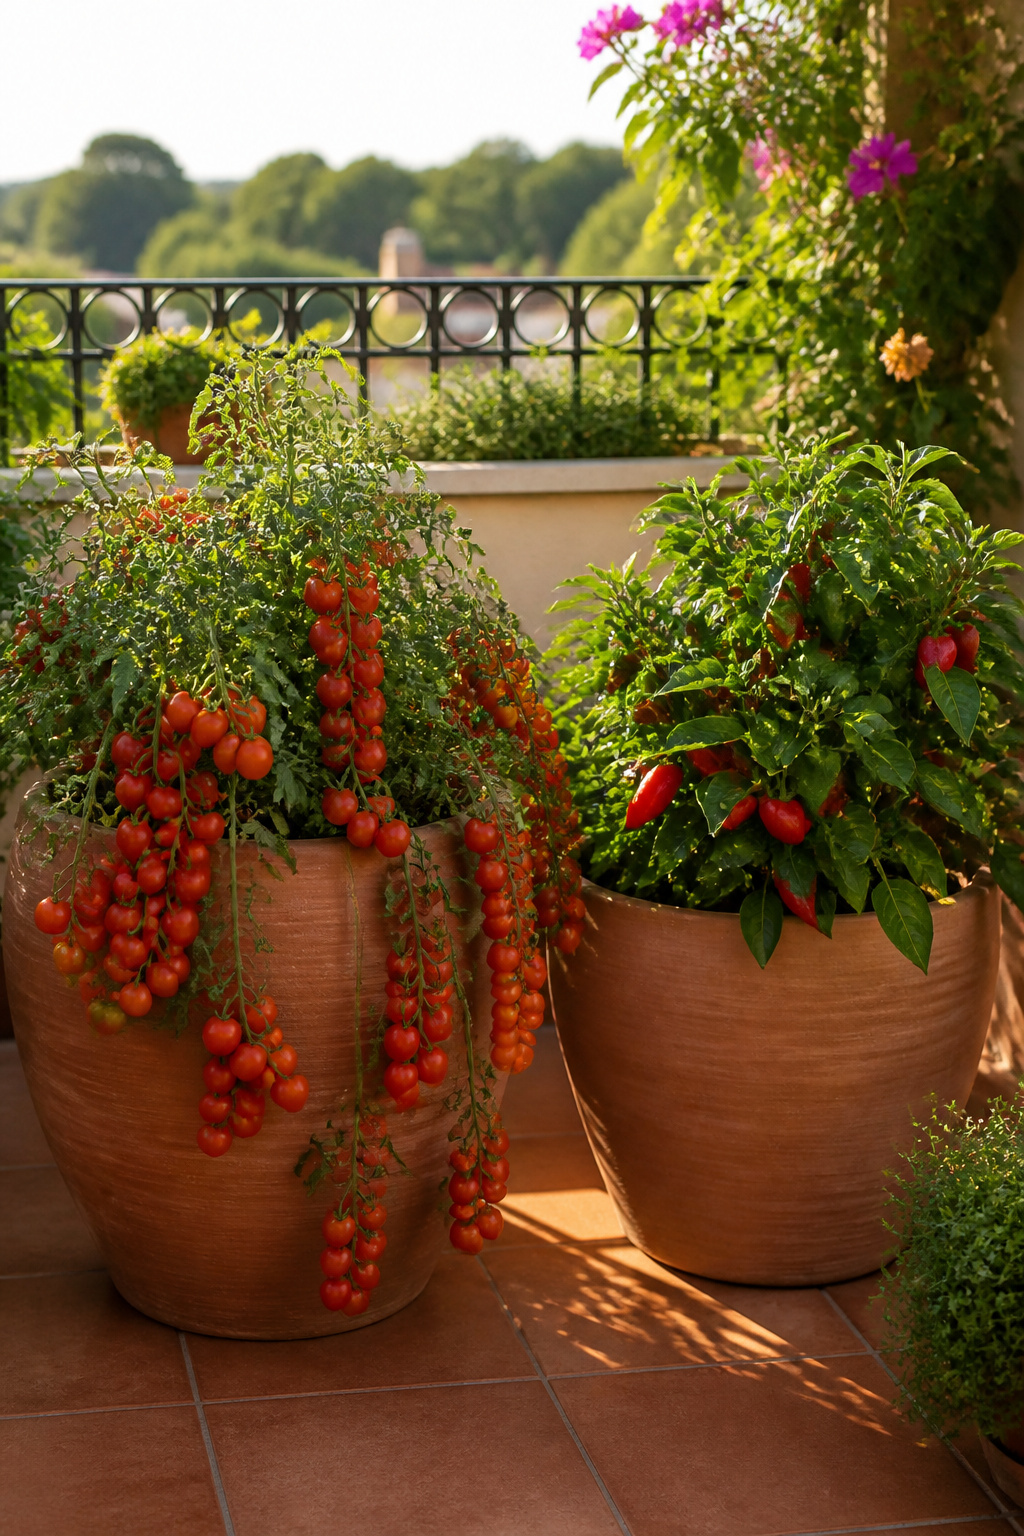
Tumbling Tom is probably the best-known container tomato — trailing stems laden with cherry tomatoes that cascade over the rim, no staking required, one plant per 25cm hanging basket. Balconi Red and Balconi Yellow stay under 30cm tall and produce dense clusters of cherry fruit from a medium pot throughout summer. Losetto offers strong disease resistance alongside good fruit size — valuable in cooler, damper climates where late blight pressure on outdoor tomatoes is high.
For compact peppers, Mohawk (sweet, stays under 45cm, prolific) and Pot-a-Peno (a genuine jalapeño bred for 25-30cm container growing) both perform well in 10-litre pots. Growing a jalapeño on a balcony gives a particular kind of satisfaction — most people assume it needs a full greenhouse.
Container size matters: the minimum for tomatoes is 5 gallons (approximately 20 litres). Smaller containers create drought stress that’s hard to recover from at height. Containers of 30 litres or more give roots proper space and improve yield significantly. Start weekly high-potassium liquid feeding (Tomorite, Phostrogen) once the first flowers appear. Potassium drives fruit development; high-nitrogen feeds after flowering push leaf growth at the expense of fruit. Consistent watering prevents blossom end rot — a self-watering container is by far the most effective prevention.
11. Strawberries in Hanging Baskets and Tiered Planters
Strawberries have a particular magic in container growing. They produce fruit in the first season. They look beautiful in flower and at harvest. And in a hanging basket, they’re safely above the slugs and snails that ruin ground-grown strawberries every June. The variety choice determines everything about the experience.
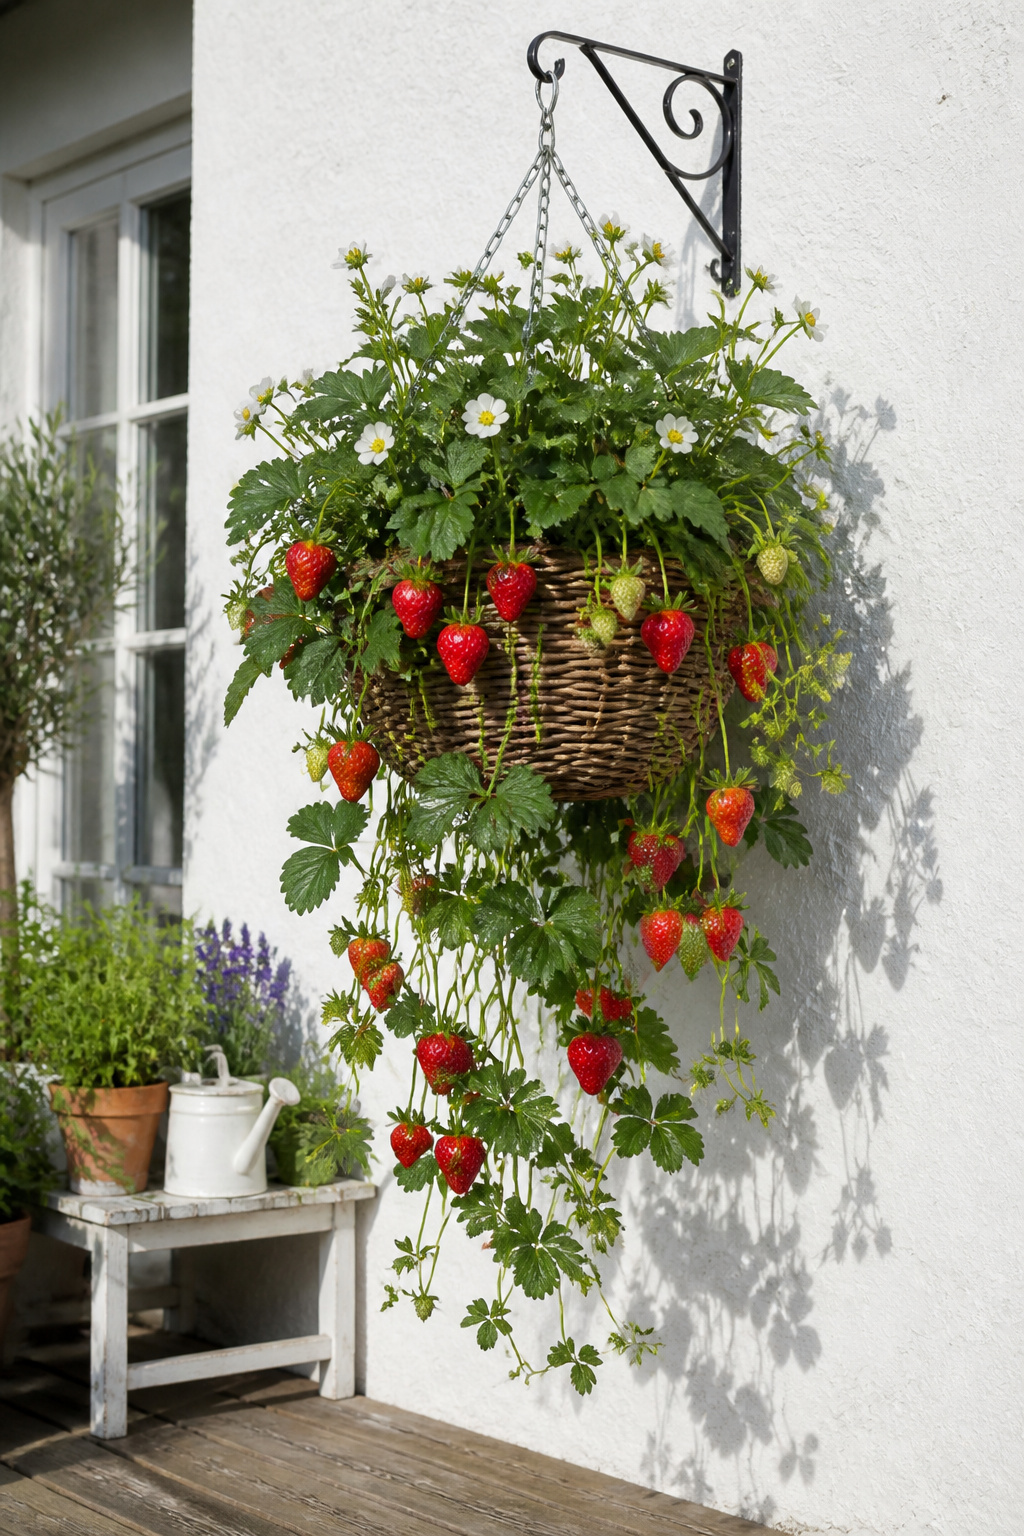
June-bearing (traditional) varieties produce one large crop in early summer, then nothing until next year. That’s not useful in a container garden where space efficiency across the full season matters. Everbearing varieties produce two or three harvests per season — late spring, midsummer, and often a third flush in early autumn — with sporadic berries between flushes. These are the best choice for container productivity. Alpine strawberries (Fragaria vesca) produce small, intensely sweet berries continuously from late spring through autumn. They tolerate partial shade better than other types and produce no runners at all — the lowest-maintenance option for a windowsill or north-facing balcony.
Container sizing: at least 12 inches wide and 8-10 inches deep to accommodate root growth. Many hanging baskets are already this size, which is why strawberries suit them so naturally. For tiered planters, each pocket needs roughly 2 litres of growing medium per plant.
Remove all runners from container-grown strawberries. Runners are the long stems that root into adjacent soil to produce new plants. In an open garden this is useful for propagation, but in a container it directs energy away from fruit production. Pinch them off as they appear throughout summer, and your plants will produce noticeably more berries. After two years, container strawberry production declines — replace plants with new runners or buy fresh stock for consistent yields.
12. Dwarf Fruit Tree Container Garden for Small Outdoor Spaces
A container fruit tree occupies a different category from anything else in this list. It asks for patience — years, not weeks. But it delivers something no other container plant can: a tree-scale harvest from a pot you can move, overwinter, and take with you when you leave. The portability is perhaps the most underappreciated feature.
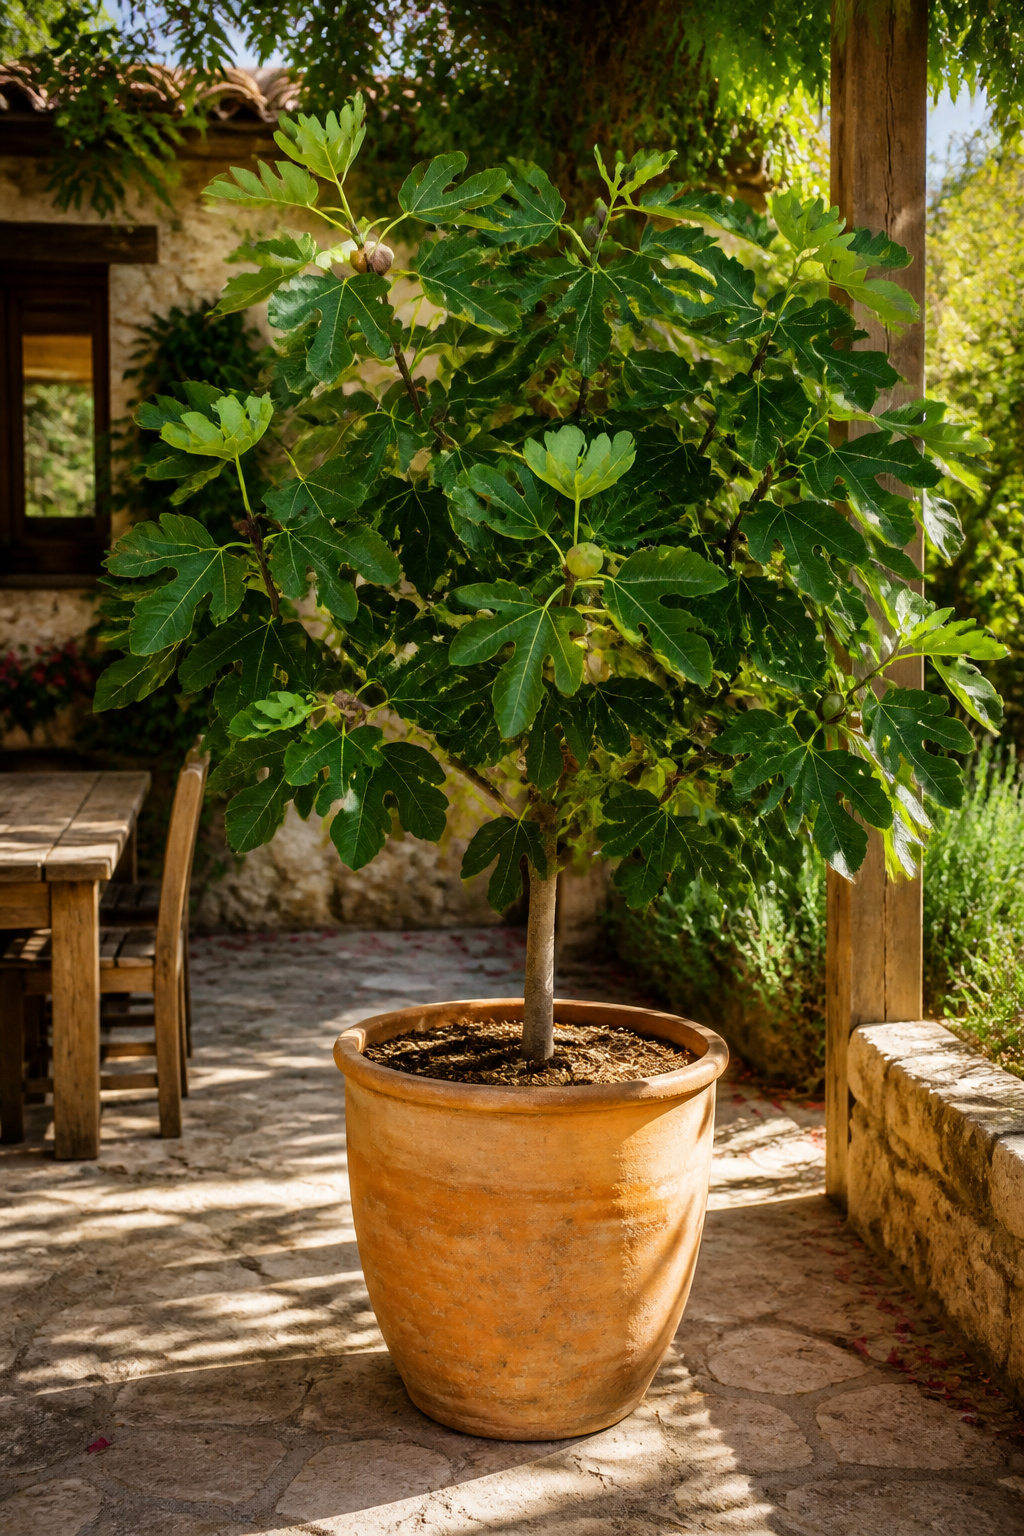
Fig trees make the best argument for starting with container fruit growing. Unlike most fruit trees, figs actually perform better in containers than in open ground, because root restriction triggers more prolific fruiting. This is not gardening folklore — it’s a well-documented fig physiology response. Historically, fig trees were grown in bottomless containers or paved courtyards specifically to limit root run. Violette de Bordeaux and Brown Turkey are the most container-reliable varieties; both are cold-hardier than many figs and produce crops reliably in temperate climates.
Meyer lemon is the best entry-level container fruit tree for temperate climates. It’s self-fertile (no need for a second tree), capable of fruiting from a 5-gallon pot, tolerant of indoor conditions over winter, and nearly continuously productive in a warm enough position. Bring it inside to a light, cool, frost-free space from late autumn through spring and it will reward the effort with persistent fruit.
Container sizing: start young trees in 15-20 litre pots and graduate to 25-50 litres as they establish. In autumn, wrap the container with hessian or bubble wrap. Container roots are exposed to frost from all sides and can freeze at temperatures that wouldn’t trouble ground-grown roots. Top-dress annually in spring by removing the top 5-8cm of old compost and replacing with fresh compost and slow-release granular fertiliser.
13. Aquatic Container Garden: Water Plants in Half-Barrel Ponds
The aquatic container garden is the most surprising item on this list, and consistently the one that generates the most response from visitors. A half-barrel pond on a patio — wooden whiskey barrel or galvanised trough lined with a pond liner — requires no plumbing and about one afternoon to set up. No professional installation needed. Within weeks, it attracts frogs, dragonflies, and beneficial insects to your outdoor space.

The setup is straightforward: if using a wooden barrel, fit a preformed plastic liner to prevent any chemical leaching from the wood. Add a planting shelf — a brick or inverted pot — at 2-4 inches depth for marginal plants. Position deeper planting baskets at 6-12 inches below the surface for a dwarf water lily. Nymphaea ‘Pygmaea Helvola’ is the most reliable choice: cream-yellow flowers, leaves only 2-3 inches across, comfortable in 6-18 inches of water. It needs 4-6 hours of direct sun to flower reliably.
Pair the water lily with a marginal plant on the shelf. Marsh marigold (Caltha palustris) flowers vivid yellow in early spring before anything else is in bloom. Water mint spreads attractively at the water surface; yellow flag iris adds height and structure. Add an oxygenating plant — hornwort or water starwort — to reduce algae and keep the mini-ecosystem balanced.
Mosquito control is simple: Mosquito Dunks (BTi biological bacteria tablets) dissolved in the water kill mosquito larvae without affecting any other wildlife. Alternatively, a small solar-powered fountain pump creates surface movement that discourages egg laying entirely — mosquitoes only breed in still water.
14. Microgreens and Sprouting Setups for Year-Round Indoor Growing
Microgreens are the container growing method that makes the most sense for anyone without outdoor space. A single 10×20-inch growing tray occupies less than 0.2 square metres and delivers 4-8 ounces of fresh greens in 7-14 days. Set one up on a kitchen counter or shelving unit and you’re already growing. Three trays staggered at weekly intervals produce enough for daily use year-round, in roughly the footprint of a laptop bag.
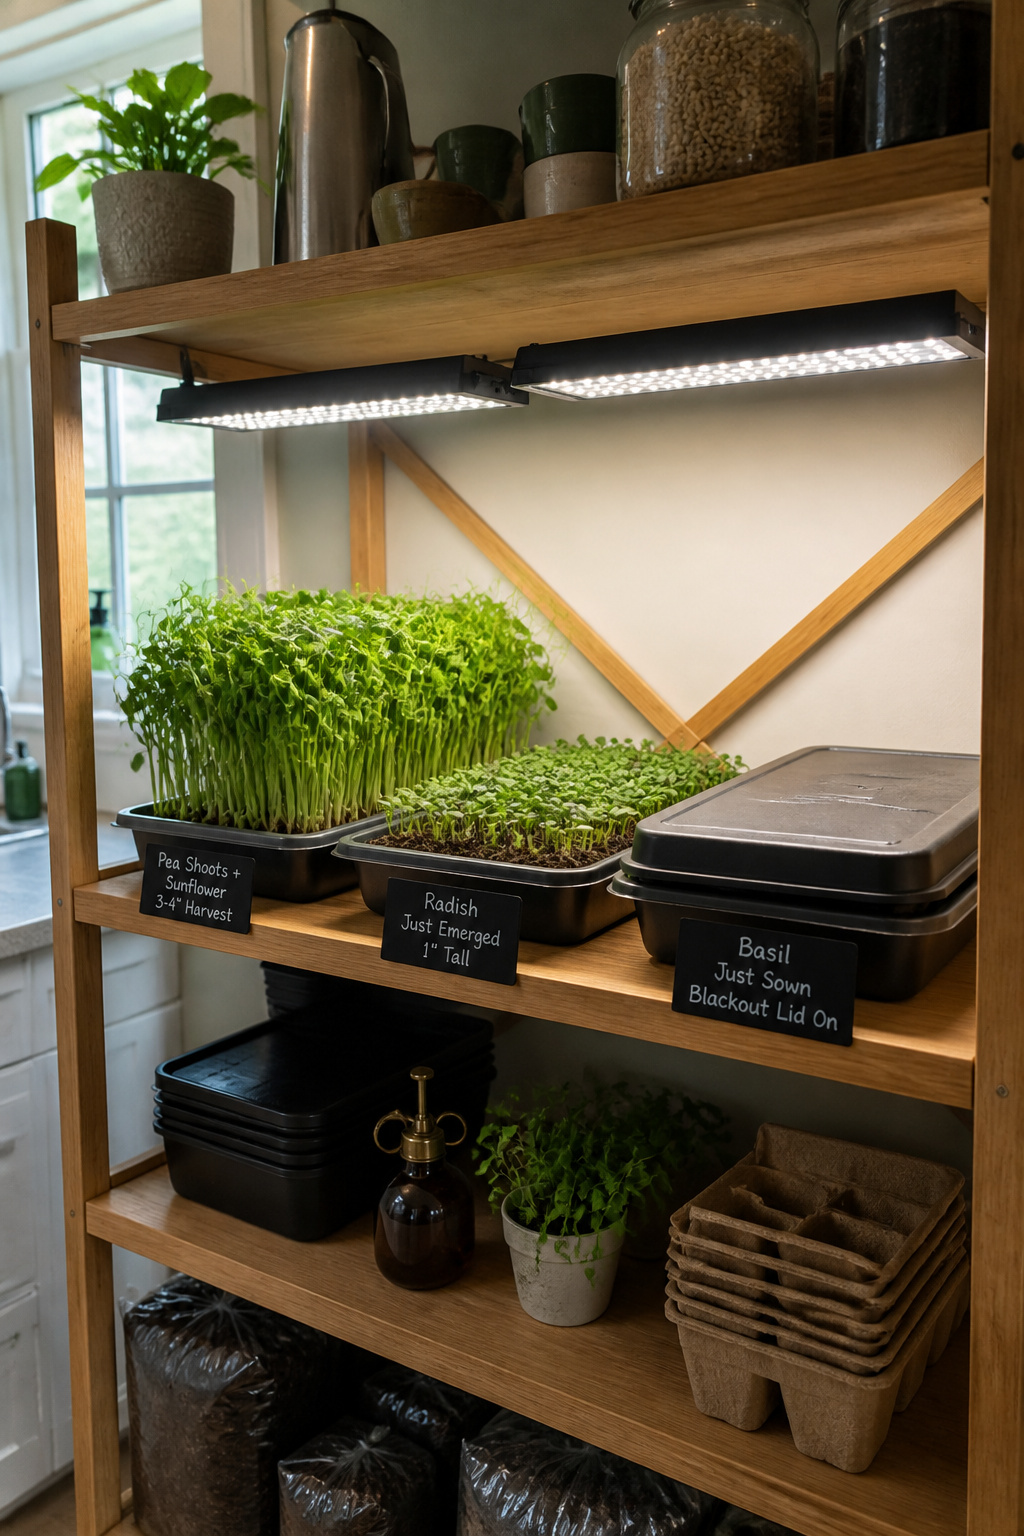
The nutritional case for microgreens is also compelling: these tiny seedlings harvested at the cotyledon stage contain 4-40 times the nutrient density of their equivalent mature vegetables. Radish microgreens reportedly contain 40 times the vitamin E of mature radish. Broccoli microgreens are exceptionally high in sulforaphane. Kale microgreens contain five times more glucosinolates than mature kale. Whether the long-term dietary impact of this density differential is meaningful is debated, but they are unquestionably fresher than anything sold in a supermarket.
The fastest crops — radish, mustard, arugula — harvest in 7-10 days. Pea shoots and sunflower shoots take 12-14 days but are among the most universally popular flavours. Pre-soak larger seeds for 8 hours before planting for faster germination. The growing setup is simple. Use a 10×20-inch tray with 2 inches of seed-starting compost. Sow seeds densely — touching is fine for most varieties — then place a second tray on top as a blackout lid until germination.
Lighting: full-spectrum LEDs at 5000-6500K positioned 6-12 inches above the trays for 12-16 hours per day. Three 20-watt LED shop lights per shelf is the commercial growers’ standard. It’s affordable, effective, and produces excellent results without the heat or electricity cost of older grow-light technology.
15. Community Container Garden Planting for Shared Terraces and Courtyards
If you have a shared outdoor space — a courtyard, terrace, roof garden, or communal area — a community container garden scheme might be the most productive idea on this list. It’s certainly the most socially rewarding. The container model suits shared spaces well. No ground-breaking required — it works on concrete and decking, rearranges without permanent ground works, and lets individual participants take ownership of specific containers.
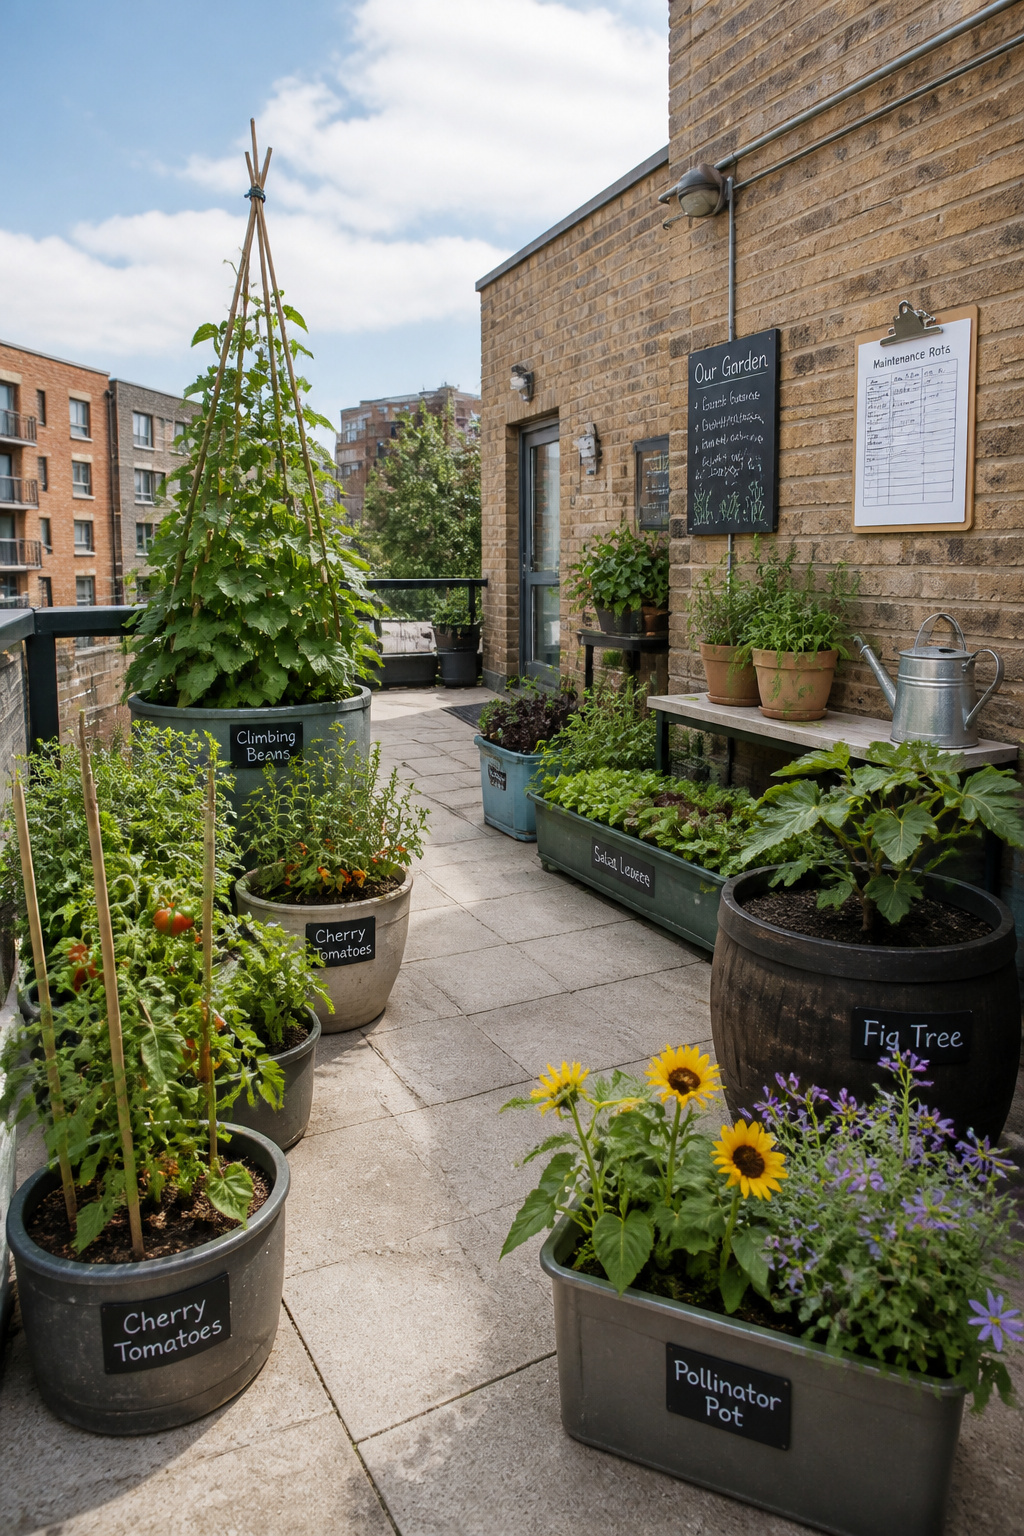
The operational structure matters more than the horticultural choices. Two models work at small scale. Individual allocation — where each participant owns and maintains their own labelled containers — keeps things simple and conflict-free. Cooperative sharing builds stronger community bonds but requires more communication and trust. For a first season with 3-5 participants, individual allocation is more likely to succeed. Once habits are established, a cooperative model in year two is natural.
A maintenance rota prevents the most common shared-garden failure mode: the ‘who watered it last’ spiral of neglect. Post the watering schedule on a group chat, rotate weekly, and establish a clear escalation (ask before assuming someone else will cover). Keep the plant choices forgiving: climbing beans (prolific, dramatic, easy), cherry tomatoes in self-watering containers, and cut-and-come-again salad greens. Also add a shared herb container — rosemary, thyme, sage — that all residents can help themselves from.
Plant Choices for Shared Schemes
Include one ornamental pollinator pot — a large container of sunflowers and borage — that blooms visibly and makes the communal space feel alive even between harvests. The best examples of community outdoor growing spaces share this quality: they look intentional and cared-for, which makes everyone more likely to invest. A garden that looks good generates investment; a collection of green plastic pots in various states of health generates arguments.
Choosing the Right Container Garden Approach for Your Space
The most useful question is not which container garden is the most impressive, but which one suits the space, time, and experience level you actually have. A single container, consistently cared for, teaches more about growing than ten neglected ones. And it’s more satisfying than any project that outlasts your available attention.
Start by mapping your constraints honestly. Windowsill only: herbs and microgreens are your primary options, with a small salad trough if you have a south-facing exposure. A small balcony: add a self-watering container of tomatoes, a vertical tower for herbs and salad, and a pollinator pot. A larger terrace: the full range becomes available, including root vegetables, a barrel pond, dwarf fruit trees, and a community planting scheme.
Time investment matters too. Microgreens need five minutes daily but deliver results within days. A windowsill herb container needs a few minutes every second day. A dwarf fruit tree asks almost nothing during the growing season but requires thoughtful care through the year. Match the time commitment to your genuine availability, not your aspirational availability.
If you’re just starting out with urban gardening ideas, a cut-and-come-again salad trough is the single best first container. It’s forgiving, fast, and builds the daily checking habit that underpins all successful container growing. Add a self-watering planter with cherry tomatoes as a second step. The quick returns from the salad, combined with the seasonal satisfaction of a tomato harvest, cover the full range of what small space gardening can feel like. From there, the rest of this list is just a menu of pleasant decisions.


