Tile is the one decision in a bathroom renovation that outlasts everything else you’ll choose. The fixtures trend. The paint gets repainted. But the tile stays — for ten, twenty, thirty years — quietly shaping how the room feels every morning. That permanence is exactly why bathroom tile designs deserve the kind of deliberate thought a Japanese designer would give to placing a single stone in a garden. The wrong choice doesn’t announce itself immediately. It reveals itself slowly, over years, in a persistent low-level irritation you can’t quite name.
These 18 bathroom tile designs range from porcelain slabs that eliminate grout lines almost entirely to handmade zellige tiles where no two pieces are identical. The selection spans material types, budget ranges, and aesthetic approaches — so what you’ll find here is a set of genuinely different answers, not variations on a theme. Understanding why each design works — the technical principle, the visual logic — matters more than the surface inspiration. That understanding makes the difference between a tile choice you’ll still love in year twelve and one you’ll be replacing by year four.
1. Large Format Porcelain Slab Bathroom Tile Designs
In Japanese residential design, the concept of ma — the space between things — is treated as a design element in its own right. Large format porcelain tile applies that principle directly. Fewer grout lines means more of the material, less of the grid, and a surface the eye can actually rest on.

The technical specifications matter here more than with any other tile type. Substrate flatness must not vary more than 1/8 inch in ten feet. Large slabs telegraph every subfloor irregularity in a way smaller tiles never would. The mortar must be LHT-rated (large and heavy tile) with back-buttering to achieve 95-100% coverage. This eliminates the air pockets that create hollow spots and eventual cracking under foot traffic. Weight is a real consideration. At 10mm thickness, large format porcelain runs approximately 25-27kg per square metre. Structural engineer sign-off may be required for upper-floor installations.
Choose sizes based on your room proportions. 600x600mm is the practical threshold for a compact bathroom. 1200x600mm starts requiring two-person handling; 1200x1200mm and above is professional territory. Use rectified tiles — precision-cut to ±0.3mm after firing — so grout joints can run as narrow as 1-2mm. They approach invisible at that width. Set out from the room’s centre, not from a corner. Use a laser level rather than chalk lines. Every deviation in alignment accumulates across a large tile run in a way that smaller tiles simply forgive.
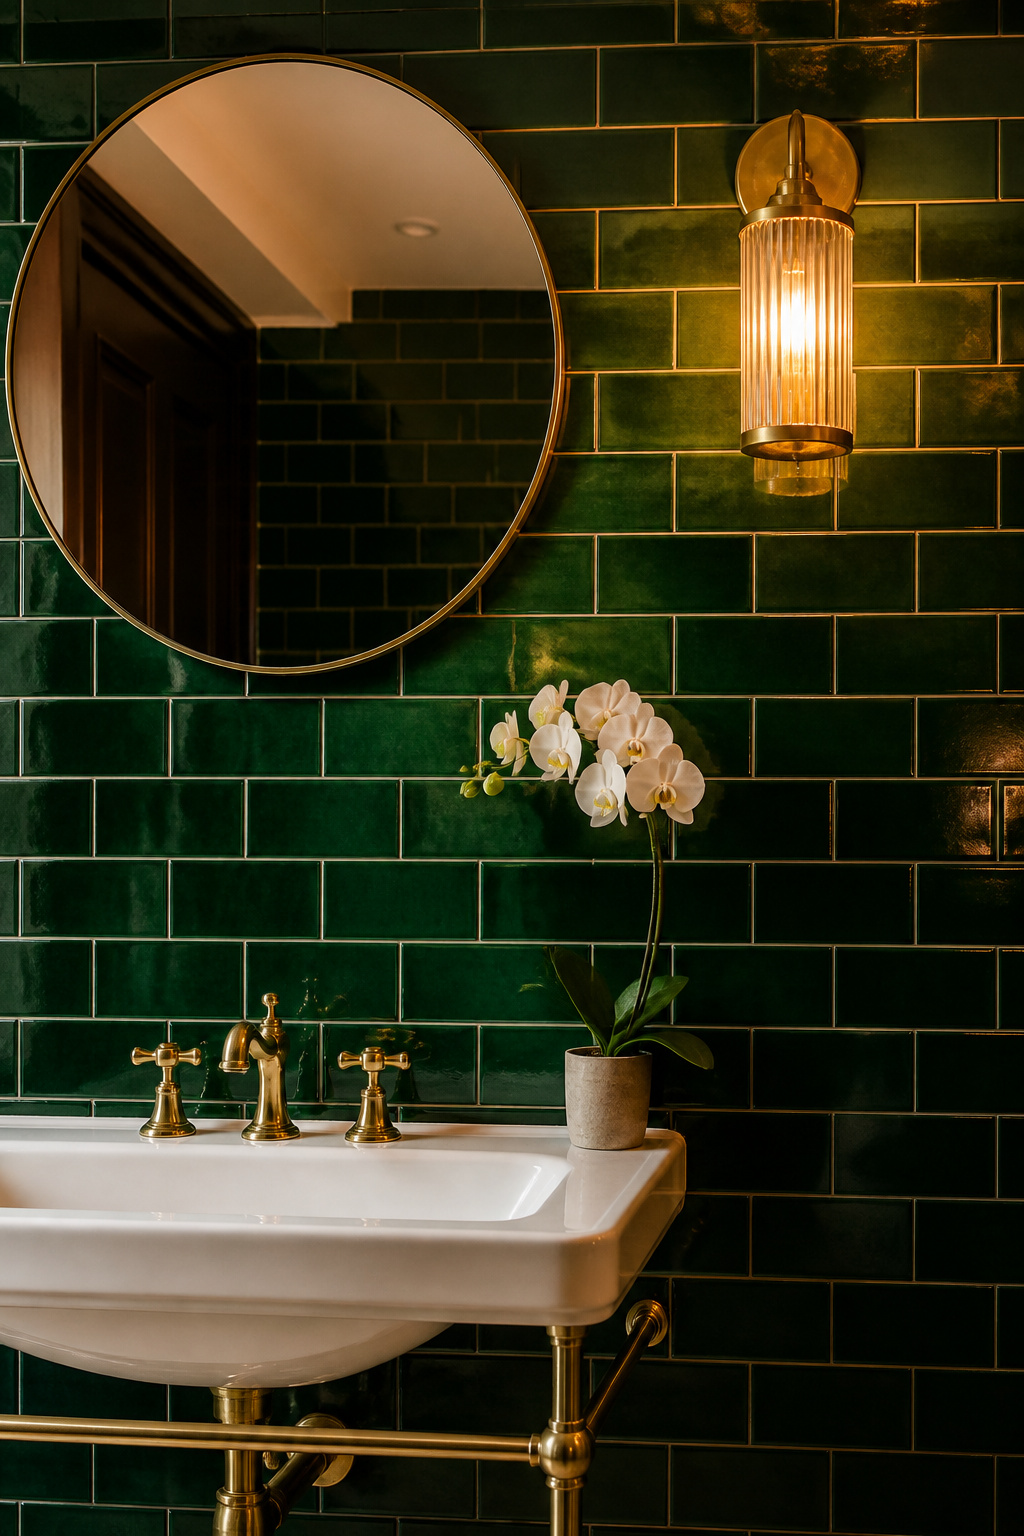
2. Zellige Moroccan Wall Tiles for an Artisan Shower
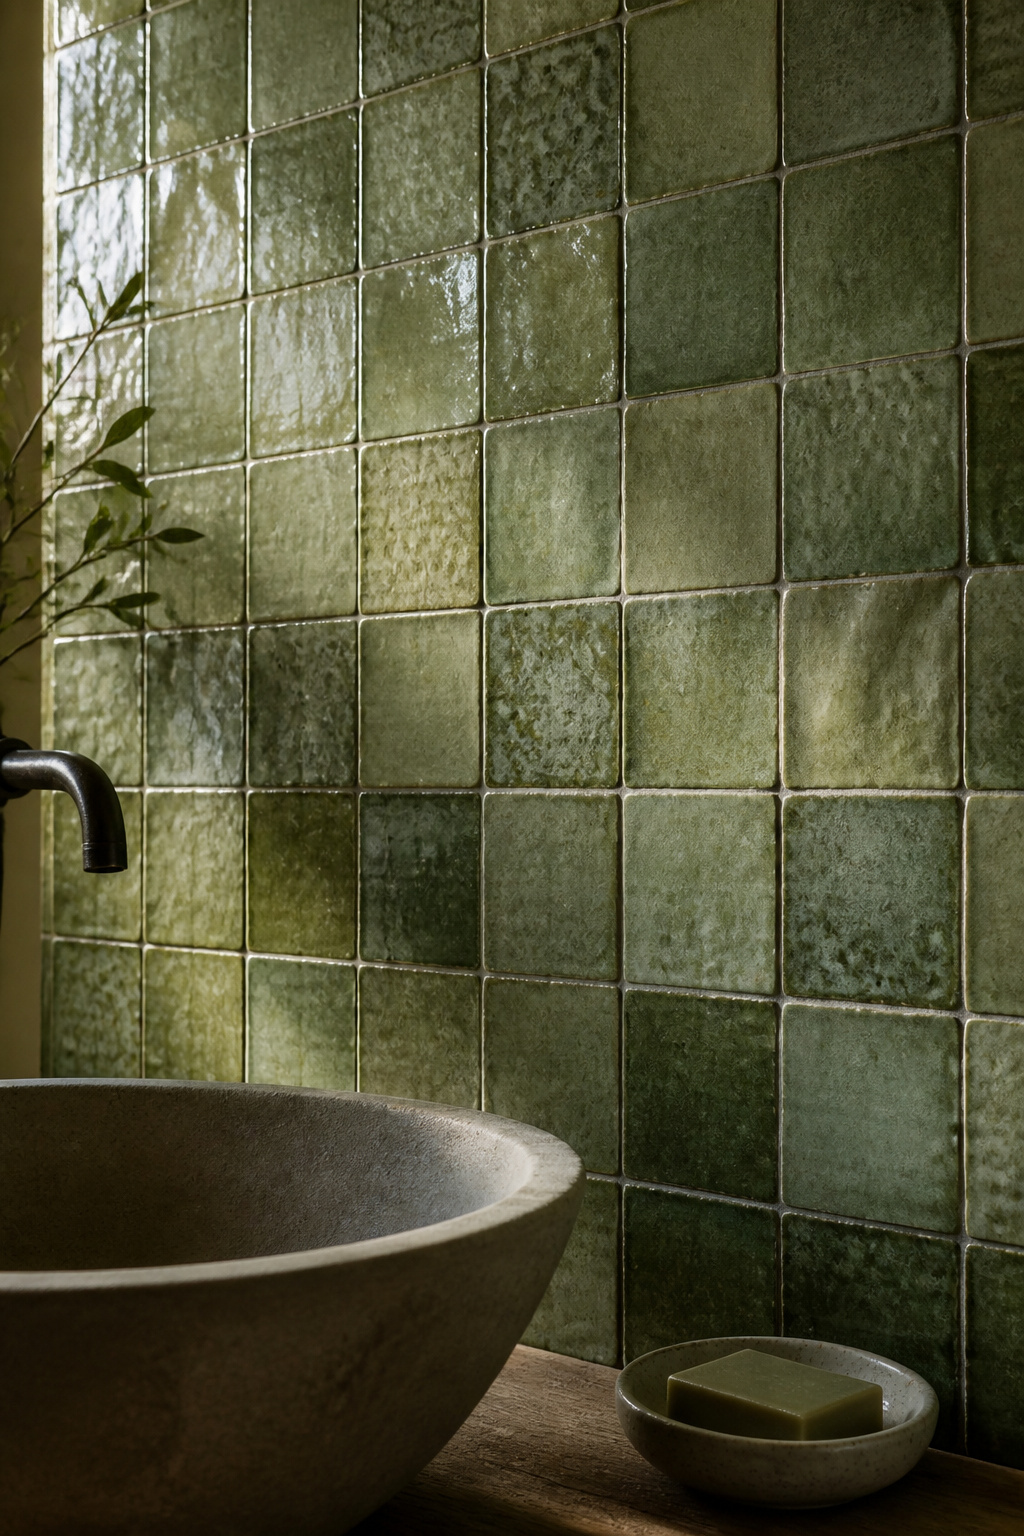
There is a particular quality of light that appears only in rooms finished with zellige — a shifting, jewel-like shimmer. The tiles are simultaneously the same colour and not the same colour. No two pieces are identical. Each one is hand-cut from Moroccan clay (Fassi clay, from the region around Fes), glazed individually, and fired at a lower temperature than industrial ceramic. The result is a variation in colour depth, surface texture, and edge profile that mass-produced tile — including the many ‘zellige-effect’ ceramic ranges now on the market — cannot replicate.
Glazed zellige is suitable for wet areas including shower walls. Its glaze layer is non-porous. Soak glazed zellige tiles in room-temperature water for 1-2 minutes before installation to remove dust and improve the adhesive bond. Mix tiles from all boxes before laying. Open and shuffle every box so colour variation distributes naturally across the wall, rather than clustering dark tiles in one patch and pale tiles in another. Grout joint width will vary between 2-5mm from tile to tile, and this is not an error: it is the honest expression of the material. If you want the artisan quality of zellige but need consistent joints, you have chosen the wrong tile. For the particular pleasure of bathroom shower tile ideas with more predictable installation parameters, glazed ceramic in a zellige-inspired format may be a better fit.
One critical note on ordering: add 15% overage and place a single order for the entire project. Zellige batches are not repeatable. An add-on order will arrive from a different firing with different colour character, and matching them after the fact is essentially impossible.
3. Vertical Stacked Bond Subway Tiles in a Japanese-Inspired Bathroom
Of all the bathroom tile designs that use subway tile as their base material, the stacked bond is the most underused and the most effective. Subway tile in brick offset is familiar to the point of invisibility. The stacked bond — tiles aligned directly above each other, no offset — is the same material doing something entirely different. The running bond draws the eye horizontally along staggered joints. The stacked bond creates a vertical column structure instead — extending perceived ceiling height and reading with formal, deliberate precision.
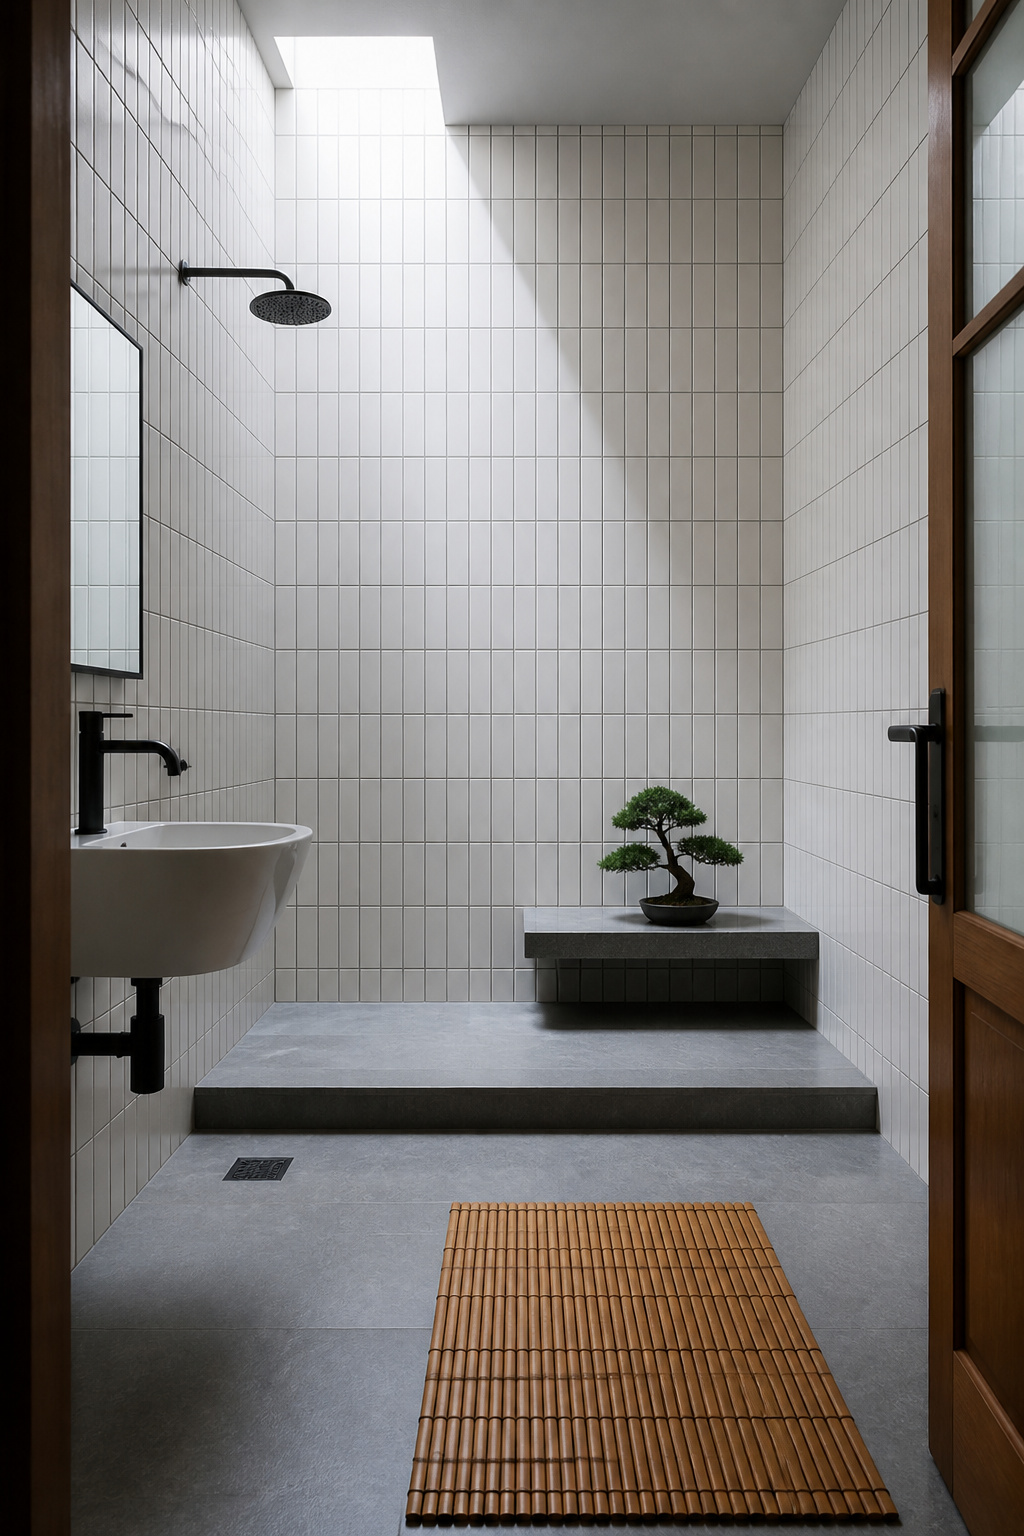
This is not a casual bathroom tile design variation. Japanese sento bathhouses historically used wall tile in vertical column arrangements — a historical precedent that the contemporary design world has rediscovered. For a bathroom that is genuinely trying to achieve a calm, uncluttered atmosphere, the stacked vertical grid supports that intention. The meandering brick offset quietly undermines it.
The execution demands more precision than standard offset. There is no stagger to mask dimensional variation, so any slight misalignment in the vertical joint becomes immediately visible. Use rectified tiles only — non-rectified tile in stacked bond will show the dimensional variation as a mistake rather than an inherent quality. At 100x200mm in a matte or satin white glaze, the stacked bond brings a Japanese bathhouse quality to a contemporary bathroom. No other design intervention is required. Keep joints to 2-3mm. Keep grout to a matching or near-matching white. Let the format carry the design.
4. Pebble Floor Bathroom Tiles for a Natural Spa Effect
The sensation of standing barefoot on natural river pebbles is unlike anything a flat tile produces. Each step engages a different part of the foot, in a light reflexology effect that connects — without overstating it — to Japanese foot bath tradition. The pebble shower floor is the most tactilely honest bathroom tile design on this list.
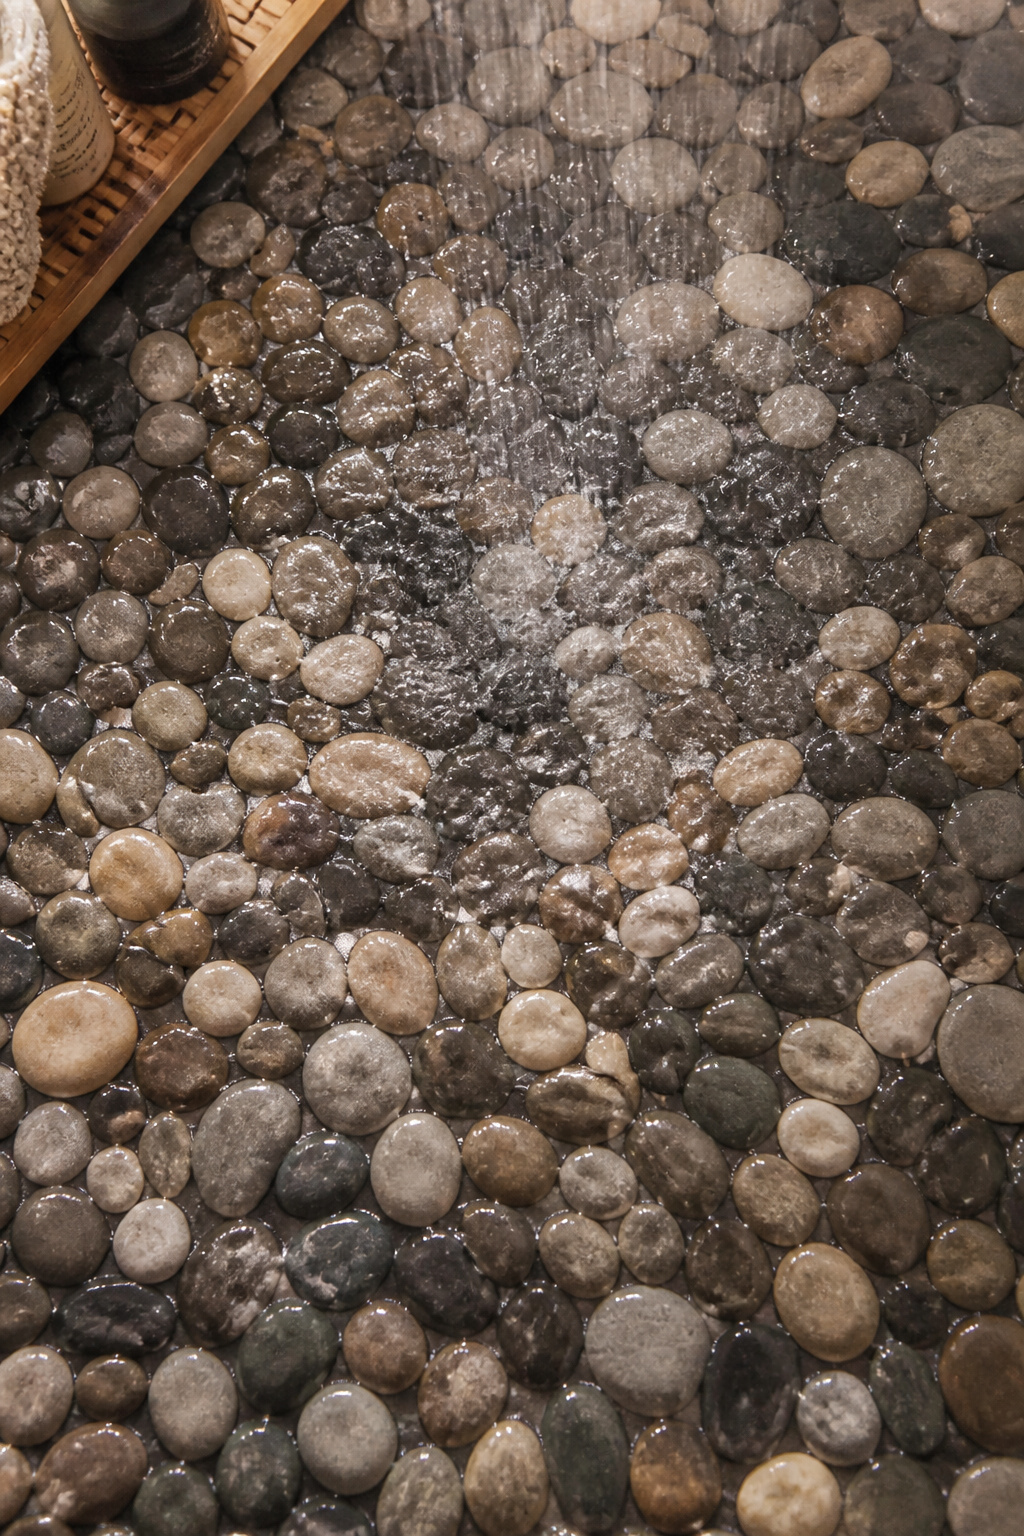
Natural river pebble tiles arrive mounted on 300x300mm mesh backing sheets. This makes installation manageable and allows the mesh to conform to the shower’s drainage slopes. Work from the back of the shower forward toward the drain, maintaining a minimum 1/4-inch-per-foot slope throughout — water sitting in depressions behind the drain is the source of most pebble floor maintenance problems. For grout, epoxy is the correct answer. It is waterproof, stain-proof, mould-resistant, and never needs sealing — which matters enormously given the number of grout joints a pebble floor contains. Standard white cementitious grout in a pebble shower floor will be grey within three months. This is one place where the additional cost of epoxy grout is not optional.
Sliced pebble tile — pebbles cut in half to present a flat face with a natural stone perimeter — is a reasonable compromise for households with elderly members or young children where the uneven natural pebble surface is a stability concern. It retains the visual character of natural stone. The underfoot sensation is simply firmer.
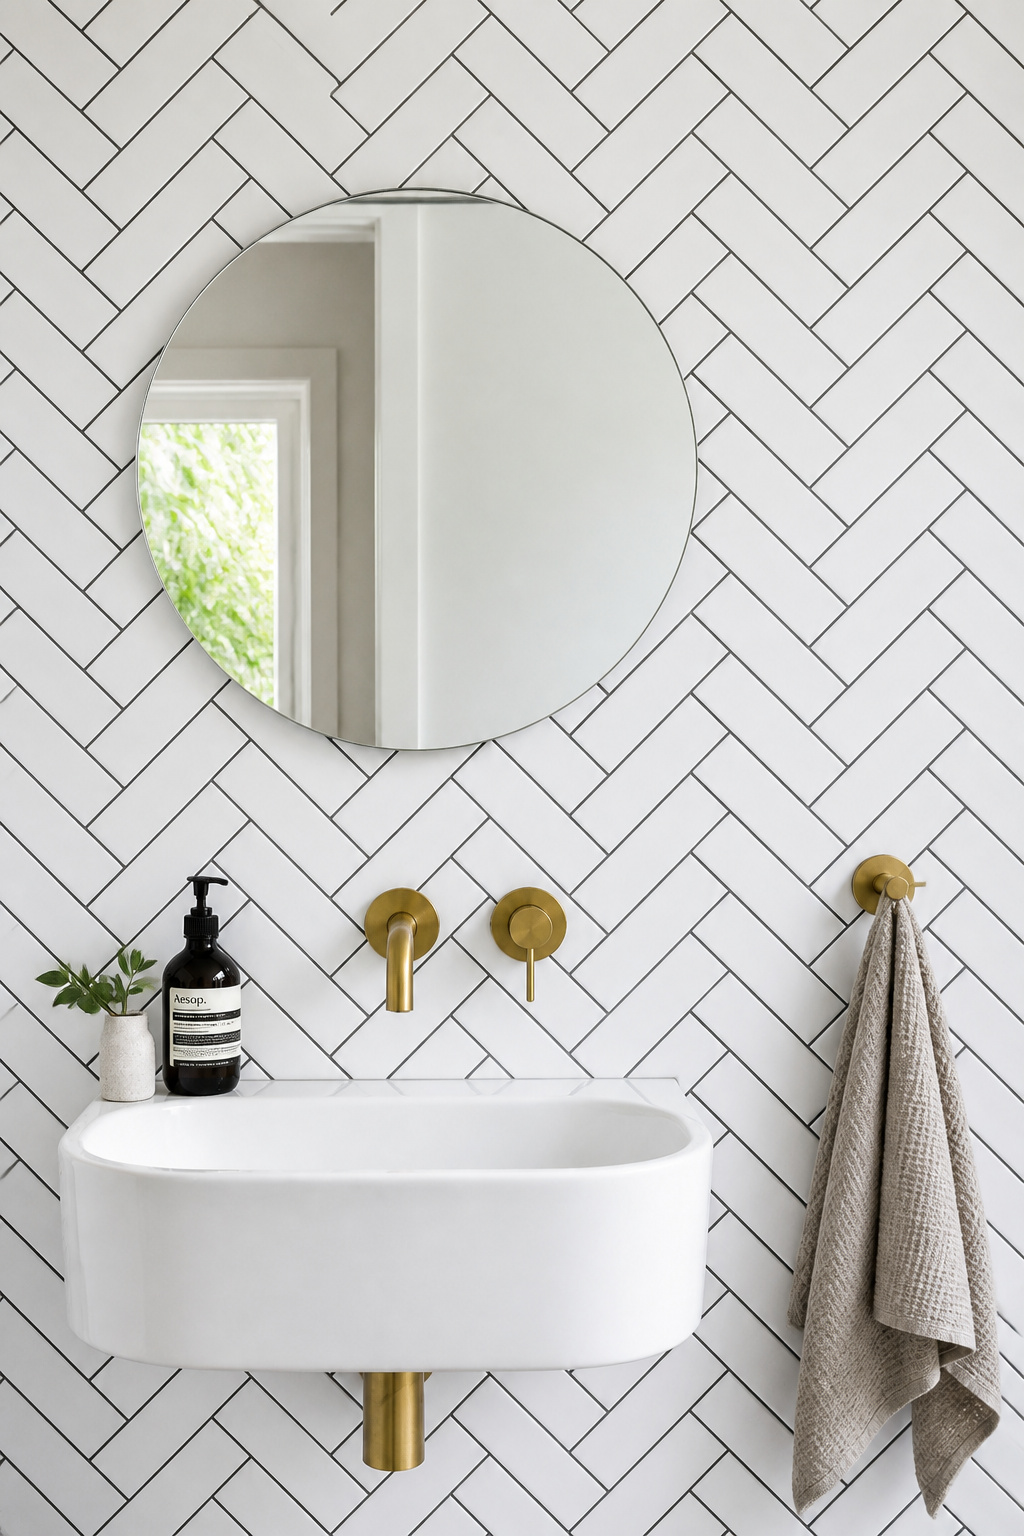
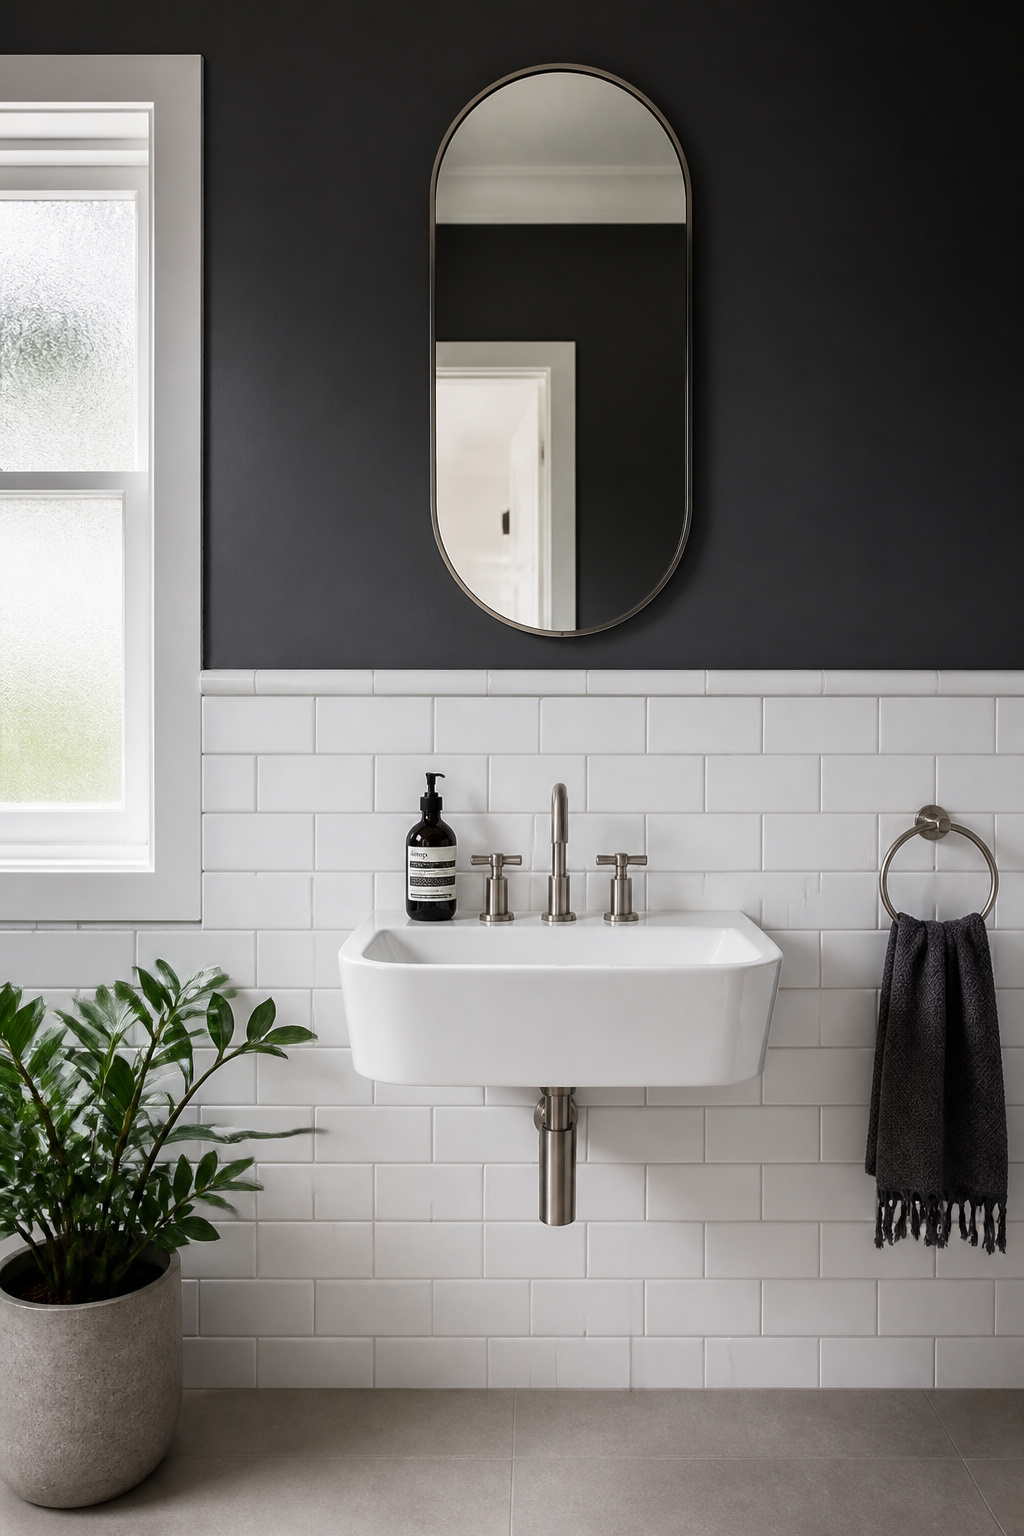
5. Herringbone Pattern in White Subway Tile for a Timeless Bathroom
Herringbone is the bathroom tile design that most consistently makes designers pause before recommending a replacement. The pattern traces to Roman mosaic floors and has appeared continuously in interior design across every era since. The reason it survives every trend cycle is structural: the 45-degree V-shape creates visual movement without committing to a clear directional bias. In a narrow bathroom, herringbone laid horizontally makes the wall feel wider. In a low-ceiling bathroom, laid vertically, it extends perceived height. It is one of the few decorative patterns that does actual spatial work.
Order 15-20% more tile than your measured area. Every tile that meets a perimeter wall requires a 45-degree cut. Those triangular off-cuts cannot typically be reused elsewhere. This is not the waste allowance you add to be safe — it is a mathematical consequence of the pattern that experienced tilers will confirm before you start. Set out from the centre of the largest surface, not from a corner, and mark your 45-degree reference lines with a chalk line checked against a set square before any mortar goes down.
Grout colour is the design decision that determines whether herringbone reads as pattern or texture. White tile with matching white grout: the pattern is subtle, present as texture but not graphic. White tile with charcoal grout: the herringbone becomes the dominant feature of the room. The latter requires perfectly consistent joint widths — any variation in the joint width is sharply visible against a dark background. If you want the graphic version, use rectified tile and an experienced installer.
6. Terrazzo Bathroom Tile Designs for Retro-Modern Style
Terrazzo featured in nearly a third of bathroom vignettes at the 2025 Architectural Digest Design Show — not as a retro reference but as a contemporary anchor material. The shift is worth understanding: terrazzo is no longer being used as a nostalgic callback to 1950s terrazzo floors. It is being used as a serious surface material in its own right, on floors, shower walls, and integrated sinks.
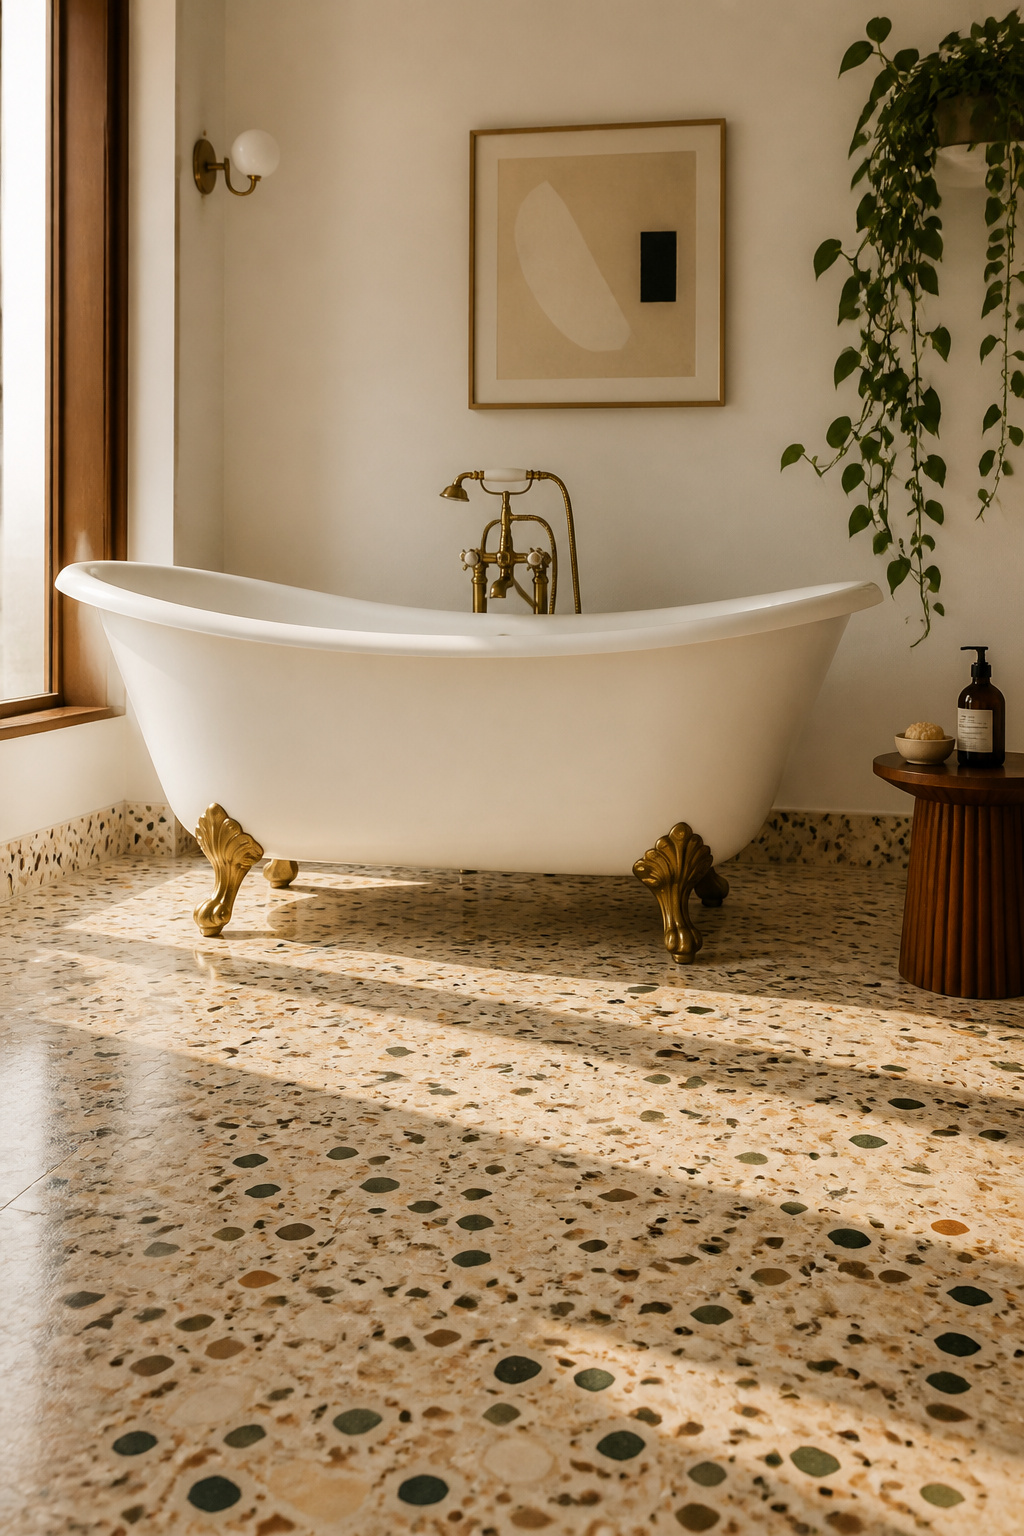
The buying decision begins with material honesty. Poured terrazzo has aggregate chips embedded in epoxy or cement, ground and polished in situ. It is seamless, genuinely unique, and costs $20-100 per square foot installed. Genuine terrazzo tile retains real chip variation and costs $9-22 per square foot installed. Porcelain terrazzo-effect tile is digitally printed — the chip distribution repeats in a pattern that becomes visible across a large installation — and costs $4-12 per square foot in materials. A hybrid approach (genuine terrazzo tile on the floor, porcelain terrazzo-effect on walls) saves 30-40% compared to real terrazzo throughout while maintaining the material quality at eye level. For the broader context of where modern bathroom tile trends are heading beyond terrazzo, the range of current directions is wider than any single material can represent.
Chip size matters more than most buyers realise before their tile arrives. Micro-terrazzo (chips under 5mm) reads as refined texture, almost granular. Standard chip (5-15mm) is the classic proportion. Large chip (15-25mm) is bold, graphic, and tends to dominate a space — use it on the floor with quiet walls rather than attempting it on four surfaces.
7. Black Hexagon Floor Tiles With Stark White Grout Lines
Black hexagon tile with white grout is a graphic bathroom tile design, but one that reads as geometric rather than dark — the white joints create a net pattern across the surface that the eye registers alongside the tile colour. The overall impression is of a structured, intentional floor rather than a heavy one.

The scale of the hexagon determines the room’s character. A 25mm penny round creates something close to a mosaic effect — soft, detailed, appropriate for period-style bathrooms. A 50mm hexagon is versatile, the default contemporary choice. For bathrooms with 100mm or larger hexagons, the effect is overtly architectural — suited to wet rooms and larger spaces where the shape can be appreciated at distance. Choose the scale based on the room’s size and the visual register you want to occupy.
The white grout maintenance question deserves an honest answer before installation, not after. Epoxy grout is the correct product for a white-grouted black tile floor: it is stain-proof, mould-resistant, and never needs sealing. The material cost is three to four times that of standard cementitious grout. The additional labour adds to the installation quote. Accept both without compromise. Standard white cementitious grout on a bathroom floor, regardless of initial sealing, will require constant maintenance to remain genuinely white — and the visual failure of stained white grout on black tile is more visible than stained grout against almost any other background.
8. Cement Encaustic Tiles as Patterned Bathroom Feature Wall
Cement encaustic tile is not fired. That single fact changes everything about how you work with it. Where ceramic and porcelain tile are glass-hard and waterproof after kiln firing, cement tile is compressed under hydraulic pressure, leaving a porous body that absorbs water, oil, and — most critically — grout. Its patterns are formed by pouring pigmented cement slurry into metal moulds, which means the colour goes all the way through the tile body rather than sitting in a glaze on the surface.
The sealing schedule is the non-negotiable: two to three coats of penetrating sealer before grouting, applied with full cure between coats. Then one to two further coats after grouting and cleanup. Never use a topcoat sealer in a wet area — topcoat films peel under sustained moisture exposure. Grouting before sealing is the single most common installation mistake with cement tile. The porous cement absorbs pigment from the grout, permanently staining the pattern areas. There is no recovery from this. Seal first, grout second, seal again.
For pattern mixing: the Japanese principle of one strong visual element supported by calm surrounds applies directly here. A geometric Moroccan star pattern on a single shower wall, paired with a coordinating solid tile on all other surfaces, creates a space with genuine focus. Two competing pattern tiles in the same bathroom create visual exhaustion. One complex pattern, one quiet plain: the contrast makes each more effective.
9. Wood-Look Porcelain That Challenges What a Bathroom Can Feel Like
Real timber in a bathroom makes a promise it cannot keep. The warmth and organic quality are genuine. The longevity is not. Sustained moisture — even the ambient humidity of a bathroom in daily use — causes solid wood to expand, contract, and eventually fail over a timeline of years rather than decades. Wood-look porcelain has spent the last decade closing the visual gap, and at the premium tier, it has arrived.
Current wood-look collections from Porcelanosa, Fioranese, and Atlas Concorde use high-definition inkjet printing across four to six surface variations per size. This eliminates the visible repeat cycle that made earlier wood-look tile obviously artificial at scale. The embossed surface texture follows the printed grain. Running a hand across the tile, the tactile and visual information are aligned — the final element earlier products got wrong. Water absorption is under 0.5% (the ISO standard for porcelain), compared to real oak which absorbs water immediately and begins swelling within hours on a bathroom floor.
Laying Direction and Pairing
The laying direction question has a clear answer: horizontal planks across the short wall widen a narrow bathroom. Planks running toward the far wall create a sense of depth and forward movement. Grout colour is the detail that either holds the illusion or collapses it — match closely to the tile body and the planks read continuously; use a contrasting grout and the floor reads as tiled, not wood. Natural accessories anchor the material in a domestic context: plants, linen towels, ceramic soap dishes. If you want the warmth the material implies, the surrounding elements need to support it. For a look at how wood tones and natural textures work in adjacent styles, farmhouse bathroom ideas that work with natural materials covers complementary territory.
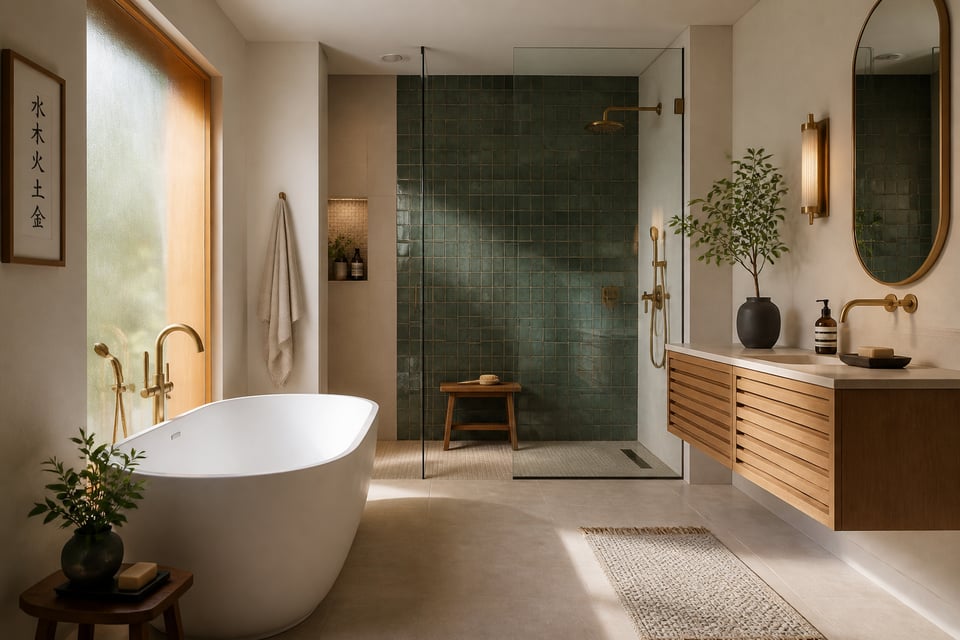
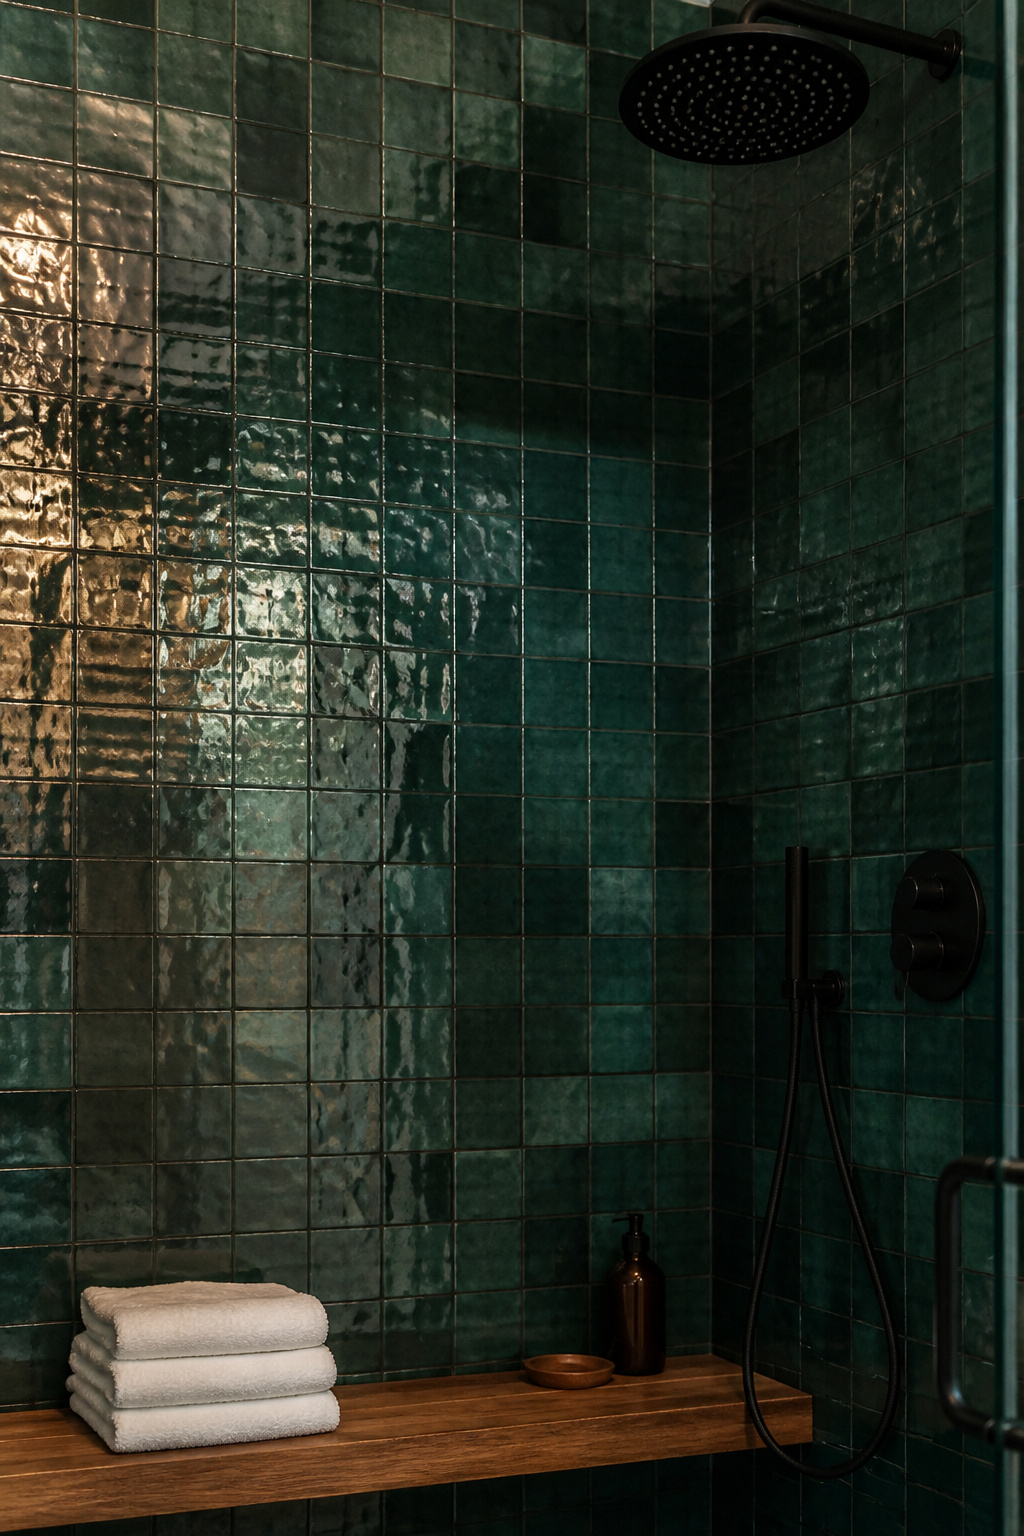
10. Bold-Colour Metro Tile Designs for Bathroom Walls
A bold-colour metro tile is one of the few bathroom tile designs where the selection and the design statement are essentially the same act. Glazed ceramic in a strong colour is one of the most reliable tools for giving a bathroom a distinct identity without structural change. The colour sits in the fired glaze layer — unlike paint, it does not fade, chalk, or degrade with cleaning. A forest green glazed bathroom tile installed today looks the same in year fifteen as it did in year one.
Deep forest green leads bathroom tile trend reports consistently across 2025-26, followed by terracotta in its glazed (not raw) form and navy blue. Each behaves differently under artificial light. Navy enriches under warm lighting, which suits most residential bathroom schemes. Terracotta gains depth under warm light and flattens slightly under cool daylight; sage green is the most stable across lighting conditions. ### Finish, Light, and Restraint
The gloss level adds another variable — gloss finish in a strong colour reflects light and shifts more dramatically between natural and artificial light conditions than matte, which absorbs light and reads consistently throughout the day. For a bathroom with limited natural light, matte in a strong colour is the more predictable choice.
The design principle that makes bold tile succeed is restraint in scope. One surface — typically the wall behind the bath or shower — given over entirely to a strong colour. The remaining surfaces in white, off-white, or a quiet neutral. This is not timidity; it is the difference between a focal point and wallpaper. Apply the same logic to accessories: select fixtures and towels that complement the tile colour without matching it exactly. Exact matches look coordinated in a showroom and flat in practice. The contrast is what makes each element visible.
11. Floor-to-Ceiling Waterfall Tile That Amplifies Perceived Space
Floor-to-ceiling tile is the bathroom tile design that works through what it removes rather than what it adds. There is a boundary in most bathrooms that nobody talks about but everyone experiences. It is the line where tile stops and paint begins. At that line, the eye pauses. The room’s height registers as ceiling-to-tile, not ceiling-to-floor. Running tile continuously from floor to ceiling removes that boundary entirely, and the effect on perceived space — particularly in bathrooms under 2.4m ceiling height — is significant enough to qualify as a spatial intervention rather than a decorative choice.
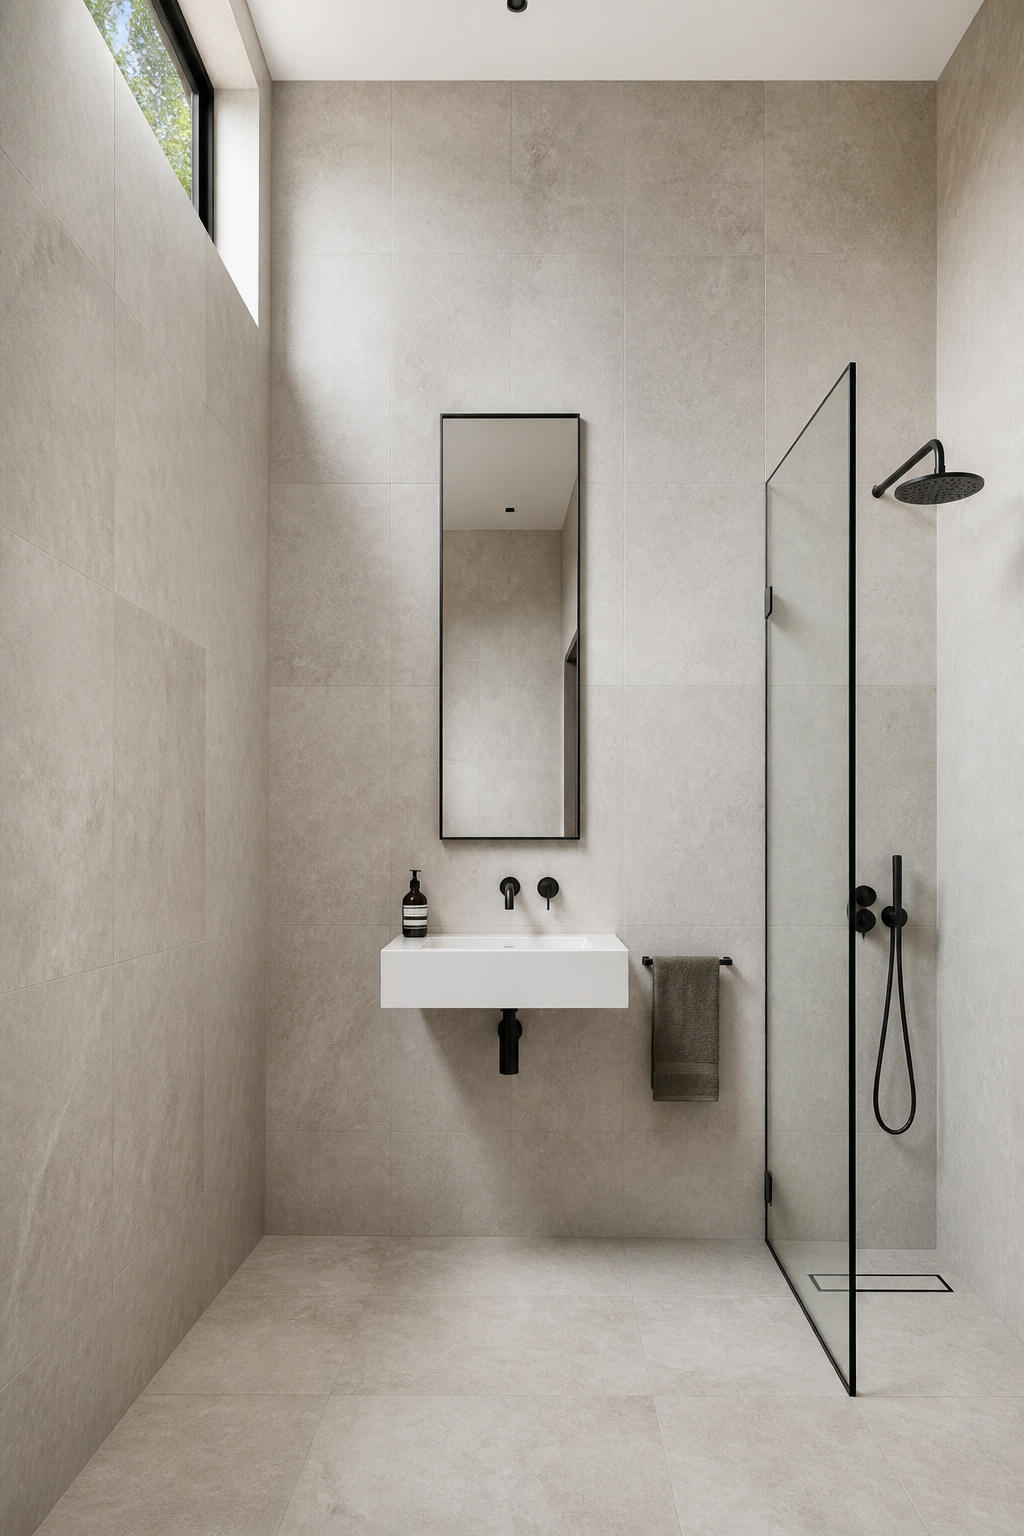
The technique works through visual continuity: the eye travels the full height of the wall without interruption, allowing the room’s actual ceiling height to register. For small bathroom interior ideas that maximise space, this is one of the highest-impact design decisions available without changing the room’s footprint. Large format tiles or slender format tiles (100x600mm, 75x600mm) work best — they minimise horizontal grout lines and reinforce the vertical emphasis. Very small tiles (mosaic, penny round) can feel heavy when they cover every surface in a compact bathroom. Use them on one wall rather than all four.
The technical requirement that most homeowners are not told about upfront: expansion joints at all changes of plane. The floor-to-wall junction is the highest-stress point in any tile installation — the floor and wall move independently with temperature and structural changes, and the junction must accommodate that movement. Fill that junction with flexible silicone in a grout-matching colour rather than with tile adhesive or grout. Without this detail, tiles at floor level begin cracking outward from the corner within the first few years. The visual line is maintained; the structural integrity is protected.
12. Travertine Natural Stone for an Earthy, Grounded Bathroom
Travertine is a sedimentary limestone formed from calcium carbonate deposits around hot springs and geothermal vents. Its voids, veins, and variations are geological records. Each tile captures a moment of formation pressure, not a manufacturing decision. No porcelain replica yet produced captures the three-dimensional translucency of real travertine: light enters the stone and scatters from within, in a way it simply cannot scatter from an opaque ceramic body.
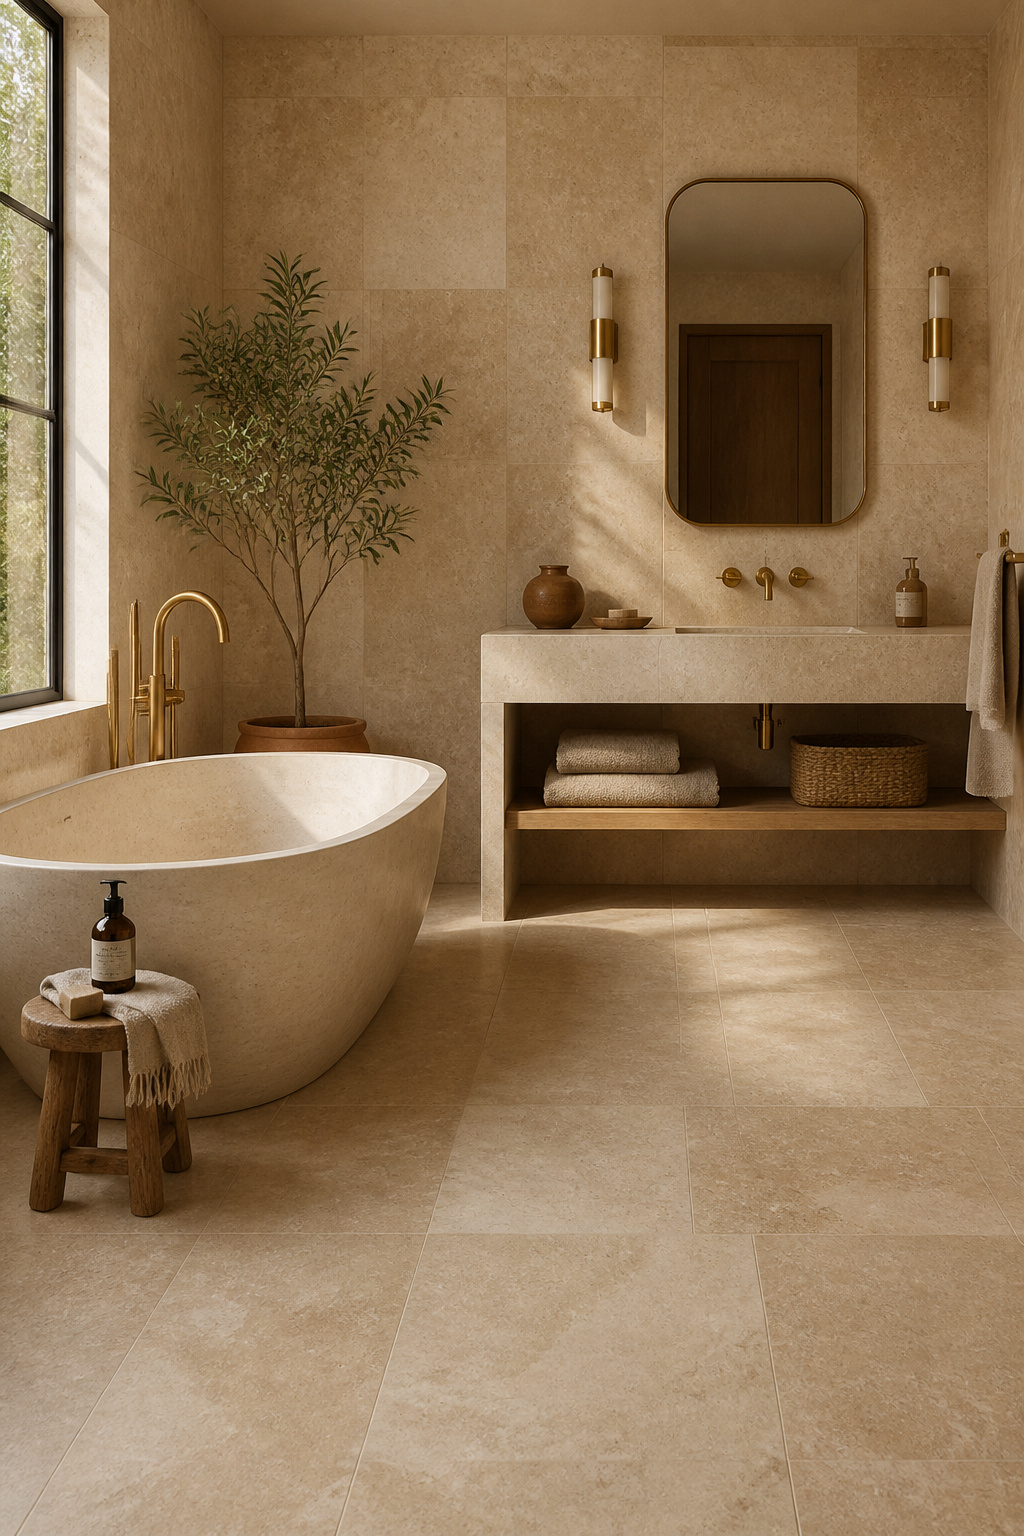
The first practical decision is filled vs unfilled. Unfilled travertine retains the natural pitting of the original stone — visually authentic, tactilely interesting, but accumulates soap, moisture, and organic material in the voids. For a bathroom in daily use, this requires rigorous cleaning to prevent mould establishing in the depressions. Filled travertine has those voids pre-filled with matching epoxy or grout — cleaner, lower maintenance, and the correct choice for most bathroom applications. Choose a honed finish over polished: the matte surface is more slip-resistant and suits the earthy quality of the material more naturally than a mirror polish. Travertine in a honed finish pairs naturally with wooden accessories, linen towels, and warm brass fixtures — it resists styling that feels designed and accepts styling that feels gathered over time.
One absolute rule with travertine: no acidic cleaners, ever. Travertine is a calcium carbonate stone from the limestone family, and acidic products — this includes vinegar, lemon juice, certain bathroom descalers, and some tile cleaners — dissolve the calcium carbonate on contact. The mark this leaves (called etching) is physical damage to the stone surface, not a stain that can be cleaned off. Check the pH of any cleaning product before it touches travertine, and use only pH-neutral stone soap for routine maintenance.
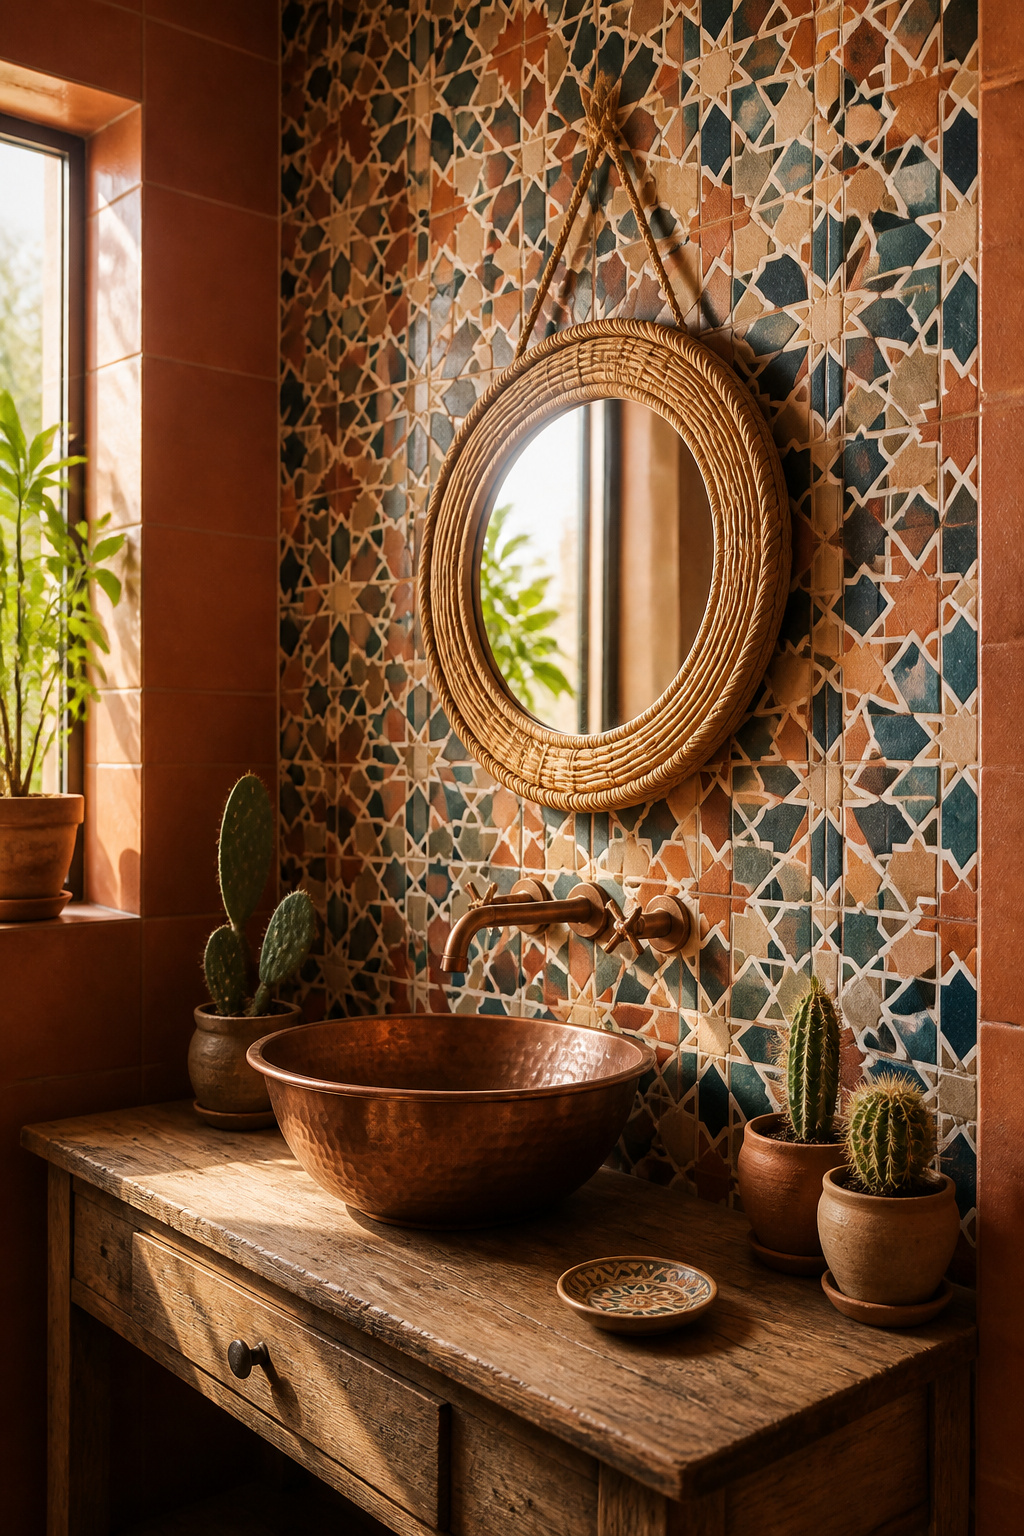
13. Geometric Tile Patterns as a Modern Bathroom Focal Point
Geometric tile in 2025-26 has moved past the hexagon revival of the previous decade and settled into a more nuanced set of shapes. The leading forms now are the scallop (rounded, fan-shaped — organic edges that soften the geometric quality), the Moorish star (8-point interlocking star — architectural, high-commitment), and the ogee arch. Scale has also become a primary variable. Large individual geometric tiles at 200mm and above are now being used where smaller repeating patterns were the default.
The selection principle from Japanese spatial philosophy is useful here: one element of high visual interest, everything else in support of it. A Moorish star pattern on the shower wall, with plain coordinating tile on every other surface, creates a focused design with genuine impact. Two competing geometric patterns in the same bathroom do not create complexity — they create noise. The pattern needs the contrast of a plain surface to be legible.
Scale selection follows room size: in a bathroom under 5m², medium-scale geometric (100-150mm) is the most forgiving choice — the individual shape registers clearly without overwhelming the space. In a larger bathroom or wet room, architectural-scale geometric (200mm+) justifies the investment by creating a surface that genuinely changes character as you move through the room. For a floor treatment, geometric tile provides high visual return for minimum tile quantity — a geometric-tiled bathroom floor with plain white walls is one of the most consistently successful bathroom design combinations in any size of room.
14. Handmade Artisan Tiles With Organic Edge and Colour Variation
Handmade artisan tile is the bathroom tile design approach that requires the most adjustment in expectation — and delivers the most character in return. An industrial pressed tile is made to tolerances of ±0.3mm — nearly identical piece to piece, designed for a seamless surface where the eye moves across material rather than from tile to tile. A handmade tile operates to tolerances of ±2-3mm in size, ±1-2mm in thickness, with slight warping that is an honest consequence of being placed and fired by hand. The variation is not a quality issue. It is the quality.
The glaze on handmade tile is applied by hand — dipped, poured, or brushed rather than sprayed — creating colour depth and pooling that registers as depth rather than flatness. Pratt + Larson in Portland (Oregon) produces handmade ceramic with an exceptionally wide colour range and genuine batch-to-batch variation. Heath Ceramics (Sausalito, California) works in a modernist tradition where the handmade quality is expressed through subtle colour graduation and surface texture rather than overt irregularity. Bert and May in London curate glazed encaustic and terracotta tile from producers where the handmade character is explicit.
Installation with handmade tile requires adjusting the standard technique. Use wider grout joints — 5-8mm rather than the 2-3mm appropriate for rectified tile — to accommodate dimension variation without forcing tiles into alignment they cannot hold. Open and mix every box before laying so colour variation distributes evenly. Do not try to close the gap between tiles — the variation in joint width is authentic. The most common installation mistake is placing tiles as you would industrial tile and then being surprised by the result: the material announces its own nature, and the installation technique must honour that.
15. Marble-Effect Bathroom Tile Designs That Look High-End for Less
The visual gap between premium marble-effect porcelain and real marble has closed considerably at the upper tier. Atlas Concorde’s Calacatta collection maps vein profiles from actual stone slabs across six profile variations. Florim produces book-matched panel sets in Calacatta and Statuario where adjacent tiles share a mirrored vein pattern. At normal viewing distance — 2m in a bathroom — an experienced designer may genuinely have to look twice. The remaining tell is optical: real marble has translucency, with light scattering within the stone body; porcelain is opaque, reflecting light only from the surface.
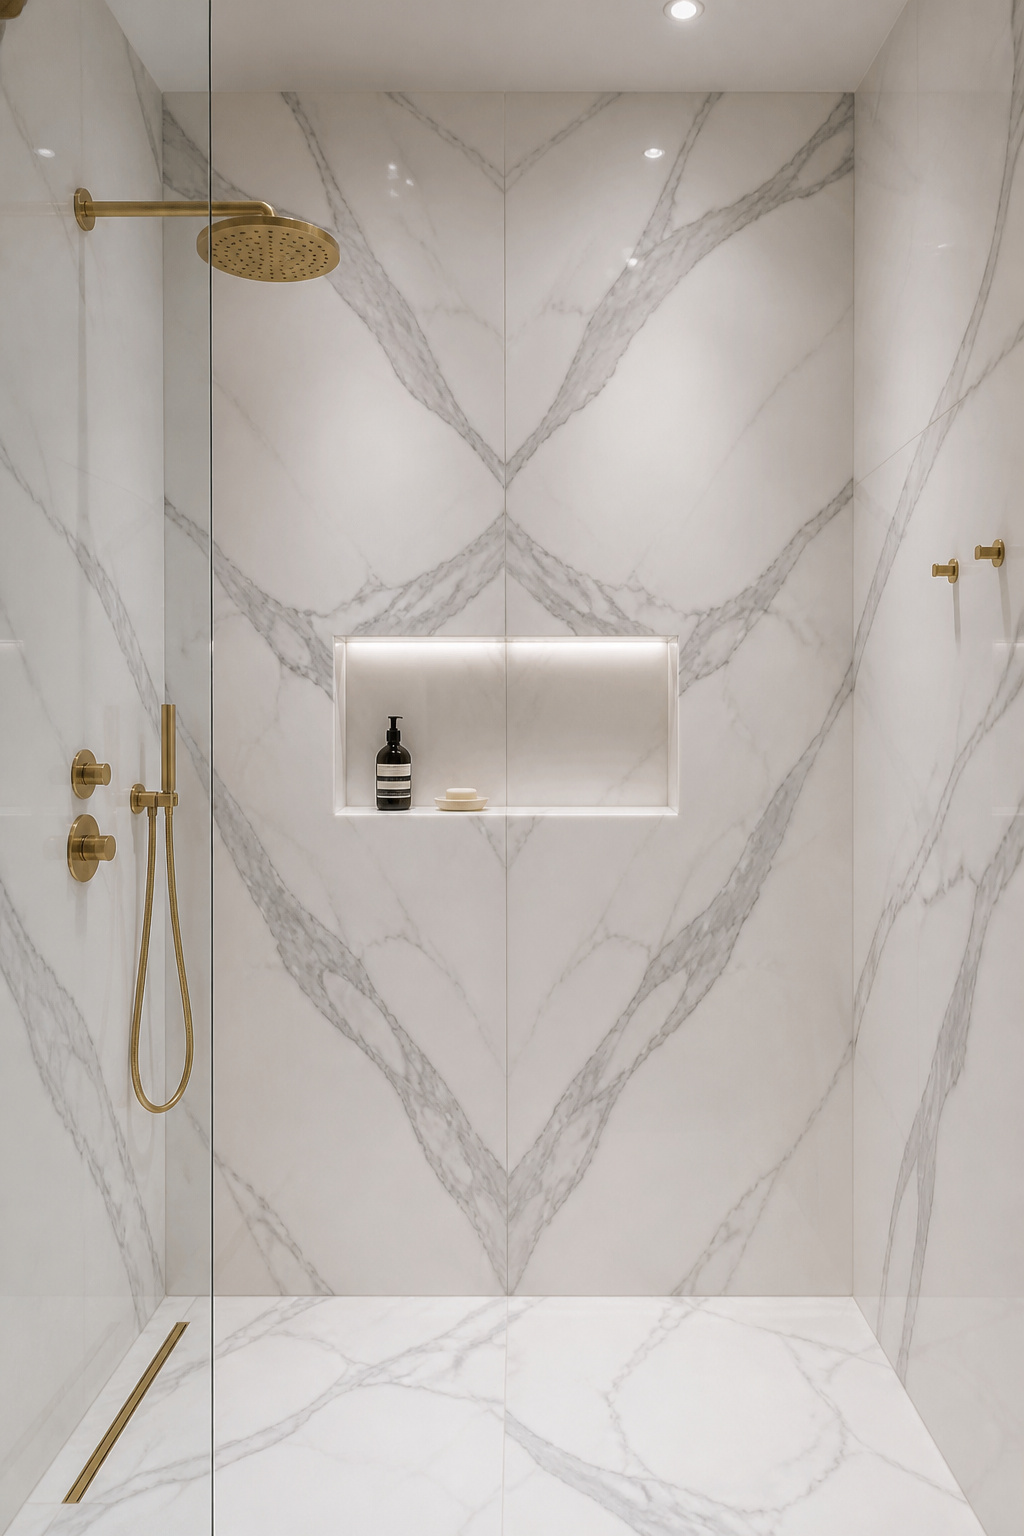
The single most important installation step that most DIY installations skip: planning the vein direction before a single tile is mortared. Marble veining has a natural flow, and adjacent tiles with random vein orientation create a surface that looks like a tile floor rather than a marble surface. If you are buying a book-matched collection (where adjacent panels arrive in numbered pairs designed to mirror each other), the installation sequence is prescribed — follow it. For non-directional tiles, shade-sort the entire order dry before installing: set every tile out, rotate for best vein continuity, then mortar in the planned sequence. The cost difference between real Carrara marble tile and comparable porcelain on a 10m² bathroom floor runs $700-2,200 in favour of porcelain. Maintenance requirements are also significantly lower. For bathrooms on a tight budget overall, budget bathroom remodel ideas that look expensive covers the wider set of decisions that frame the tile choice.
Use real marble where translucency and up-close quality are experienced: a vanity surround, a shelf, a single feature niche. Use porcelain for the floor and large shower walls, where the area makes real marble costly and the maintenance demands are highest.
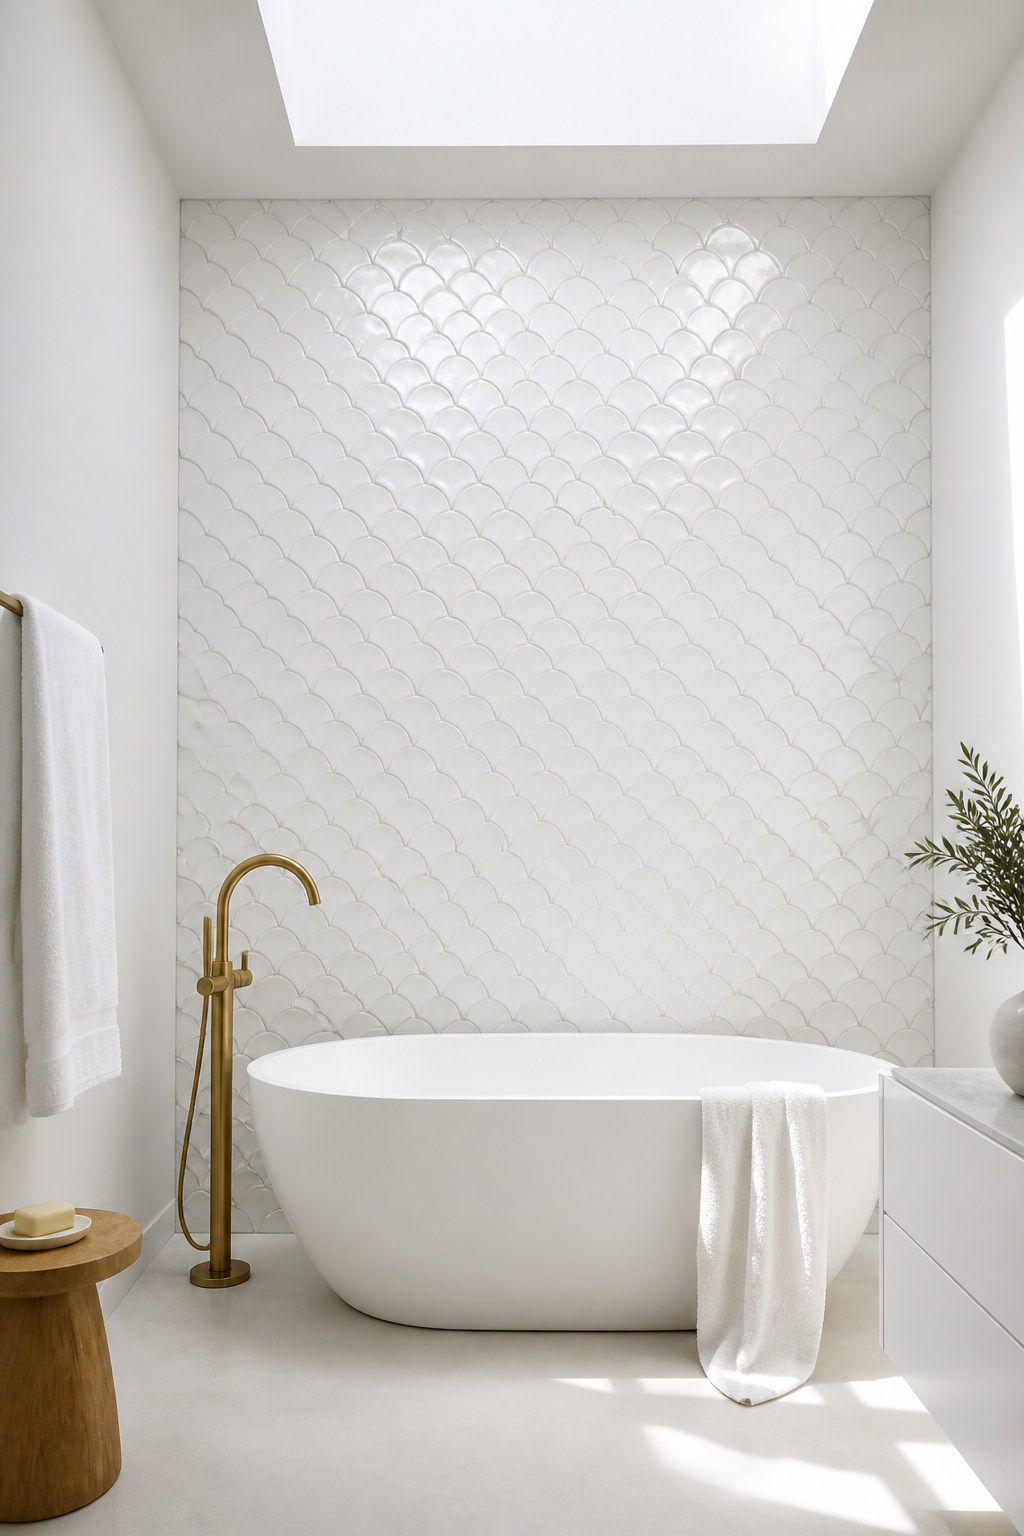
16. Mosaic Tile Inserts for Shower Niches and Curved Surfaces
The mosaic niche insert is the bathroom tile design detail that separates bathrooms that have been designed from bathrooms that have simply been tiled. Large format tile on a curved surface — a barrel-vaulted shower recess, the interior of a rounded niche, a sloped ceiling alcove — requires multiple saw cuts per tile and never lies fully flat. The result looks forced. Mosaic tile (under 50mm across the largest dimension, on mesh backing sheets) bends to follow curves naturally: the mesh absorbs the angular changes that would require cutting in a larger tile.
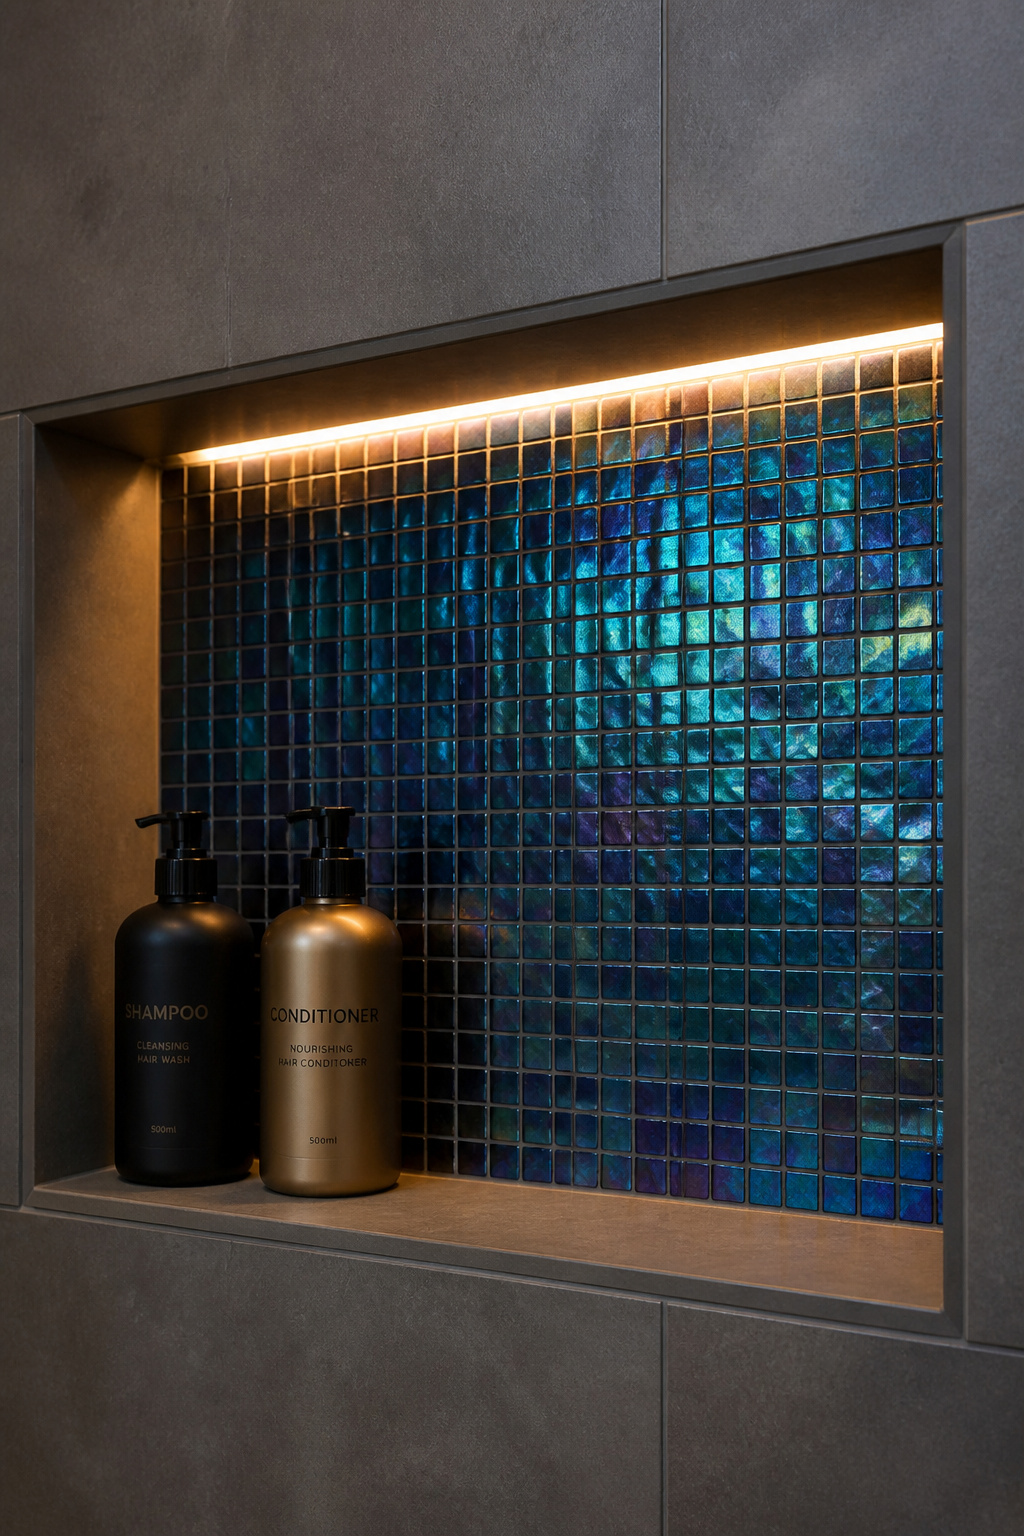
The Niche as a Design Moment
The shower niche has become a genuine design moment in contemporary bathrooms, not just a utility shelf. Standard sizing: 300x300mm for a deep single shelf. 300x600mm for a standard double-height shelf; 600x300mm for a wide single shelf suited to bottles. Standard depth is one stud bay — 90-100mm. Greater depth requires structural planning. The niche back panel is the natural location for a contrasting tile — glass mosaic catches the light from the shower fitting and creates a jewel-like focal point within the shower enclosure.
Glass mosaic is 100% non-porous — it requires no sealing and is genuinely impervious to water — making it the technically ideal choice for a wet niche. Use a white or off-white tile adhesive beneath it. Grey adhesive telegraphs through translucent glass and muddies the colour. Stone mosaic (marble, travertine) brings natural material quality to the niche but requires regular sealing. Ceramic mosaic is the accessible option: wide colour range, easy to cut, durable in wet applications, and the least expensive. The one technical requirement that applies regardless of tile choice: waterproof the niche cavity itself before tiling. The niche sits within the wall structure; the tile is not the waterproofing. An untreated cavity behind even well-installed tile will rot the structural framing within years.
17. Half-Wall Tile Designs With a Contrasting Upper Section
The dado — the horizontal band of protective material that runs around a room at lower-wall height — traces to ancient Roman and Greek interior architecture, where timber panelling at shoulder height protected plaster walls from physical contact. In contemporary bathrooms, the dado rail has been replaced by a tile-to-paint transition, and the logic has shifted from protection to proportion. A tiled lower section grounds the room’s horizontal register. The painted upper section provides the flexibility to introduce colour or texture above.
Getting the Height and Finish Right
The height decision matters more than most bathroom design guides acknowledge. A 900mm dado is historically standard — the original chair rail height — and works well in bathrooms under 2.4m ceiling height, where a taller dado would leave little painted wall above. At 1100-1200mm, the tiled section is proportionally generous and aligns naturally with the top of a standard basin or the height of a toilet cistern, creating a horizontal line that ties the room’s separate elements together. Running the tile to match an architectural feature — window sill height, vanity top — makes the transition feel designed. An arbitrary height, unrelated to anything, looks like an error. For bathroom design trends worth knowing that speak to where the tile-to-paint transition is being applied now, the range is wider than the traditional half-wall assumption.
The finishing detail that separates a considered installation from an incomplete one: the tile top edge. Without a bullnose or a metal trim profile, the raw tile edge is exposed. It collects grime, can chip, and signals unfinished work. Bullnose is a tile with one rounded, glazed edge used to cap the section. A metal profile (Schluter Reno-T or similar) is the contemporary alternative. Many contemporary tile ranges no longer include matching bullnose pieces. In these cases, a metal trim profile in brushed brass or matte black is the clean professional solution and reads as a deliberate design decision.
18. Textured 3D Relief Tiles for a Sculptural Bathroom Finish
The leading tile trend of 2025, according to every design publication that tracked it, was texture: not new colours, not new patterns, but tiles with physical dimension that create light and shadow across the surface. Relief tile changes character as light moves across it throughout the day. No flat tile surface can do that.
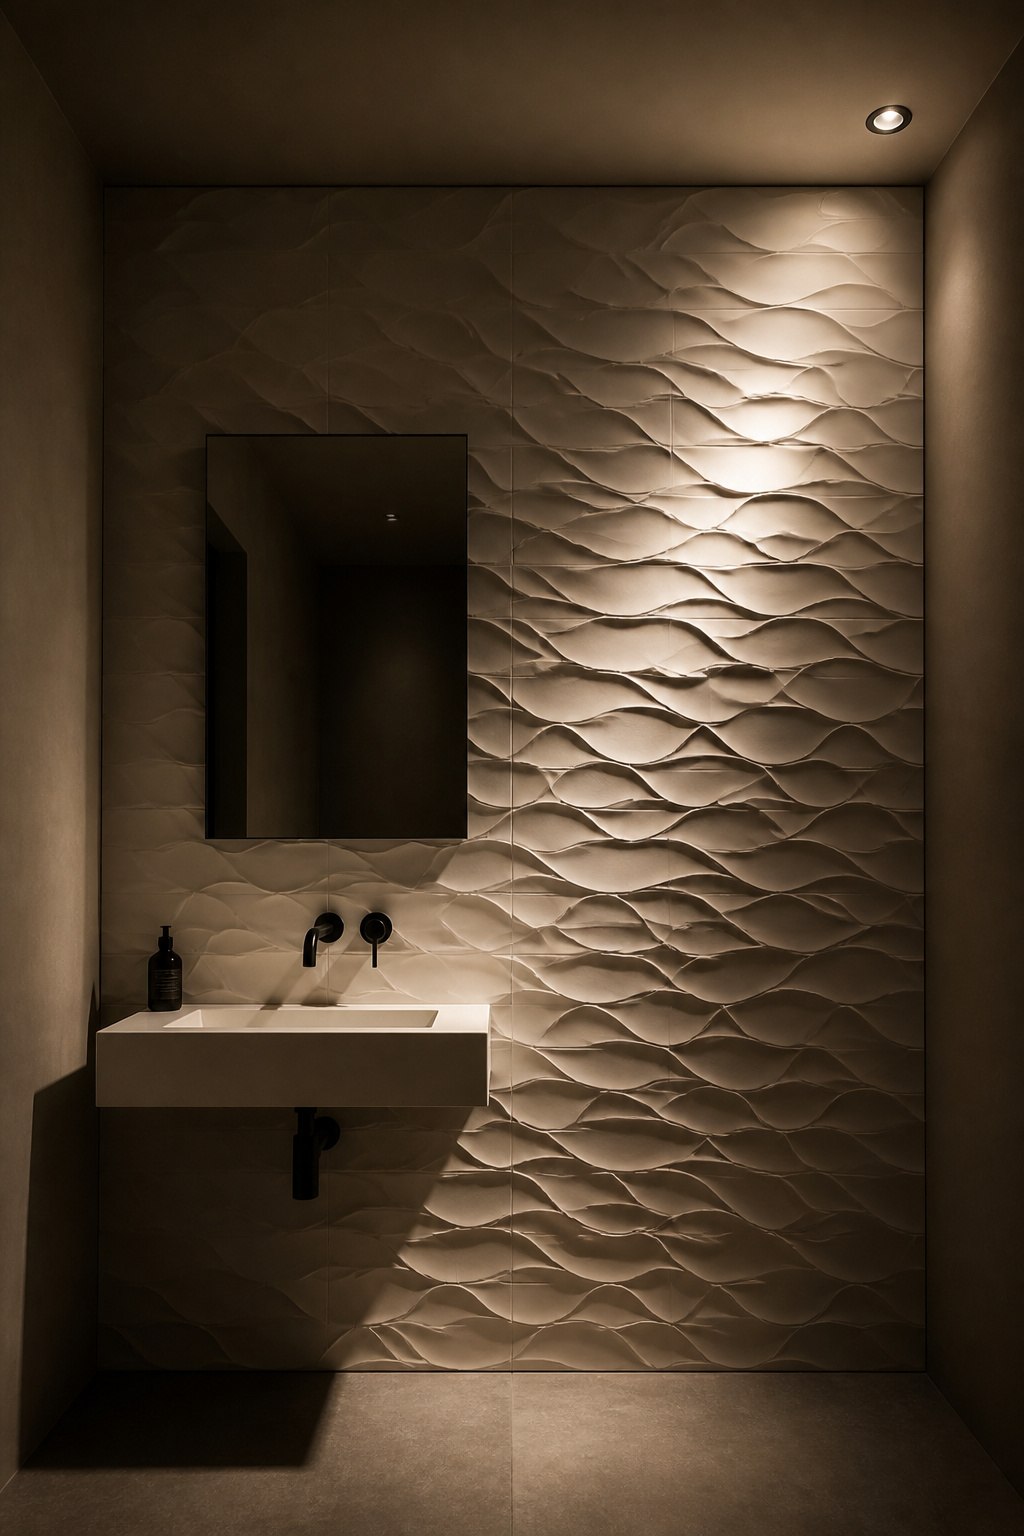
Lighting and Placement
The critical caveat, and the reason some relief tile installations disappoint: the effect is entirely dependent on lighting placement. Position a light source perpendicular to a relief tile wall (directly in front of it) and the shadow that activates the texture is eliminated. The wall reads as flat. Position the same light source at 15-30 degrees from the wall plane — raking it across the surface — and every relief element casts a shadow that makes the texture present and legible. LED strip lighting at floor level directed upward across a relief tile wall is a device borrowed from contemporary hotel bathroom design, and the effect is worth the additional electrical work.
The surface selection rule is practical: shallow relief (under 3mm depth) is manageable in a shower environment — soap and mineral deposits can be wiped away with a flat squeegee. Deep relief on a shower wall creates cleaning recesses that cannot be accessed with standard cleaning tools. Best applications are dry feature walls, bath surround panels, alcove walls, and niche ceilings — surfaces where the visual impact is high and the cleaning demand is low. Refin and Atlas Concorde produce relief tile in ceramic and porcelain. CLE Tile curates sculptural ceramic wall tile from independent studios. The consistent recommendation across all of them: test a sample under your actual bathroom lighting before ordering, not under showroom lighting, which bears no resemblance to the conditions in which you will live with the tile.
Choosing Your Bathroom Tile Design: A Practical Starting Point
Eighteen options is not a manageable decision framework. It becomes one when you start with two constraints: your actual bathroom area and your maintenance tolerance. Everything else follows from those. These two filters eliminate most options before aesthetic preference even enters.
Small bathrooms (under 4m²) benefit paradoxically from large format tile — fewer grout lines expand the visual field. Avoid small repeating patterns that emphasise the room’s limited area by filling it with visual information. High-maintenance materials (natural stone, cement tile) are genuinely worth their care requirements for homeowners who enjoy the ritual and value the material quality. For everyone else, porcelain provides equivalent visual results with near-zero maintenance overhead.
After the practical filter, the clearest advice is this: identify one surface, one material, or one design element you are genuinely drawn to, and allocate budget to doing it well. A single wall of zellige, a travertine floor, a geometric niche — these are high-impact investments. They provide a focal point. Everything else around them can be quiet and simple. The mistake most bathrooms make is spreading design effort evenly across all surfaces, resulting in a room where nothing is experienced clearly because everything is competing. Order the largest sample you can source — A3 minimum — and live with it on your bathroom wall for a week before committing. The tile that still feels right on day seven is the right bathroom tile design for your space — and the right one is the only metric that matters.


