There’s a particular moment most kitchen renovations start from: you’re standing in a perfectly functional space and something about it feels wrong. Not broken — just hollow. Flat cabinet doors, granite the colour of a conference room, recessed lights that make everything look like a dental waiting room. You didn’t move into this kitchen because you love it. You moved in despite it.
Farmhouse kitchen remodeling is about fixing that. Not by following a trend, but by adding the things that make a kitchen feel like it belongs to someone who cooks in it — real wood, honest materials, light that’s warm rather than clinical. I’ve spent years helping people build productive growing spaces and sustainable kitchens, and the thing I keep coming back to is this: the best farmhouse kitchens aren’t styled. They’re built to be used, and they happen to look beautiful as a result.
These 16 ideas range from weekend-level swaps to structural projects. You don’t need all of them. Pick the ones that match your budget, your skill level, and how much of your kitchen you’re willing to take apart. Start with one, and you’ll likely want to keep going.
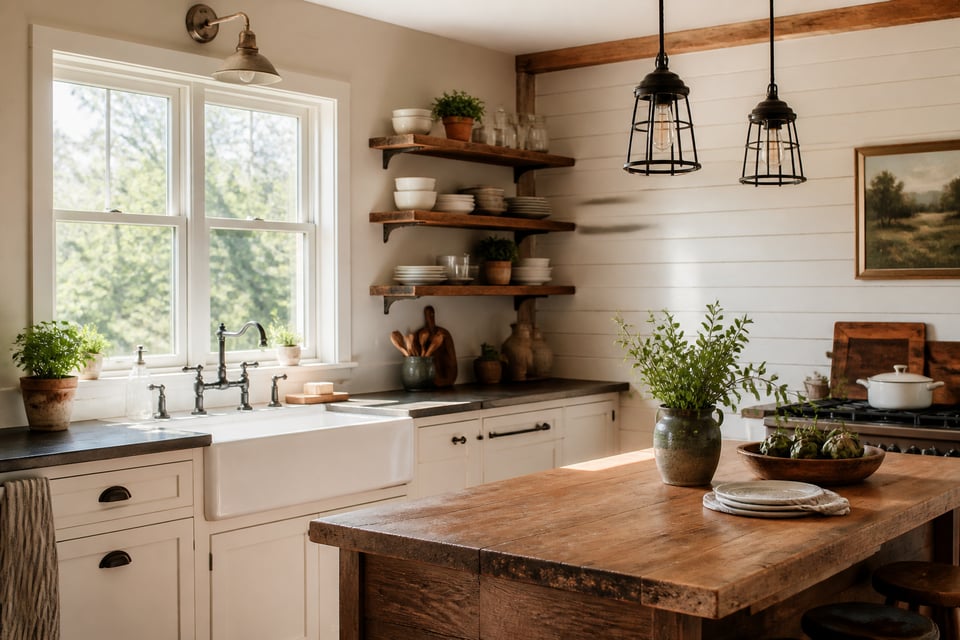
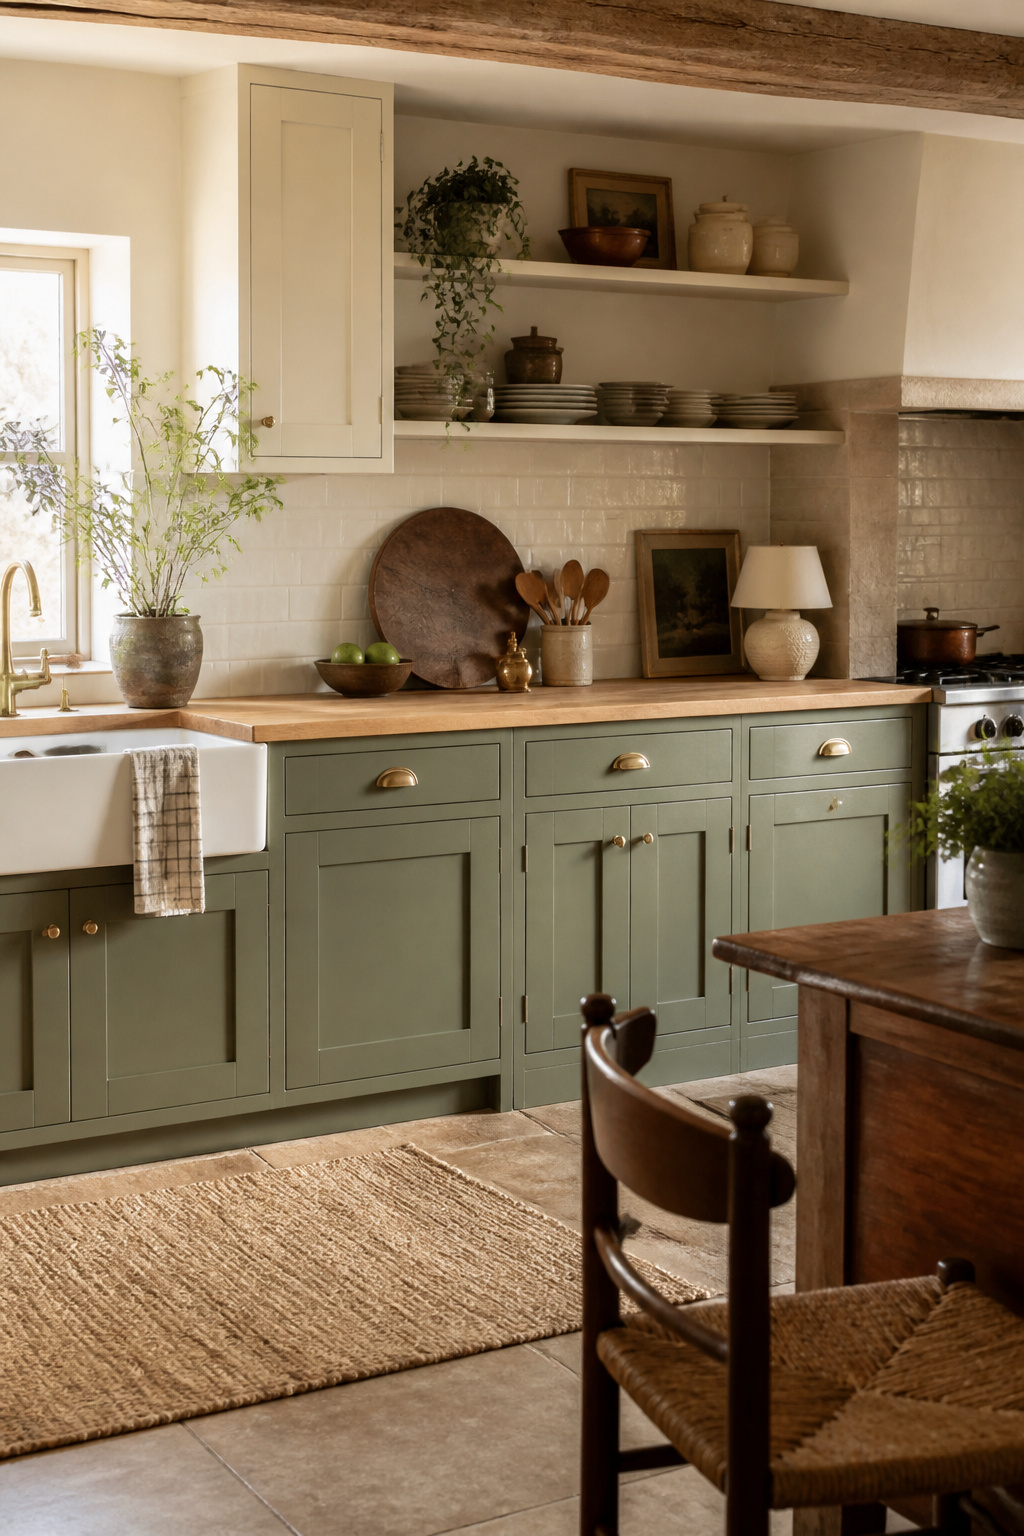
1. Farmhouse Kitchen Remodeling Starts With the Right Sink
If there’s one fixture that announces a farmhouse kitchen the moment you walk in, it’s the apron-front sink. The exposed front panel — the apron — sits proud of the cabinet face instead of hiding behind it, and that single design detail does more work than any backsplash or hardware choice.
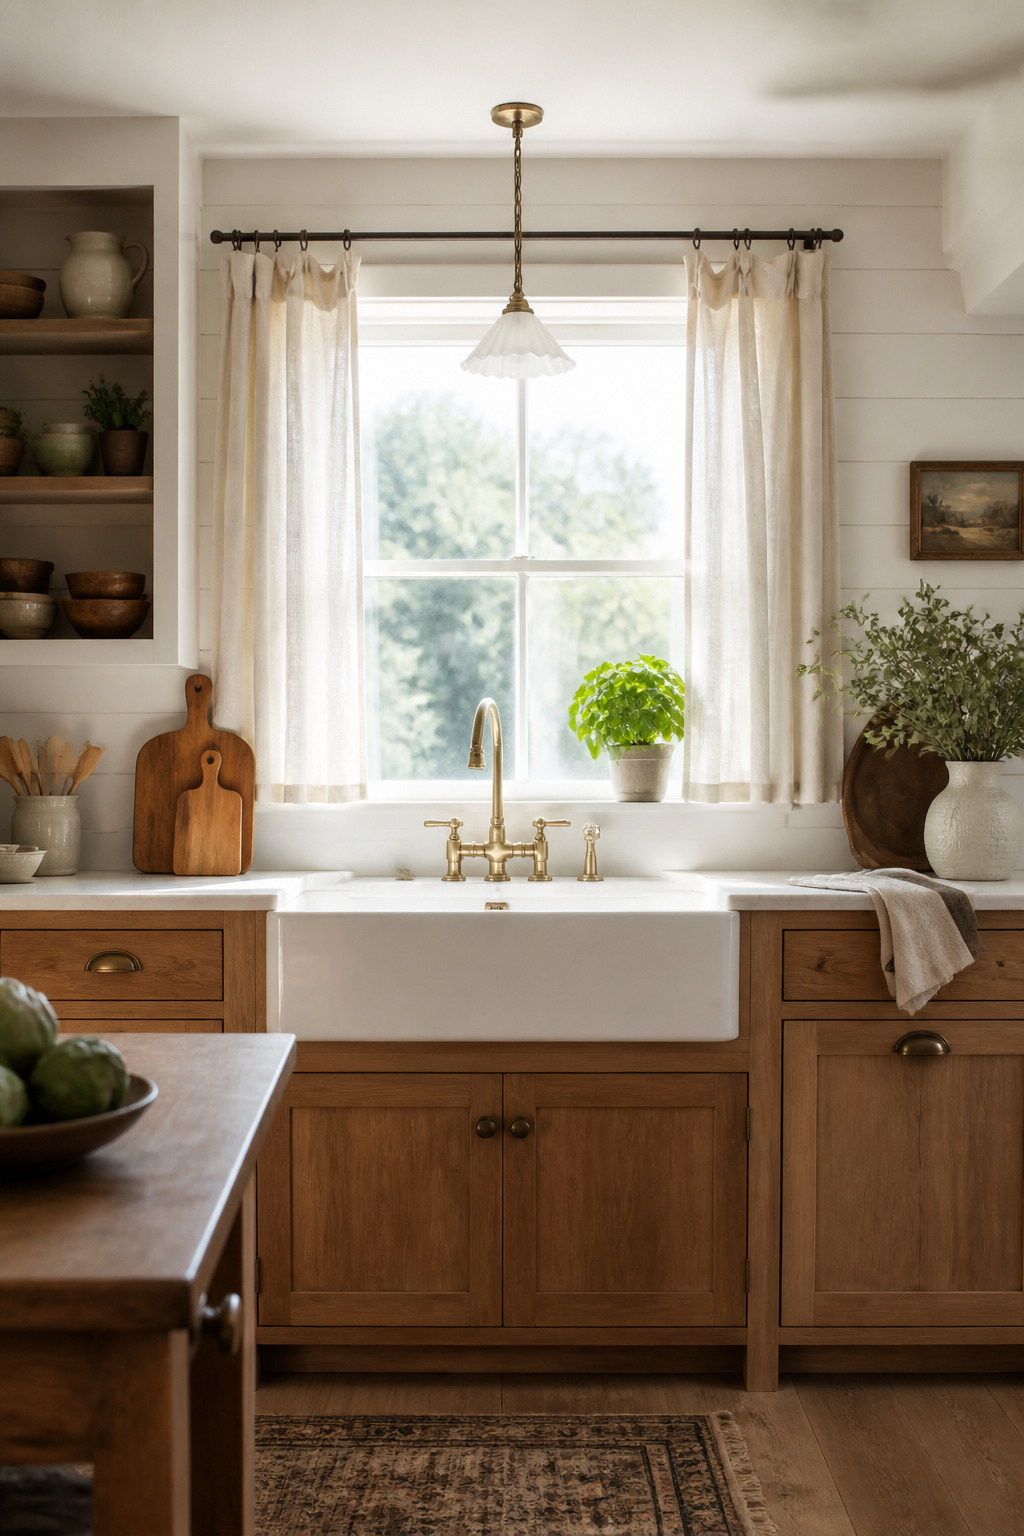
Standard sizes run 24, 30, 33, and 36 inches wide. The 30-inch single-basin is the workhorse of most farmhouse kitchen remodeling projects — deep enough at 9-10 inches to handle stock pots and roasting pans, wide enough to feel generous without dominating a modest kitchen. The 33 and 36-inch models suit larger kitchens and people who batch-cook regularly.
Three materials worth knowing well: fireclay, cast iron, and stainless. Fireclay — ceramic clay fired above 1,800°F — weighs 80-120 lbs, resists chips and heat staining, and costs $270-$1,500 for quality apron-front models. It’s the most popular choice for DIY installations because it’s manageable with two people and requires no cabinet reinforcement. Cast iron (enamel-coated, typically 200+ lbs) is the bulletproof option — $700 to $5,000 — but you’ll need to add framing support under the cabinet before it arrives. Stainless apron-fronts at $200-$700 are the budget route; they look clean and last well, though they show water spots more readily than fireclay. For more detail on farmhouse kitchen sink materials and styles, the comparison gets quite specific.
Retrofitting into existing cabinetry means removing part of the cabinet’s front rail — a precise cut that most capable DIYers can handle, but one worth taking slowly. Measure twice, cut once is not a cliché here.
2. Shiplap Accent Walls That Define the Farmhouse Look
Shiplap is identified by its rabbet joint: each board has a small cut on each edge so boards slightly overlap each other, creating a consistent 1/8-inch shadow gap. That gap is the signature. Beadboard uses moulded ridges between narrow planks — more Victorian, more cottage. Tongue-and-groove sits flush with no gap at all. The shadow line on shiplap is what makes it read as specifically farmhouse rather than generically paneled.
In a kitchen, where you’re installing it matters as much as what you’re installing. A single accent wall — behind the range, or the wall the refrigerator sits against — is more impactful than a fully clad kitchen, which can feel visually busy and genuinely loud. An island panel in shiplap is the easiest retrofit: no outlets to work around, no steam to worry about.
Moisture is the honest concern for any wood paneling in a kitchen. Real pine shiplap installed without proper sealing will warp and stain from cooking steam within months. The solution: oil-based primer first (even if your topcoat is water-based), which adds a moisture barrier and stops wood tannins from bleeding through the paint. For the topcoat, choose semi-gloss or satin — flat paint in a kitchen collects grease and cannot be wiped clean. If you prefer natural wood rather than painted shiplap, a clear polyurethane or varnish topcoat is required, reapplied every 3-5 years depending on how hard the kitchen gets used. A useful shortcut: paint boards before installation on sawhorses, not on the wall. Every farmhouse kitchen remodeling project that involves shiplap goes faster and cleaner with that one prep step.
3. Open Shelving to Replace Upper Cabinets
The honest reason to replace upper cabinets with open shelves isn’t aesthetic — it’s functional. Upper cabinets in a working kitchen are where things go to be forgotten. The back reaches of a 12-inch deep cabinet become dead storage. Open shelves put everything in plain sight and within reach, cutting the time you spend opening doors and hunting for the right pan lid.
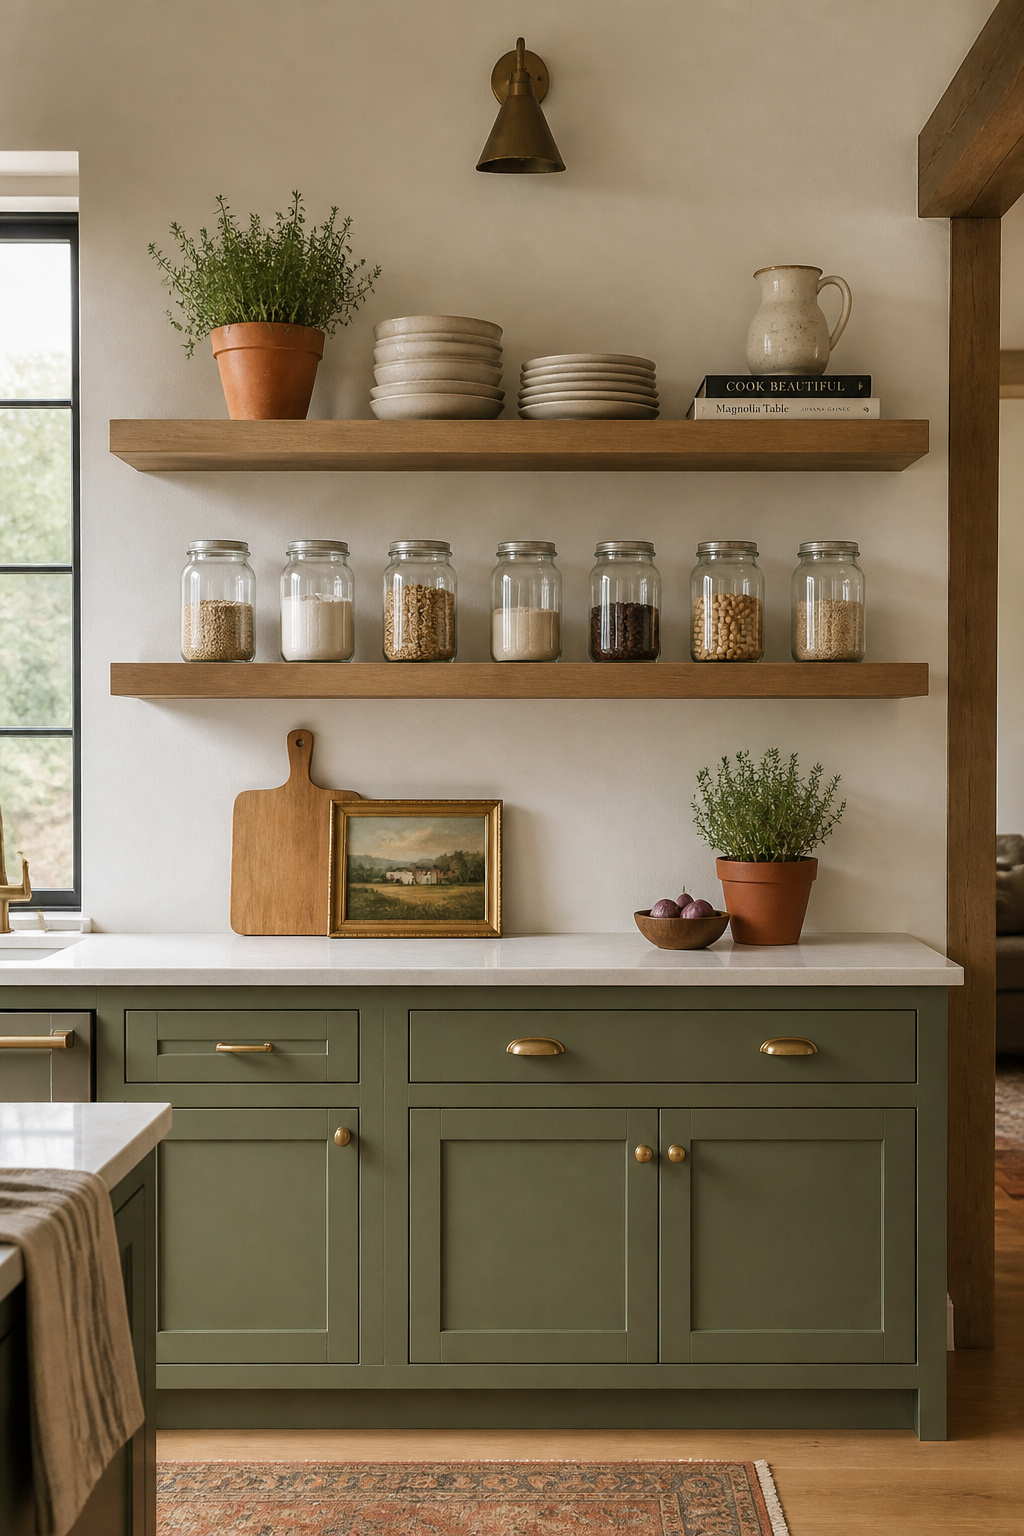
White oak and maple are the right woods for kitchen shelves. Both resist humidity reasonably well, take stain evenly, and are hard enough to support stacked dishware without sagging over time. Pine is charming and affordable but soft — it dents easily and needs more frequent refinishing. For a working kitchen, hardwood shelves almost always outperform pine over the long run.
Standard kitchen shelf depth is 10-12 inches. Twelve inches accommodates most plates and bowls; a depth beyond 12 inches starts to feel like upper cabinets — items migrate to the back and you’re back where you started. For brackets, a floating bracket (hidden rod through the shelf) gives the cleanest look; raw steel L-brackets add an industrial-farmhouse edge; standard angled brackets are reliable and inexpensive. Whatever bracket you choose, ensure it covers at least two-thirds of the shelf depth, and add a third bracket to any shelf over 36 inches long.
Styling is where most open shelving goes wrong. The rule of thirds is useful: roughly one-third functional dishware, one-third food-related vessels (jars, crocks, pitchers), and one-third space — actual visible breathing room. Resist filling every inch. Add one live element per shelf: a small herb plant, a trailing pothos, or a jar of fresh herbs from the windowsill. It keeps the shelves from reading as storage and starts them reading as kitchen.
4. Butcher Block Countertops for Warmth and Texture
No countertop material ages with a farmhouse kitchen the way butcher block does. Stone counters look the same on day one as they do in year ten. Butcher block develops — nicks, patina, the darkening from oil treatments, the character of a surface that has been genuinely used. That evolution is the point.
The most useful comparison point: installed cost runs $40-100 per square foot against granite’s $45-120 per square foot. You’re not saving dramatically, but you’re getting warmth, refinishability, and a connection to the work of cooking that cold stone doesn’t provide. The pairing where butcher block really earns its place is the island — where you want warmth in the centre of the room, and where stone or quartz can feel like a slab that landed from another kitchen entirely.
Wood Species and Hardness
Hard maple (1,450 Janka hardness) is the industry standard: tight grain, resistant to bacteria, mid-range cost around $50-70 per square foot installed. White oak (1,360 Janka) is the current farmhouse favourite because its warmer golden tone integrates better with the farmhouse palette than maple’s cooler colour. Walnut (1,010 Janka) is softer and better suited to an island section where you’re not cutting directly on the surface — its dark tone is beautiful but it marks more easily.
Sealing and Maintenance
For sealing: food-grade mineral oil ($8-12 per quart) is the most accessible starting point. New butcher block needs three coats in the first week, then monthly oiling through the first year. Mineral oil doesn’t harden, so it needs regular reapplication. A board conditioner (mineral oil plus beeswax) extends the protection window. For countertops not used as direct cutting surfaces, Waterlox — a tung oil varnish — creates a more durable film that only needs re-coating every 3-5 years. Whatever sealant you choose, the one maintenance rule that matters above all others: don’t leave standing water on butcher block. Even a sealed surface will absorb water at the seams if left long enough.
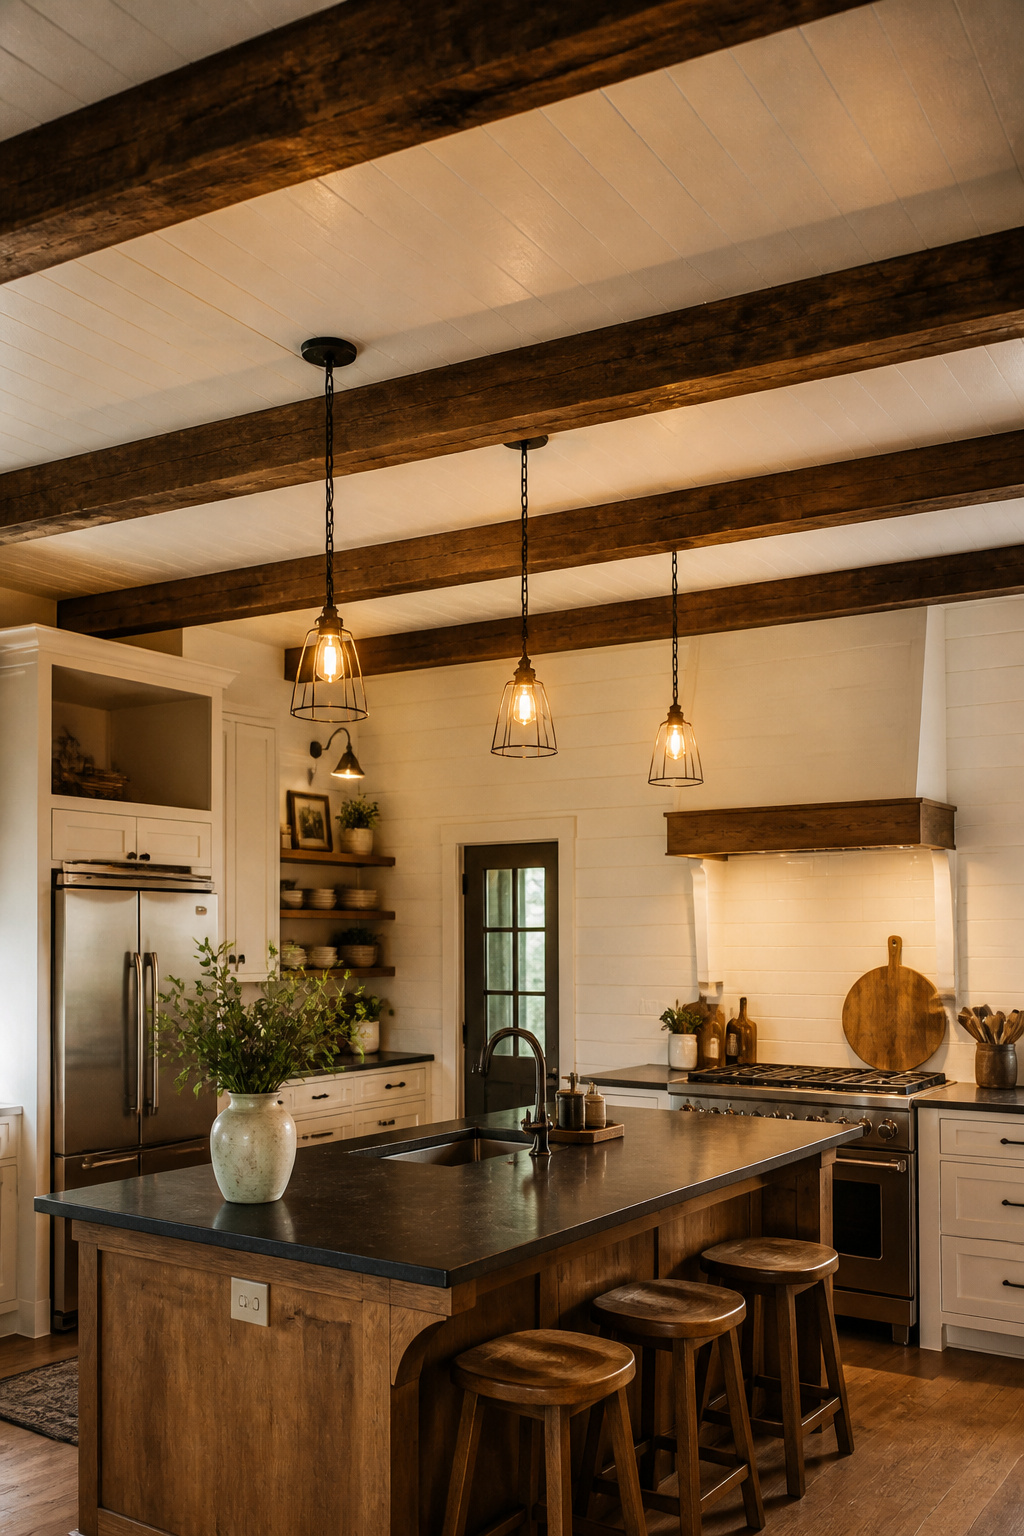
5. A Statement Range Hood That Anchors Your Farmhouse Kitchen Renovation
The range hood is the most architecturally influential fixture in the kitchen. It sits directly above the range, at eye level when you’re standing at the stove, occupying the most prominent vertical real estate in the room. A builder-grade stainless box does the job mechanically. A custom surround turns the cooking zone into a focal point and gives the kitchen a sense of purpose and design that no amount of accessories or styling can replicate.
Custom farmhouse hoods fall into a few clear categories. The plaster surround — a 2×4 frame clad in drywall, finished with smooth plaster or a limewash texture — creates a European farmhouse look that’s paintable in any colour. This is the most budget-friendly custom approach at roughly $500-$1,500 in materials. The shiplap surround extends your wall paneling to become the hood cover — visually cohesive if shiplap appears elsewhere, typically 32 inches wide and 18 inches deep as a finished form. Hammered copper hoods are the artisan end: $1,500-$5,000 for a custom-made piece that develops a genuine patina above the heat. Pair it with other copper or unlacquered brass details throughout the kitchen to keep the metal story coherent.
Two specifications must be confirmed before any construction begins. First, select the insert — the actual ventilation blower — before building the surround; the decorative shell is built around the insert’s dimensions, not the other way around. The hood should also extend at least 3 inches beyond each side of the range: a 30-inch range needs a 36-inch minimum hood width. For ventilation: most residential kitchens perform well with 400-700 CFM; high-output gas ranges over 60,000 BTU need at least 600 CFM. Build the surround first, wire the insert wrong, and you’ve created a beautiful object that vents poorly.
6. White Beadboard Cabinet Doors for Cottage Charm
The farmhouse spectrum runs from the lean modern-farmhouse look (shaker doors, black hardware, concrete) to the warmer cottage-farmhouse (beadboard, cup pulls, painted wainscoting). If your kitchen is moving toward the warmer end, beadboard cabinet doors are one of the most effective single changes you can make.
The difference between beadboard and shaker: shaker doors have a flat centre panel within a simple frame — clean, transitional, suited to everything. Beadboard panels have narrow vertical planks separated by moulded ridges (the beads), and that texture adds the kind of handcrafted character that flat panels can’t imitate. The ridges catch light differently through the day. A kitchen with beadboard doors looks genuinely different at noon than at 7 in the evening.
The good news for a budget-minded farmhouse kitchen remodeling project: you don’t have to replace the cabinet boxes. Door-only replacement runs $100-$300 per quality door; a kitchen with 20 doors costs $2,000-$6,000 in doors plus hardware. Compare that to full refacing at $4,000-$10,000, or full cabinet replacement at $15,000-$35,000+. Unless your boxes are damaged or the layout is genuinely wrong, door replacement is the right move.
On paint: cream and off-white work well — Benjamin Moore White Dove (OC-17) and Sherwin-Williams Alabaster (SW 7012) are both kitchen-proven. Soft sage green on beadboard reads as genuinely cottage-farmhouse without the cool industrial register that grey cabinets can fall into. Whatever the colour, use satin or semi-gloss sheen. Matte paint on kitchen cabinet beadboard is a cleaning problem: grease and fingerprints are nearly impossible to wipe from a flat surface, and the ridges trap residue.
7. Classic White Subway Tile Backsplash
The 3×6-inch white subway tile was designed in 1904 for New York City subway stations — chosen because it was easy to clean, bright, durable, and simple to install in large quantities. Over a century later, it remains a farmhouse kitchen staple for exactly the same reasons. It’s one of the few design choices that is simultaneously honest, functional, and attractive.
The grout colour decision matters more than most people expect. White grout on white tile creates a near-seamless surface — the grid almost disappears, and what you’re left with is a clean white field. This reads as spa-like and calm. Light grey grout makes the running bond pattern visible without high contrast — the most popular choice because it hides dirt better than white and reads as traditional rather than modern. Dark grey or charcoal grout creates a strong grid that reads as more contemporary than classic farmhouse, though it pairs well with wood and natural stone when those appear elsewhere. The kitchen backsplash design ideas that hold up over time usually choose grout colour before tile, not after.
Installation Patterns
Three installation patterns for the classic 3×6 tile. Running bond (50% offset) is the traditional and most DIY-friendly: horizontal rows staggered so each tile centre aligns with the joint above and below. Herringbone (tiles set at 45-degree angles) creates visual movement and energy — but requires 10-15% more tile due to angled edge cuts, and is meaningfully more difficult to set accurately. Vertical stack (tiles set vertically with aligned joints) creates a taller, more contemporary read — not harder than running bond, but intentionally modern rather than classic.
One installation note that saves grief: keep grout joints at 1/8 inch or 3/16 inch maximum. Wider joints collect grease and make the backsplash significantly harder to clean. Use unsanded grout for joints under 1/8 inch; sanded for 1/8 inch and wider.
8. Sage Green or Creamy White Painted Cabinetry
Painting existing cabinets is the single highest-return move in farmhouse kitchen remodeling — and it isn’t close. A professional paint job costs $1,500-$5,000. Materials for a careful DIY job run $200-$600. Compare either figure to $15,000-$35,000+ for new cabinets. Properly painted cabinets with a quality waterborne alkyd paint last 7-10 years before needing a refresh. The math is straightforward.
The two professional-grade options are Benjamin Moore Advance and Sherwin-Williams Emerald Urethane Trim Enamel. Both run $80-100 per gallon — budget 1.5-2 gallons for an average kitchen in two coats. Advance is a waterborne alkyd with extended open time for brushing and rolling, which makes it more forgiving for home painters; it self-levels well but takes 24-48 hours between coats and needs a full week to fully harden. SW Emerald Urethane Trim dries faster (2-4 hours to recoat), which is useful for a one-weekend project, and is slightly more resistant to dents and scuffs once cured. The trade-off: less time to brush out and correct mistakes.
Best Farmhouse Cabinet Colours
For colour in a farmhouse kitchen: BM October Mist 1495 (sage green, Benjamin Moore’s 2022 Colour of the Year) sits at the cooler, more sophisticated end of the green spectrum. SW Evergreen Fog SW9130 is warmer and greyer — reads as earthy rather than minty. For cream and off-white: BM White Dove OC-17 (warm white, very slightly yellow undertone), SW Alabaster SW7012 (creamy off-white, the most popular cabinet colour in recent years), and BM Chantilly Lace OC-65 (clean bright white with barely any warmth, more modern-farmhouse than traditional).
Prep Is Everything
Prep accounts for about 80% of the outcome. Clean cabinets with a degreaser or TSP substitute before anything else — kitchen grease on a surface means topcoat peeling within months. Scuff-sand with 120-grit, smooth with 220-grit. For factory-finished or previously stained cabinets, use a bonding primer (Zinsser BIN or similar) before the topcoat. Skip the primer and the paint will peel regardless of quality.
9. Exposed Wooden Ceiling Beams for a Farmhouse Kitchen Redesign
The structural beam question comes up in almost every farmhouse kitchen redesign conversation, and the answer is almost always the same: what you’re installing are decorative, not structural. Decorative beams carry no load. They attach to blocking or furring strips in the finished ceiling. They don’t require permits in most jurisdictions, don’t need a structural engineer’s approval, and can be removed without consequence. The only exceptions are kitchens with genuinely exposed structural timbers from an open ceiling or barn conversion — those are load-bearing and should never be removed without an engineer’s assessment.
Real Timber vs. Faux Box Beams
The honest comparison comes down to this: real reclaimed timber runs 8-10 lbs per linear foot, costs $15-$30 per linear foot in materials plus $20-$50 per foot for professional installation — a single 12-foot beam can exceed $1,000 installed, and that’s before reinforcing the ceiling to hold it. DIY hollow wood box beams (built from 1x boards nailed over a mounting cleat) weigh 2-4 lbs per linear foot and cost $50-$150 in materials for a 12-foot beam. Polyurethane faux beams weigh 1-2 lbs per linear foot, cost $150-$400 for a 12-foot pre-finished piece, and are genuinely indistinguishable from real wood from 10 feet below. I’d choose faux every time in a finished kitchen — the savings are real and no one standing in the room will know the difference.
For sizing: on an 8-foot ceiling, beams 4-6 inches deep look proportional; on 9-10 foot ceilings, 6-8 inch beams work without feeling heavy. Slightly irregular spacing — as if the beams were structural timbers exposed as-found — reads more authentically farmhouse than mathematical equal spacing. Also, if you’re building DIY box beams, stain them on sawhorses before installation. Staining above your head is slow, uneven, and miserable. The pre-stain conditioner and warm walnut or provincial stain that reads beautifully against a white ceiling is easy work on the ground and near-impossible overhead.
10. Warm-Toned Wide Plank Flooring
Original farmhouse floors were wide plank not because it was fashionable but because early sawyers cut boards from single large-diameter trees. The wide board was a function of the tree, not a design choice. That history is part of why wide plank flooring reads as authentically farmhouse — it’s a material truth, not a manufactured aesthetic.
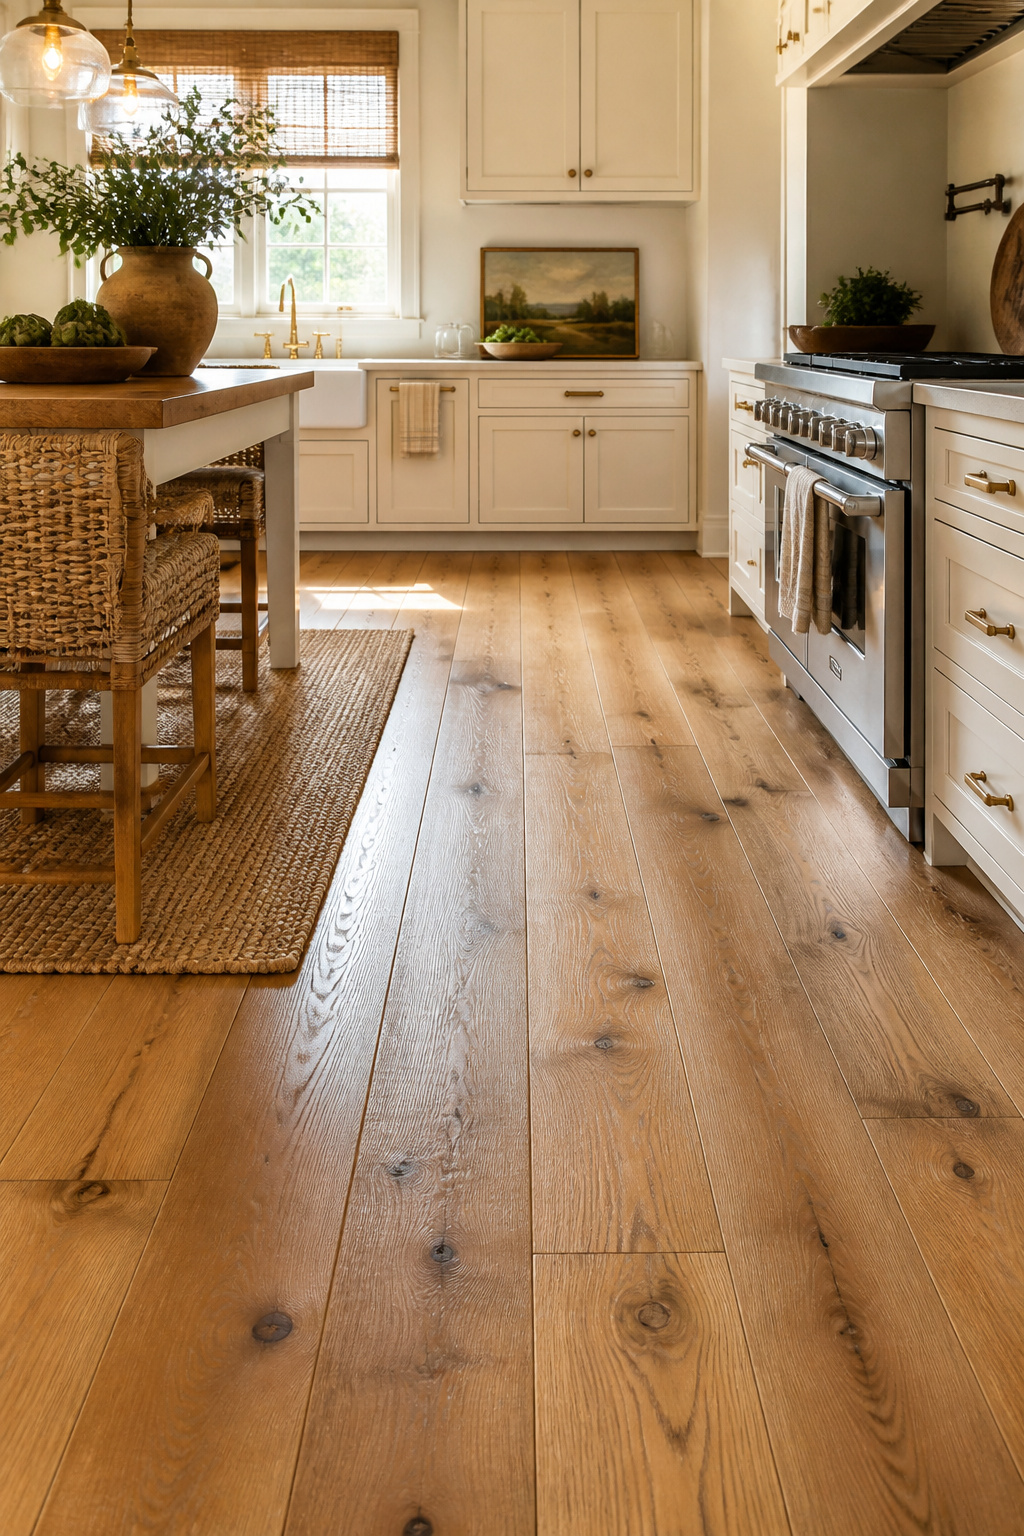
Wide plank is defined as 5 inches or wider; most farmhouse kitchens use 5-7 inch boards. The farmhouse kitchen flooring options that hold up best in a working kitchen with varied humidity are engineered rather than solid. Solid hardwood planks wider than 5 inches move significantly with seasonal humidity changes — gapping in dry winters, pressing tight in humid summers — and in a kitchen near a sink and dishwasher, that movement becomes a problem. Engineered wide plank has a real wood veneer (refinishable 2-3 times) over a dimensionally stable plywood core. It behaves in kitchens the way solid plank cannot.
White oak is the current farmhouse favourite, and probably for good reason: its natural golden-blonde tone ages gracefully, its open grain takes wire-brushed and hand-scraped textures well, and it responds to whitewash or light stain without losing grain character. Hickory is an alternative for people who want visible colour variation and knots — it hides pet traffic and scratches better than oak but is harder to stain evenly. The one finish decision that matters most: keep the sheen low. Matte or low-sheen finishes (under 30 gloss units) hide scratches and read as authentic. High-gloss farmhouse floors look wrong from the day they’re installed and show every footprint. In terms of farmhouse kitchen remodeling investments, flooring offers one of the highest returns for full-kitchen transformations.
11. Mason Jar Herb Garden on Open Shelves
Of all the ideas in farmhouse kitchen remodeling, this is the one that gives something back every day. A working herb garden on open kitchen shelves is the most honest expression of the farmhouse kitchen’s original philosophy: grow what you eat, in the place where you cook it.
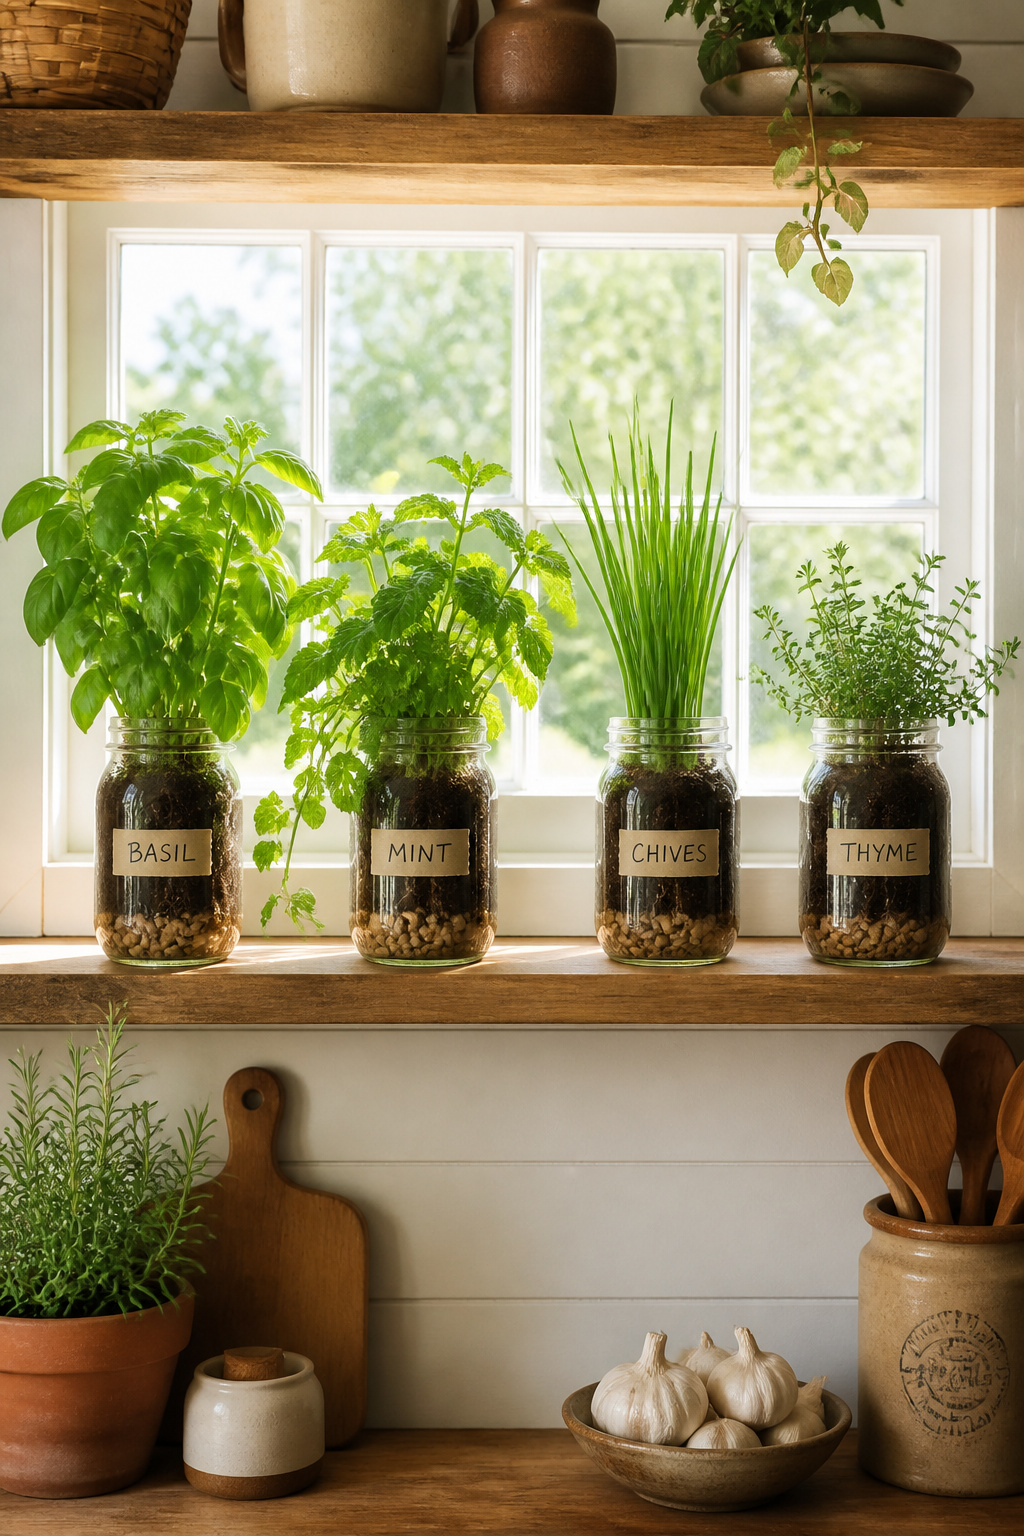
The practical setup for a mason jar system is simple, but getting the drainage right is what separates a thriving herb shelf from a collection of decaying plants. Mason jars have no drainage holes. To compensate, put 1-2 inches of pea gravel in the bottom of each jar, then a thin layer of activated charcoal over the gravel. The gravel holds water below the root zone; the charcoal prevents bacterial growth in the standing water zone. This combination is the difference between plants that last a season and plants that rot in three weeks.
Light and Watering
For a south- or west-facing window: basil, rosemary, and thyme are your sun-lovers — all three need 6+ hours of direct light to produce well. Keep basil above 60°F and pinch the flowers before they open to keep the leaves coming. For a kitchen with indirect light only: chives, mint, and parsley manage on 3-4 hours. Keep mint in its own jar — it spreads aggressively and will take over any shared planting within weeks.
For a kitchen that lacks natural light entirely, LED grow lights (4000-6500K spectrum) positioned 4-6 inches above the herbs for 12-14 hours per day work well and are unobtrusive. Under-cabinet clip lights are the least noticeable installation. The most common mistake in any herb garden is overwatering: most culinary herbs die from root rot before they ever die from drought. Let the top inch of soil dry completely between waterings.
12. Vintage-Inspired Hardware: Bin Pulls and Cup Pulls
Cabinet hardware is the cheapest line item in a farmhouse kitchen remodeling project that delivers the most visible return per dollar spent. A complete hardware swap for an average kitchen — 20 to 30 pieces — runs $300-$800. That’s it. And the visual difference between contractor-grade brushed nickel bar pulls and oil-rubbed bronze bin pulls is immediate and significant.
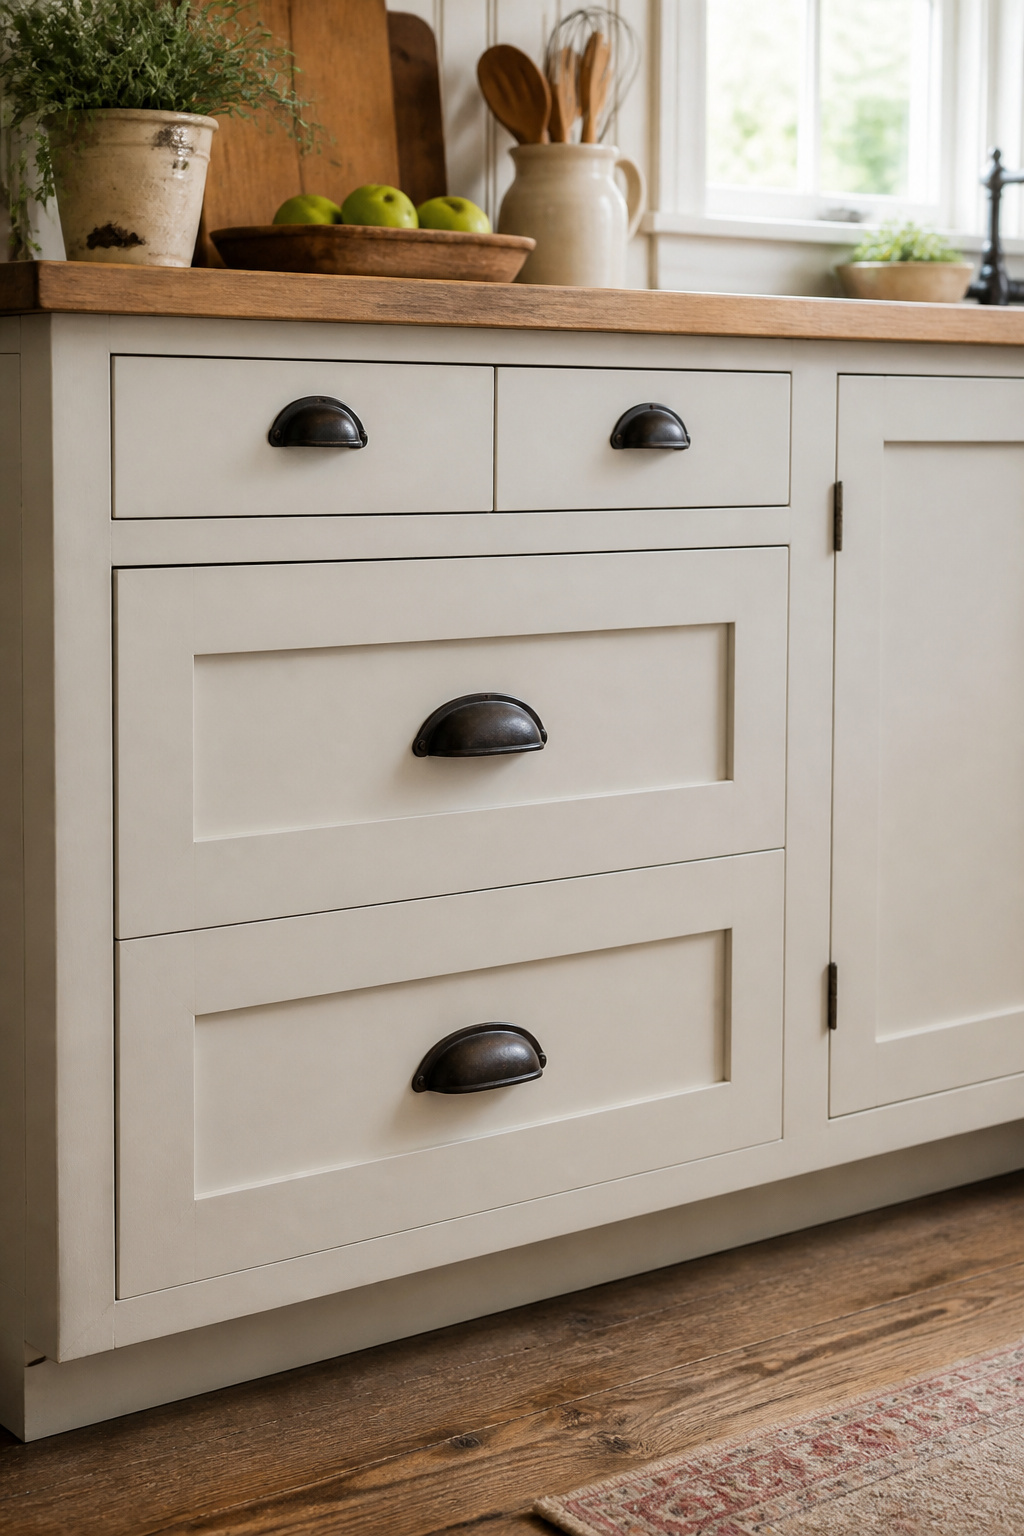
The two classic farmhouse hardware profiles are the bin pull (a curved, bucket-shaped pull that projects from the cabinet face) and the cup pull (a concave arc that the finger hooks into from below). Both have vintage origins — they were used on kitchen cabinets and apothecary drawers long before the builder-grade bar pull existed — and both read authentically farmhouse in a way that straight bar pulls simply don’t.
For sizing: cup pulls at 3-inch centre-to-centre are standard for drawers up to 18 inches wide. Bin pulls run 3-4 inches for smaller drawers and 4-6 inches for drawers between 18-24 inches wide. Before ordering, measure the centre-to-centre distance on your existing hardware — new hardware with different spacing means drilling new holes and filling old ones, which adds real work and cost.
On finish: oil-rubbed bronze has a dark chocolate-brown with copper undertones, an artisanal quality that pairs naturally with cream or white cabinets. It doesn’t show fingerprints, and it suits both traditional and modern farmhouse aesthetics. Unlacquered brass develops a natural patina over 1-3 years — golden to amber to slightly darkened — and the evolving finish is explicitly part of the appeal. If you don’t want your hardware to change, lacquered brass (with a protective coating) holds its original colour indefinitely. Matte black offers the sharpest contrast and reads as modern farmhouse — cleaner and less ornate than bronze or brass.
13. A Farmhouse Kitchen Makeover With a Central Island
The farmhouse kitchen was always organised around a central work table — the place where bread was kneaded, vegetables were prepped, and the actual work of cooking happened. The island is the modern descendant of that table, and in a farmhouse kitchen makeover, it does more than add counter space. It anchors the room.
For farmhouse kitchen island design principles, clearance is the specification that most people underestimate before installation. The absolute minimum aisle width around a working island is 36 inches — two people cannot pass each other comfortably at this width. The practical standard is 42-48 inches on all working sides. Less than 42 inches and the kitchen feels constrained the moment two people are cooking simultaneously.
Standard island height is 36 inches (matches most countertops). Bar height (42 inches) adds seating but reduces the tactile comfort of standing prep work — the higher surface is less intuitive for rolling pastry or applying pressure to food. At 36-inch height, a seating overhang of 15 inches provides good knee clearance for bar stools. At 42-inch bar height, 12 inches is standard. Pre-built stationary islands start at $900 and reach $5,000 for quality units. Custom-built islands start at $3,000 and climb depending on size, countertop material, and features. For smaller kitchens, a 2×4 foot moveable cart — $200-$600 at most retailers — is often the right first step before committing to a permanent structure.
The best island storage is one or two deep drawers on the working side (for pots, mixing bowls, and utensils), open shelving on the seating side (for cookbooks, baskets, and plants), and a built-in compost or recycling drawer on the prep side. That last one is the most farmhouse-appropriate addition: the working kitchen manages its waste at the source.
14. Wainscoting and Board-and-Batten Lower-Wall Paneling
Wainscoting in a kitchen sounds more complicated than it is. It’s simply paneling on the lower portion of the wall — the zone below the chair rail, roughly 32-36 inches from the floor. That height represents about one-third of an 8-foot wall, which is the proportion that feels balanced in most kitchen spaces.
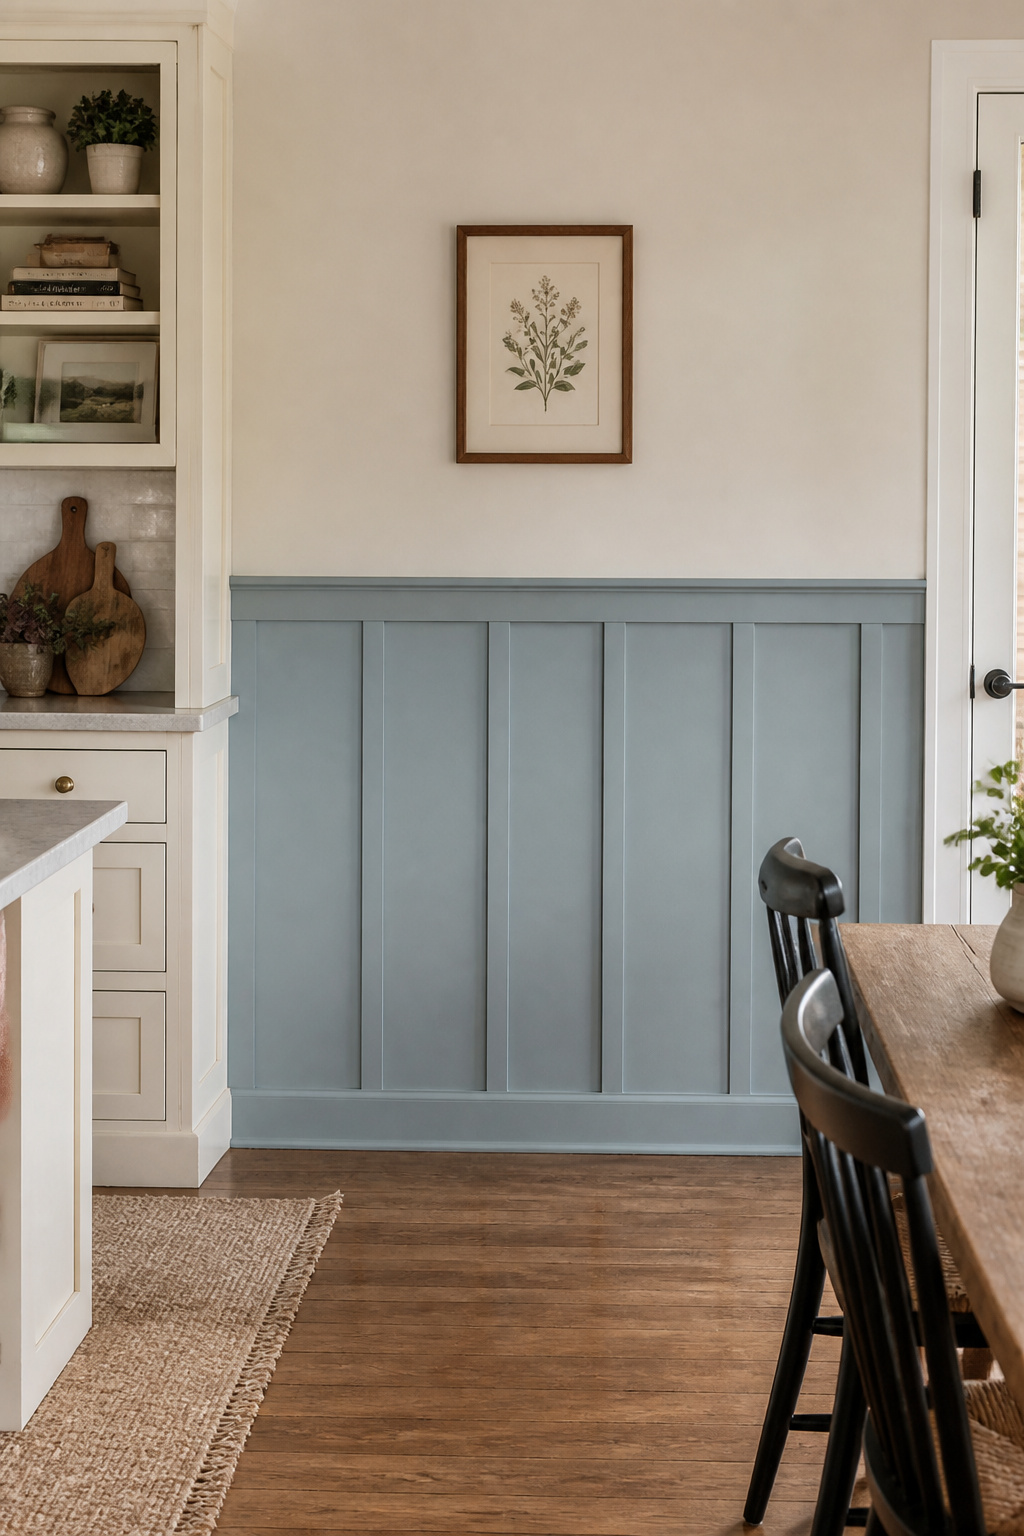
Three varieties worth distinguishing. Traditional wainscoting uses raised or recessed panels within a frame — the most formal and historically correct, suited to kitchens that reference the colonial farmhouse rather than the Shaker or Scandinavian-influenced version. Board-and-batten uses wide vertical boards with narrow strips (battens) covering the seams — a more graphic, slightly more modern look that suits both traditional and modern farmhouse kitchens. Shiplap on the lower wall is the most casual option and works best in kitchens where shiplap already appears on another surface, for consistency.
Board-and-batten spacing is one of those decisions that’s easier than it looks: place a batten in each corner, one on each side of windows and outlets, then divide the remaining wall evenly. Centres of 12-16 inches is the most common result in a standard kitchen.
MDF is the right material for kitchen wainscoting — it’s stable, takes paint evenly, and costs significantly less than solid wood. The one requirement: seal all cut edges before painting. Kitchen cooking steam will enter through unsealed MDF edges, causing swelling and paint failure within months. A quick pass of shellac or oil primer on every cut edge before assembly is the step that separates paneling that lasts from paneling that fails.
The most effective colour treatment: paint the paneling a soft accent colour (sage green, dusty blue, or even a deep navy) and the wall above in a lighter neutral. This two-tone treatment is one of the most visually impactful transformations in farmhouse kitchen remodeling at the most accessible cost — paint, boards, and labour is a weekend project.
15. Brick or Stone Accent Backsplash for a Farmhouse Kitchen Remodel
No backsplash material has more genuine farmhouse heritage than brick. The original farmhouses were built with it; their cooking zones were defined by it. Installing thin brick veneer behind a range connects a modern kitchen to that material history in a way that ceramic tile — however classic — cannot.
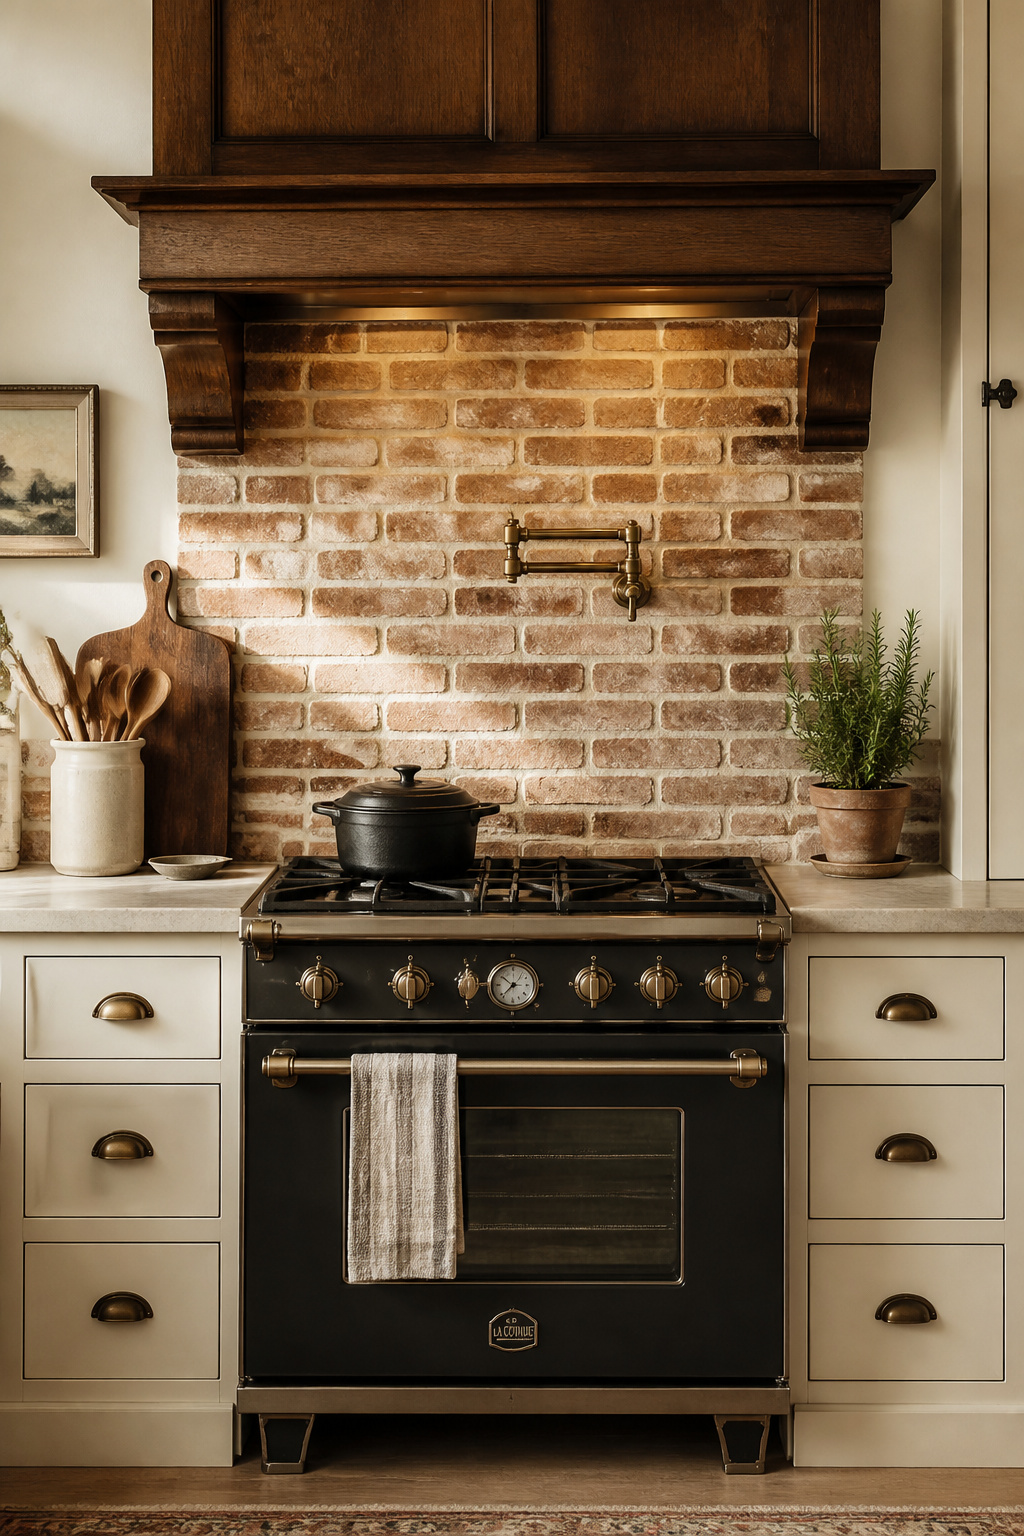
The practical option for a kitchen backsplash in a farmhouse kitchen remodel is thin brick veneer: actual clay brick sliced to 3/8-1/2 inch thick and installed like tile. It weighs a fraction of full brick and requires no additional wall reinforcement. Material costs run $6-$15 per square foot; total installed cost lands at $14-$28 per square foot. For comparison: ceramic subway tile installed is $6-$19 per square foot total. You’re paying a meaningful premium for the brick — but kitchen tile ideas that carry actual material heritage cannot be replicated with printed ceramic.
Faux brick panels (PVC or foam printed to look like brick) cost $2-$5 per square foot and install in hours. They’re fine from across the room. Up close, the seams between panels are visible and the surface feels like plastic. For a backsplash in daily view range, they fall short.
Sealing is non-negotiable for brick in a cooking kitchen. Brick and stone are porous: unsealed, cooking grease absorbs into the surface and is nearly impossible to remove. Seal before grouting and again after. A clear polyurethane sealant in satin or matte finish maintains the natural look while blocking moisture and grease. Reapply every 2-3 years. For cleaning: spray with water for daily dust, and a paste of dish soap and table salt worked in with a bristle brush handles grease spots well. Avoid acids, bleach, and abrasive scrubbers — they erode the brick surface over time.
16. Edison Bulb Pendant Lighting Over the Island
Most kitchens are underlit, and not in the way you’d think. They have adequate light — recessed cans across the ceiling, maybe an overhead fixture — but the light is flat and clinical. It comes from everywhere and creates no atmosphere whatsoever. Pendant lights over an island solve a different problem than the recessed lights do. They create a focal zone, add warmth, and make the kitchen feel like a room rather than a workspace. Of all the changes in farmhouse kitchen remodeling, lighting is the one that shifts the feeling of a space most immediately for the smallest outlay.
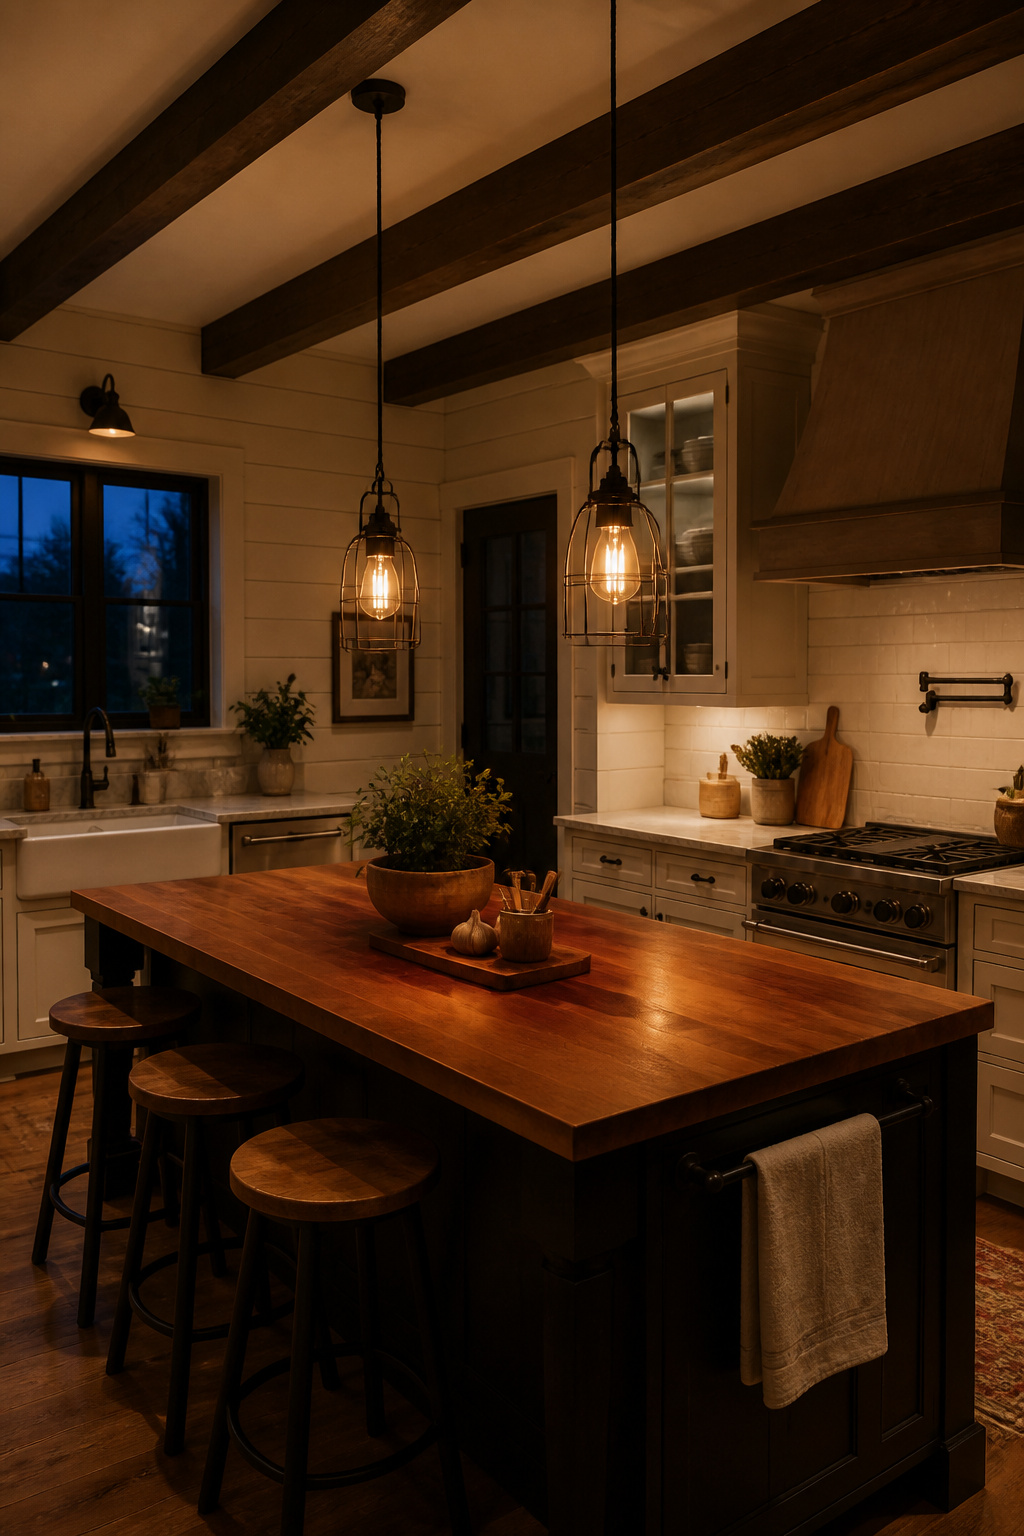
Edison filament LEDs at 2200-2700K are the farmhouse standard — that warm amber-gold tone is what makes food look appealing, wood tones look rich, and the whole kitchen feel more like 7pm than 2pm regardless of the actual time. Use them exposed in a cage or bell jar pendant and the filament itself becomes part of the visual.
Four pendant silhouettes suit farmhouse kitchens: the wire cage (open metal framework, most minimal, very modern farmhouse); the bell jar or mason jar (glass enclosure over a single bulb, references farmhouse storage directly); the schoolhouse globe (a rounded glass shade with a metal collar, the most historically accurate to a working farmhouse); and the lantern (metal frame with glass panels, more ornate, suits traditional farmhouse pairings with oil-rubbed bronze hardware). Which you choose depends on where else on the farmhouse spectrum your kitchen sits.
Height: hang 30-36 inches above the countertop — bottom of the pendant to countertop surface. For 9-foot ceilings, add 3 inches. For 10-foot ceilings, add 6 inches. The pendant shade should sit at least 4-6 inches inside each end of the island so it doesn’t create an eye-level hazard at the corners. Spacing between multiple pendants: 24-30 inches centre-to-centre, which means a 5-foot island comfortably holds two pendants. Wire all island kitchen table pendant light ideas to a dimmer — task lighting at full brightness for food prep, half-brightness for dining and conversation. Before purchasing dimmer switches, verify compatibility with your chosen LED bulbs; not all LEDs are dimmer-compatible, and a mismatch causes flicker.
How to Plan Your Farmhouse Kitchen Remodeling Project
The most useful question to ask before starting any farmhouse kitchen remodeling project isn’t “What do I love?” — it’s “What will I actually notice every single day?” That question has a different answer for everyone. Some people live at the sink; for them, the apron-front is the right first investment. Others spend more time looking at the kitchen from the living room; for them, ceiling beams or painted cabinets deliver more daily return.
On the spectrum of investment: the highest-ratio changes per dollar spent are hardware ($300-$800 for the full kitchen), cabinet paint ($200-$600 DIY), open shelving (replacing a few upper cabinets), and the herb garden. These four changes can transform the personality of a builder-grade kitchen for under $2,000 total. The mid-tier changes — farmhouse sink, subway tile backsplash, pendant lights, wide plank LVP flooring — each run $1,000-$4,000 installed and deliver visible, lasting impact. The structural projects (range hood build, ceiling beams, permanent island) start at $3,000-$5,000 and should be planned carefully before execution.
On DIY versus professional help: cabinet painting, hardware swaps, open shelving, shiplap accent panels, herb gardens, and subway tile in a backsplash zone are all within reach for most capable home improvers. The apron-front sink installation involves plumbing and requires precision — it’s worth hiring a plumber unless you have genuine plumbing experience. Island wiring and lighting installation should be professional unless you have electrical background and your local code allows homeowner electrical work. Range hood ductwork needs a professional to ensure it’s connected and sealed correctly. The rest: pick a weekend, gather the right tools, and go slowly. The farmhouse kitchen that lasts is built piece by piece, each addition considered, nothing rushed. That’s the honest farmhouse kitchen remodeling approach — deliberate, material, and worth the time it takes.


